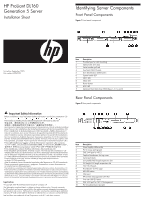
HP ProLiant DL160 HP ProLiant DL160 Generation 5 Server Installation Sheet - Page 3
Installing a Memory Module
 |
View all HP ProLiant DL160 manuals
Add to My Manuals
Save this manual to your list of manuals |
Page 3 highlights
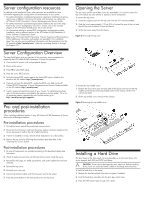
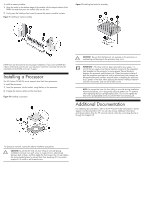
Figure 5 Installing the hot-plug hard drive assembly To install a hard drive in the server: 1. Remove the hard drive blank from front of system, if installed. 2. Push the hard drive assembly into the drive bay until it stops (step 1 in figure 8). 3. Fasten the screw with the T-15 wrench provided to secure the hard drive to the chassis (step 2 in figure 8). Figure 8 Installing the non-hot-plug hard drive assembly To install a non-hot-plug hard drive disk into the carrier: 1. Loosen four screws from the top part of the carrier (step 1 in figure 6). 2. Put the non-hot-plug hard drive disk into the carrier (step 2 in figure 6). 3. Fasten the HDD to the carrier using the screws that were just loosened (two on each side) (step 3 in figure 7). Figure 6 Installing the non-hot-plug hard drive disk into the carrier Figure 7 Fastening the non-hot-plug hard drive disk to the carrier 4. Connect the cabling from the HDD backplane to the drive using the cables provided. Installing a Memory Module The following guidelines must be followed when memory modules are being added or replaced: • Use only HP supported FBD DDR2 667 MHz modules • Supported configurations: o Install in identical pairs in the following order: 1-3, 5-7, 2-4, 6-8 o In 4, 6, and 8 DIMM configurations, it is recommended that the DIMMs in slots 1-3, 5-7 are identical; DIMMs in slots 2-4, 6-8 are identical. CAUTION: DIMMs can be damaged by improper handling. Always use an anti-static wrist strap and grounding mat, and discharge static electricity before touching DIMMs. NOTE: Refer to the server hood label for the DIMM locations.
-
 1
1 -
 2
2 -
 3
3 -
 4
4
 |
 |
