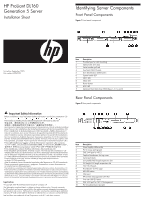
HP ProLiant DL160 HP ProLiant DL160 Generation 5 Server Installation Sheet - Page 4
Installing a Processor, Additional Documentation - g5 memory
 |
View all HP ProLiant DL160 manuals
Add to My Manuals
Save this manual to your list of manuals |
Page 4 highlights
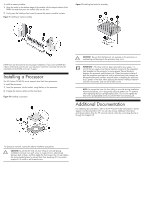
To install a memory module: 1. Align the notch on the bottom edge of the module with the keyed surface of the DIMM slot and then press the module fully into the slot. 2. Firmly press the holding clips inward to secure the memory module in place. Figure 9 Installing a memory module Figure 11 Installing the heat sink assembly DIMM slots are structured to ensure proper installation. If you insert a DIMM but it does not fit easily into the slot, you may have inserted it incorrectly. Reverse the orientation of the DIMM and insert it again. Installing a Processor The HP ProLiant DL160 G5 server supports dual Intel Xeon processors. To install the processor: 1. Insert the processor into the socket, using the key on the processor. 2. Engage the retention plate and the load lever. Figure 10 Installing a processor CAUTION: Be sure that the heat sink sits squarely on the processor, or overheating and damage to the processor may occur. IMPORTANT: If the heat sink has been removed for any reason, it is critical that you apply more thermal interface material to the integrated heat spreader on the processor to ensure proper thermal bonding between the processor and the heat sink. Clean the contact surface of both the processor and heat sink with an alcohol pad, then re-apply an HP-approved thermal interface material before reinstalling the processor. Use a pattern of five dots when applying the thermal interface material- one dot in the center, and one dot at each corner. NOTE: To prevent the heat sink from tilting to one side during installation removal procedures, use a diagonally opposite pattern (an "X" pattern) when tightening the four spring-loaded screws. Do not over tighten the heat sink's spring-loaded screws to prevent them from breaking off. Additional Documentation For additional documentation, refer to the HP ProLiant DL160 Generation 5 Server Support and Documentation CD. You can also access additional information and documentation from the HP external website, either by connecting directly or through the Support CD. For processor removal, reverse the above installation procedures. CAUTION: To prevent the heat sink from tilting to one side during installation/removal, turn each screw a couple of turns, alternatively between both of them, and then apply the final torque. Do not over tighten the spring loaded screws to prevent them from breaking off. A maximum torque of 4.5 inch-lb is set for each screw.
-
 1
1 -
 2
2 -
 3
3 -
 4
4
 |
 |
