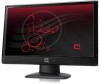
HP Q2009 User's Guide q1859, q2009, q2159 LCD Display
HP Q2009 - Compaq - Widescreen LCD Monitor Manual
 |
UPC - 884420319344
View all HP Q2009 manuals
Add to My Manuals
Save this manual to your list of manuals |
HP Q2009 manual content summary:
- HP Q2009 | User's Guide q1859, q2009, q2159 LCD Display - Page 1
User's Guide Q1859 Q2009 Q2159 - HP Q2009 | User's Guide q1859, q2009, q2159 LCD Display - Page 2
warranty statements accompanying such products and services. Nothing herein should be construed as constituting an additional warranty. HP shall not be liable for technical or editorial errors or omissions contained herein. HP -Packard Company under license. HP supports lawful use of technology and - HP Q2009 | User's Guide q1859, q2009, q2159 LCD Display - Page 3
Notational Conventions The following section describes notational conventions used in this document. Notes, Cautions, and Warnings Throughout this guide, blocks of text may be accompanied by an icon. These blocks are notes, cautions, and warnings, and they are used as follows: WARNING: Indicates - HP Q2009 | User's Guide q1859, q2009, q2159 LCD Display - Page 4
iv User's Guide - HP Q2009 | User's Guide q1859, q2009, q2159 LCD Display - Page 5
Video ...4-7 Power-Saver Feature ...4-8 Preparing the Monitor for Shipping 5-1 Preparing the Monitor for Shipping 5-1 Troubleshooting A-1 Solving Common Problems ...A-1 Getting Support from hp.com ...A-2 Preparing to Call Technical Support ...A-2 Locating the Rating Label...A-2 User's Guide v - HP Q2009 | User's Guide q1859, q2009, q2159 LCD Display - Page 6
Technical Specifications B-1 Compaq LCD Monitors...B-1 Preset Video Modes ...B-3 LCD Monitor Quality and Pixel Policy...B-4 Power Cord Private Households in the European Union C-3 Japanese Notice...C-3 Japanese Power Cord Notice...C-3 Japanese Material Content Declaration C-3 Korean Notice ...C-3 - HP Q2009 | User's Guide q1859, q2009, q2159 LCD Display - Page 7
1 Product Features Compaq LCD Monitors The Compaq LCD (liquid crystal display) monitors have an active matrix, thin-film transistor (TFT) screen. This guide discusses the following models: ■ Q1859 LCD monitor ■ Q2009 LCD monitor ■ Q2159 LCD monitor Features ■ Large diagonal display ■ Maximum - HP Q2009 | User's Guide q1859, q2009, q2159 LCD Display - Page 8
Product Features ■ Software and utilities CD, containing the following: ❏ Drivers ❏ Auto adjustment software ❏ Documents ❏ Adobe® Acrobat® Reader 1-2 User's Guide - HP Q2009 | User's Guide q1859, q2009, q2159 LCD Display - Page 9
and its peripheral devices (such as a monitor, printer, or scanner) to a surge protection device such as a power strip with surge protection or uninterruptible power supply (UPS). Not all power strips provide surge protection; the power strips must be specifically labeled as having this ability. Use - HP Q2009 | User's Guide q1859, q2009, q2159 LCD Display - Page 10
properly or has been dropped or damaged, contact your Hewlett-Packard authorized dealer, reseller, or service provider. ■ Adjust only those controls that are described in the operating instructions. ■ Turn your monitor off when not in use. You can substantially increase the life expectancy of the - HP Q2009 | User's Guide q1859, q2009, q2159 LCD Display - Page 11
use CAUTION: The screen is fragile. Avoid touching or applying pressure to the LCD screen; doing so can cause damage. 1. Set the monitor screen face down on a flat, soft, protected table or desk surface with the support column overhanging the edge. 2. Hold the base and push it onto the bottom - HP Q2009 | User's Guide q1859, q2009, q2159 LCD Display - Page 12
installed and secured before attaching the monitor. Refer to the instructions supplied with the wall-mounting fixture and check that it is capable of supporting the monitor. 1. Disconnect the power cable and any other cables from the monitor. 2. Place the monitor face down on a flat, protected - HP Q2009 | User's Guide q1859, q2009, q2159 LCD Display - Page 13
4. Remove the screws inside the support column as indicated. Setting Up the Monitor Remove the screws inside the support column 5. Rock the bottom of the support column until it snaps away from the top portion of the column, which covers the support column mounting bracket. Snapping the bottom - HP Q2009 | User's Guide q1859, q2009, q2159 LCD Display - Page 14
the instructions included with the mounting fixture to ensure that the monitor is safely attached. The four threaded holes that are on the back of the panel are compliant with the VESA standard for mounting flat-panel monitors. 11. Attach a swing arm or other mounting fixture. 3-4 User's Guide - HP Q2009 | User's Guide q1859, q2009, q2159 LCD Display - Page 15
Compaq flat-screen monitor to your computer. Connecting the VGA cable To connect the VGA cable Connect one end of the VGA video cable to the back of the monitor , use a DVI-I to VGA adapter to connect your computer to the monitor. Connect the DVI-I to VGA adapter to the DVI connector on the computer - HP Q2009 | User's Guide q1859, q2009, q2159 LCD Display - Page 16
monitor to the computer, TV, or set-top box. The number and type of cables required may vary by model. Some cables and adapters are included for select models output from your computer to the audio input on your monitor. This enables the built-in speakers to play sound. NOTE: When using a VGA or - HP Q2009 | User's Guide q1859, q2009, q2159 LCD Display - Page 17
Setting Up the Monitor Connecting the Audio Cable Connect the built-in monitor speakers to the computer by using the audio cable, as shown in the following illustration. Connecting the audio cables-connector locations may vary User's Guide 3-7 - HP Q2009 | User's Guide q1859, q2009, q2159 LCD Display - Page 18
on a cord or cable. See "Technical Specifications" (Appendix B) for additional information. Connecting the power cable 2. Connect one end of the power cable to the monitor and the other end to a grounded . (2) You should have a properly grounded electrical outlet installed. 3-8 User's Guide - HP Q2009 | User's Guide q1859, q2009, q2159 LCD Display - Page 19
Setting Up the Monitor Cable Management Your Compaq LCD monitor provides cable management. Cables can be easily routed through the hollow section of the support column and are hidden when the monitor is viewed from the front. Routing cables through the rear of the support column User's Guide 3-9 - HP Q2009 | User's Guide q1859, q2009, q2159 LCD Display - Page 20
tilt to your own preference, as follows: 1. Face the front of the monitor and hold the base so that you do not topple the monitor while changing the tilt. 2. Adjust the tilt by moving the top edge of the monitor either toward or away from you, without touching the screen. Tilt adjustment 3-10 - HP Q2009 | User's Guide q1859, q2009, q2159 LCD Display - Page 21
to: http://www.hp.com/support 2. Select your country/region. 3. Select Download Drivers and Software. 4. Enter the model number of your monitor. The software download pages for your monitor are displayed. 5. Download and install the driver and software files by following the instructions on the - HP Q2009 | User's Guide q1859, q2009, q2159 LCD Display - Page 22
: Burn-in image damage may occur on monitors that display the same static image on-screen LCD screens. To use the auto adjustment feature: 1. Allow the monitor to warm up for 20 minutes before adjusting. 2. Press the Auto/OK button on the monitor side panel. ❏ You can also press the Menu button - HP Q2009 | User's Guide q1859, q2009, q2159 LCD Display - Page 23
monitor: Operating the Monitor 1 2 3 4 5 Side-panel control buttons No. Icon 1 Power Description Turns the monitor on or puts it in standby or sleep mode. NOTE: The Power button is located on the top right side of the monitor 5 Menu Opens, selects, or exits the OSD menu. User's Guide 4-3 - HP Q2009 | User's Guide q1859, q2009, q2159 LCD Display - Page 24
monitor is not already on, press the Power button to turn on the monitor. 2. To access the OSD menu, press the Menu button. button to exit the OSD. NOTE: When a menu is displayed, if the buttons are untouched for 30 seconds ambient light sensor (select models). Automatically adjusts the screen Guide - HP Q2009 | User's Guide q1859, q2009, q2159 LCD Display - Page 25
default is English. Selects the power-management features of the monitor. Volume OSD Control Power Saver Mode Display Adjusts the volume level. in seconds that the OSD is visible after the last button is pressed. The factory default is 30 seconds. Enables the power saving feature (see "Power-Saver - HP Q2009 | User's Guide q1859, q2009, q2159 LCD Display - Page 26
Reset Sub-menu Options Power-On Status Display DDC/CI Support Bezel Power LED Sleep Timer Current Settings Recommended Settings Serial Number Version Backlight Hours Service Support Description (continued) Displays the operating status of the monitor each time the monitor is powered on. Select the - HP Q2009 | User's Guide q1859, q2009, q2159 LCD Display - Page 27
entering a sleep mode. The speakers are turned off in sleep mode. ■ Check Video Cable - Indicates a video input cable is not properly connected to the computer or monitor. ■ OSD Lock-out - The OSD can be enabled or disabled by pressing and holding the Menu button on the side panel for 10 seconds. If - HP Q2009 | User's Guide q1859, q2009, q2159 LCD Display - Page 28
Operating the Monitor Power-Saver Feature When the monitor is in normal operating mode, the Power light is green and the monitor uses the normal watts of power. For power usage, refer to "Technical Specifications" (Appendix B). The monitor also supports a power-saver mode that is controlled by the - HP Q2009 | User's Guide q1859, q2009, q2159 LCD Display - Page 29
prevents scratches, defacing, or breakage. Avoid applying pressure to the LCD screen; doing so can cause damage. Preparing the Monitor for Shipping 1. Disconnect the power, video, and audio cables from the monitor. 2. Place the monitor face down on a soft, protected surface. 3. Release the base from - HP Q2009 | User's Guide q1859, q2009, q2159 LCD Display - Page 30
Preparing the Monitor for Shipping 5-2 User's Guide - HP Q2009 | User's Guide q1859, q2009, q2159 LCD Display - Page 31
the monitor directly into the graphic card output connector on the back of your computer. The auto adjustment feature might fix this problem. Make sure the graphics card supports the optimal resolution. Make sure the latest supported driver is installed for the graphics card. For HP and Compaq - HP Q2009 | User's Guide q1859, q2009, q2159 LCD Display - Page 32
you contact customer service, refer to HP Technical Support at: http://www.hp.com/support Select your country/region, and then follow the links to the support page for your monitor. Preparing to Call Technical Support If you cannot solve a problem by using the troubleshooting tips in this section - HP Q2009 | User's Guide q1859, q2009, q2159 LCD Display - Page 33
Technical Specifications All specifications represent the typical specifications provided by HP's component manufacturers; actual performance may vary either higher or lower. Compaq LCD Monitors Face treatment: Glare polarizer with hard coating Input Terminals: ■ VGA connector Specifications model - HP Q2009 | User's Guide q1859, q2009, q2159 LCD Display - Page 34
Humidity (non-condensing): Operating Humidity: Non-Operating Humidity: Power Source: Power Consumption: Sleep Power Consumption: TFT LCD active matrix 20 in. (50.8 cm) diagonal -5o to +25o 18.9 x 20.6 x 11.4 in. (481 x 523 x 289 mm) 1600 x 900 @ 60 Hz analog mode 720 x 400 0.2768 x 0.2768 mm 24 to - HP Q2009 | User's Guide q1859, q2009, q2159 LCD Display - Page 35
Specifications Preset Video Modes The monitor automatically recognizes many preset video input modes that will appear properly sized and centered on the screen. Factory Preset Video Input Modes 59.79 Factory Preset Video Input Modes, Q2009 Preset Resolution Horizontal Frequency (kHz) Guide B-3 - HP Q2009 | User's Guide q1859, q2009, q2159 LCD Display - Page 36
specific background. To locate defective pixels, the monitor should be viewed under normal operating conditions and in normal operating mode at a supported resolution your Compaq LCD Monitor, refer to the HP Web site at: http://www.hp.com/support Power Cord Set Requirements The monitor power supply - HP Q2009 | User's Guide q1859, q2009, q2159 LCD Display - Page 37
radio frequency energy and, if not installed and used in accordance with the instructions, may cause harmful interference to radio communications. However, there is no guarantee that 1-281-514-3333 To identify this product, refer to the part, series, or model number found on the product. User - HP Q2009 | User's Guide q1859, q2009, q2159 LCD Display - Page 38
Compaq product contains mercury in the fluorescent lamp in the display LCD be found at: http://www.hp.com/go/reach Canadian Notice This sur le matériel brouilleur du Canada. European Union Regulatory Notice This -harmonized Telecom products. *Notified body number (used only if applicable-refer to - HP Q2009 | User's Guide q1859, q2009, q2159 LCD Display - Page 39
local city office, your household waste disposal service or the shop where you purchased the product. Japanese Notice Japanese Power Cord Notice Japanese Material Content Declaration A Japanese regulatory requirement, defined by Specification JIS-C-0950, 2005, mandates that manufacturers provide - HP Q2009 | User's Guide q1859, q2009, q2159 LCD Display - Page 40
areas. The terms and availability of these programs vary by geography because of differences in regulatory requirements and local customer demand. For information on the HP recycling program, refer to the HP Web site at: http://www.hp.com/recycle C-4 User's Guide - HP Q2009 | User's Guide q1859, q2009, q2159 LCD Display - Page 41
such as temperature and humidity. ᾬӊৡࢴ ⎉ (Pb) ᳮ ␍ (Cd (Hg) (Cr(VI)) (PBB) PBDE) X X O O O O ᴎੵ/݊Ҫ X O O O O O O SJ/T11363-2006 X SJ/T11363-2006 X RoHS 2003 ᐕ 1 27 2002/95/EC ภᜰ̍ User's Guide C-5 - HP Q2009 | User's Guide q1859, q2009, q2159 LCD Display - Page 42
Agency Regulatory Notices C-6 User's Guide - HP Q2009 | User's Guide q1859, q2009, q2159 LCD Display - Page 43
cable connecting 3-8 power saver 4-8 R regulatory notices C-1 - C-5 S safety guidelines 2-1 precautions 2-1 setup 3-1 - 3-10 shipping the monitor 5-1 side panel 4-2 - 4-3 software and utilities CD 4-1 specifications B-1 - B-4 T technical specifications B-1 - B-4 tilt adjustment 3-10 troubleshooting - HP Q2009 | User's Guide q1859, q2009, q2159 LCD Display - Page 44
Part number: 517198-001
-
 1
1 -
 2
2 -
 3
3 -
 4
4 -
 5
5 -
 6
6 -
 7
7 -
8
-
9
-
10
-
11
-
12
-
13
-
14
-
15
-
16
-
17
-
18
-
19
-
20
-
21
-
22
-
23
-
24
-
25
-
26
-
27
-
28
-
29
-
30
-
31
-
32
-
33
-
34
-
35
-
36
-
37
-
38
-
39
-
40
-
41
-
42
-
43
-
44
 |
 |

User’s Guide
Q1859
Q2009
Q2159