HP Q2009 User's Guide q1859, q2009, q2159 LCD Display - Page 23
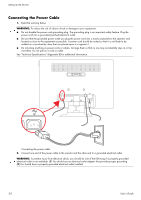
Side-Panel Controls
 |
UPC - 884420319344
View all HP Q2009 manuals
Add to My Manuals
Save this manual to your list of manuals |
Page 23 highlights
Side-Panel Controls Control buttons are located on the right side of the monitor: Operating the Monitor 1 2 3 4 5 Side-panel control buttons No. Icon 1 Power Description Turns the monitor on or puts it in standby or sleep mode. NOTE: The Power button is located on the top right side of the monitor. 2 Auto/OK Auto-adjusts the display to the ideal setting when the OSD is not active. / Enters the selected option. 3 /+ Hot key to link to Quick View. / Navigates forward through the OSD menu and increases adjustment levels. 4 /- Hot key to link to volume level adjustment. / Navigates backward through the OSD menu and decreases adjustment levels. 5 Menu Opens, selects, or exits the OSD menu. User's Guide 4-3
-
 1
1 -
2
-
3
-
4
-
5
-
6
-
7
-
8
-
9
-
10
-
11
-
12
-
13
-
14
-
15
-
16
-
17
-
 18
18 -
 19
19 -
 20
20 -
 21
21 -
 22
22 -
 23
23 -
 24
24 -
 25
25 -
 26
26 -
 27
27 -
 28
28 -
29
-
30
-
31
-
32
-
33
-
34
-
35
-
36
-
37
-
38
-
39
-
40
-
41
-
42
-
43
-
44
 |
 |

Operating the Monitor
User’s Guide
4-3
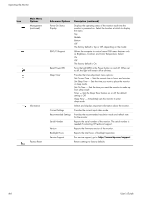
Side-Panel Controls
Control buttons are located on the right side of the monitor:
Side-panel control buttons
No.
Icon
Description
1
Power
Turns the monitor on or puts it in standby or sleep mode.
NOTE:
The Power button is located on the top right side of the monitor.
2
Auto/OK
Auto-adjusts the display to the ideal setting when the OSD is not active. / Enters the selected option.
3
/+
Hot key to link to Quick View. / Navigates forward through the OSD menu and increases adjustment
levels.
4
/–
Hot key to link to volume level adjustment. / Navigates backward through the OSD menu and
decreases adjustment levels.
5
Menu
Opens, selects, or exits the OSD menu.
1
2
3
4
5