HP Scitex FB910 HP Scitex FB910 Printer Series - User Manual
HP Scitex FB910 Manual
 |
View all HP Scitex FB910 manuals
Add to My Manuals
Save this manual to your list of manuals |
HP Scitex FB910 manual content summary:
- HP Scitex FB910 | HP Scitex FB910 Printer Series - User Manual - Page 1
HP Scitex FB910 Printer User Manual 0706472 Revision A - HP Scitex FB910 | HP Scitex FB910 Printer Series - User Manual - Page 2
E-mail: [email protected] North America Voice ......... +1 800.925.0563 or +1 952.944.4040 Fax 1 952.943.3611 or +1 952.944.8509 Latin America (Español) Voice 1 952.943.3627 Fax 1 952.944.8509 Europe, Middle East, and Africa Voice 31 23.5622000 Fax 31 23.5627944 Ink Sales North America Voice - HP Scitex FB910 | HP Scitex FB910 Printer Series - User Manual - Page 3
or her own expense. This equipment must be installed exactly as instructed in this manual using only the components supplied. If a supplied component ever needs to Commission entitled, How to Identify and Resolve Radio-TV Interference Problems (#004-000-003454). Write to the U.S. Government Printing - HP Scitex FB910 | HP Scitex FB910 Printer Series - User Manual - Page 4
Data Sheets - information for safe handling of the inks and printhead flush used with the printer. If you are using the HP Software RIP: • HP Software RIP User Guide - describes how to use the RIP. • Printing Tools User Guide - describes how to add printers to your operating system, and how to - HP Scitex FB910 | HP Scitex FB910 Printer Series - User Manual - Page 5
Getting Started Quick Tour 1-2 Basic Printer Operations 1-6 Daily Startup 1-6 Quick Load 2-10 Multi-Sheet N-UP 2-10 Margins 2-10 Using the Camera to Locate the Sheets 2-10 "Incomplete" Rows Printing Tips 2-21 Pause-Swapping Ink 2-22 Checking Jet Health 2-23 Print Prime Bars 2-23 Map - HP Scitex FB910 | HP Scitex FB910 Printer Series - User Manual - Page 6
Ink Ink System Overview 3-2 UV Lamps 3-3 Loading Ink 3-5 When to Load Ink 3-5 Unloading an Empty Ink Box 3-5 Loading a Full Ink Box 3-5 Pause-Swapping Ink 3-7 Calibrating the Printer When to Calibrate 4-2 AutoJet 4-3 AutoTune 4-4 Quality Check 4-4 Auto Calibrations 4-6 Manual - HP Scitex FB910 | HP Scitex FB910 Printer Series - User Manual - Page 7
Clean the Drip Tray 6-14 Replace Ink Filters 6-15 UV Lamp Operation and Maintenance 6-17 Operating Tips 6-18 Replacing UV Lamp Bulbs 6-19 Balancing Lamp Hours 6-19 Clean the Quartz Windows 6-20 Clean the Ionizer Bar 6-22 Printhead Procedures 6-24 Power Down and Restart 6-25 Specifications - HP Scitex FB910 | HP Scitex FB910 Printer Series - User Manual - Page 8
viii Table of Contents - HP Scitex FB910 | HP Scitex FB910 Printer Series - User Manual - Page 9
Chapter 1 Getting Started • Quick Tour (page 1-2) • Basic Printer Operations (page 1-6) • Important Operating Notes (page 1-14) Getting Started 1-1 - HP Scitex FB910 | HP Scitex FB910 Printer Series - User Manual - Page 10
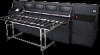
15 16 12 Service End Fig. 1-1. Input Side view 1. Input media roller height adjusters 2. Endcap cabinet (2a - User End, 2b - Service End) 3. Emergency stop switch 4. Control panel 5. Media fence 6. Multiple sheet positioning pins 7. Media feed belt 8. UV-filtered observation window Quick Tour - HP Scitex FB910 | HP Scitex FB910 Printer Series - User Manual - Page 11
supply access door 10. Ink filter/pump access panel 11. Standby power switch, foot switch port, VideoNet port Standby power switch Foot switch port VideoNet port 12. Fork lift points 13. Sheet Ready foot switch 14. Shop air input (Service End of printer), industrial quick connect Hose connection - HP Scitex FB910 | HP Scitex FB910 Printer Series - User Manual - Page 12
3 Service End 4 5 6 Fig. 1-2. Output Side view User End 1. Access door with UV-filtered observation window (opening any door on the output side will halt printing) 2. Output media roller height adjusters 3. Fork lift points 4. Output table 5. Roll-fed takeup system (optional) 6. Printhead wipe - HP Scitex FB910 | HP Scitex FB910 Printer Series - User Manual - Page 13
Media information 14. Turn On/Turn Off Lamps 2. Printer status 15. Media Wizard 3. Ink levels 16. Load Media 4. Media detector (red=media out, green=media detected) 5. UV lamps status 6. Vacuum Pressure gauge 7. Media Handling status 8. Printer doors status 9. Stored jobs status 17. Configure - HP Scitex FB910 | HP Scitex FB910 Printer Series - User Manual - Page 14
purge the printheads. Follow the instructions on the control panel screen. The printer will detect when clean the media drive belt daily will allow any ink on the belt to continue to cure, making by the jets in one printhead, starting with the black head 1 toward the service end of the carriage, - HP Scitex FB910 | HP Scitex FB910 Printer Series - User Manual - Page 15
1 Fig. 1-4. Prime Bars 5. If any missing jets are present after printing the Prime Bars, proceed to the next step, "Recover Jets Part 1" on page 1-8. Basic Printer Operations 1-7 - HP Scitex FB910 | HP Scitex FB910 Printer Series - User Manual - Page 16
Recover Jets Part 1 6. Press the Purge key on the control panel to purge the printheads. Follow the instructions on the control panel screen. The printer will detect when you open and close the endcap access door, and remove and reinstall the drip tray, to determine when you have completed certain - HP Scitex FB910 | HP Scitex FB910 Printer Series - User Manual - Page 17
Basic Printer Operations 1-9 - HP Scitex FB910 | HP Scitex FB910 Printer Series - User Manual - Page 18
jets (indicated by a printed line) are working, the printer is ready to print. • If the Prime Bars show any missing jets, dab only the printheads that have missing jets. Dab or blot the printheads with a lint-free cloth moistened with HP Scitex MF50 Flushing Solution. 11. Print the Prime Bars again - HP Scitex FB910 | HP Scitex FB910 Printer Series - User Manual - Page 19
Basic Printer Operations 1-11 - HP Scitex FB910 | HP Scitex FB910 Printer Series - User Manual - Page 20
client workstation to the printer. If you are using a non-HP RIP, refer to the to the online help or manual for instructions. The raster image processing ( in the menu at Settings > UV Lamps Idle Time. 600x300 Printing The Guide (part number 0706399) for instructions. 1-12 Basic Printer Operations - HP Scitex FB910 | HP Scitex FB910 Printer Series - User Manual - Page 21
PRINTER. The printer will automatically enter a Sleep mode when it has been idle for a user-defined period of time (see page 5-4 and page 5-12 for details). If the printer must be shipped or power removed for an extended period, contact Technical Services for instructions. Basic Printer Operations - HP Scitex FB910 | HP Scitex FB910 Printer Series - User Manual - Page 22
starting the printer again. Caution Do not connect any equipment to the line conditioner for the UV power supply, except as specified in this manual. • To dab the printheads, use only genuine HP Scitex MF50 Flushing Solution. (See "Recover Missing Ink Jets" on page 6-11 for instructions.) DO NOT - HP Scitex FB910 | HP Scitex FB910 Printer Series - User Manual - Page 23
during printing. • DO NOT clean the printhead surfaces with a dry cloth or paper towel of any kind. Use only a lint-free (Class 100 cleanroom) cloth, such as those supplied with the printer and available from Supplies Sales, moistened with HP Scitex MF50 Flushing Solution. • DO NOT reprint - HP Scitex FB910 | HP Scitex FB910 Printer Series - User Manual - Page 24
also required by UL compliance as protection from UV light and moving parts hazards. • DO NOT rest or store the roll-feed foam rollers ("lift roller" and "press roller") on a horizontal surface, or a persistent flat spot on the roller will be created. When not in use, store the foam rollers in the - HP Scitex FB910 | HP Scitex FB910 Printer Series - User Manual - Page 25
instructions, safety glasses or other protective clothing are not necessary. • Mechanical hazards - Keep fingers away from carriage and media path. Use a fork lift truck to lift the printer . The battery must be replaced only by authorized service providers, and must be replaced only with the same - HP Scitex FB910 | HP Scitex FB910 Printer Series - User Manual - Page 26
OSHA, NIOSH oder ACGIH etabliert. • Ozon - das Hochleistungs-UV-Licht, das von den Aushärtungslampen abgegeben wird, reagiert mit Sauerstoff umgewandelt wird. Español • Luz UV - Las lámparas de curado ultravioleta (UV) emiten luz UV de alta intensidad. La impresora debe ser manejada con filtros de - HP Scitex FB910 | HP Scitex FB910 Printer Series - User Manual - Page 27
"OFF", LA POTENCIA PUEDE SEGUIR SIENDO SUMINISTRADA A LOS COMPONENETES DELA IMPRESORA. Para cortar totalmente el suministro de corriente a la impresora, deberá desenchufar los cables de potencia de las tomas. • Ozono - La luz UV de alta intensidad emitida por las lámparas de curado reacciona con el - HP Scitex FB910 | HP Scitex FB910 Printer Series - User Manual - Page 28
composants de l'imprimante. Pour éteindre totalement l'imprimante, il faut débrancher le câble électrique de la prise. • Ozone - L'émission importante de lumière UV émise pour le séchage par les lampes réagit à l'oxygène et produit de l'ozone. Cette réaction tend à être plus importante au moment du - HP Scitex FB910 | HP Scitex FB910 Printer Series - User Manual - Page 29
locale, régionale ou gouvernementale. Italiano • Luce Ultravioletta (UV) - Le lampade UV, emettono raggi ultravioletti ad alta intensita'. Bisogna operare il prese. • Ozono - La elevate intensita' ultravioletta delle lampade UV, reagisce con l'ossigeno e produce ozono. Questo processo tende ad - HP Scitex FB910 | HP Scitex FB910 Printer Series - User Manual - Page 30
• Residui pericolosi - All' interno del gruppo elettrico del plotter, si trova una batteria al litio il quale se non sostituita in maniera corretta puo' rischiare di esplodere. Per tale motivo, solamente personale tecnico specializzato deve eseguire tale operazione. Per lo smaltimento della batteria - HP Scitex FB910 | HP Scitex FB910 Printer Series - User Manual - Page 31
Chapter 2 Printing This chapter shows you how to set print mode and media options, load media, and print: • Configure Printing (page 2-2) • Configure Media (page 2-6) • Load and Print on Rigid Media (page 2-8) • Load and Print on Roll-Fed Media (page 2-15) • Printing Tips (page 2-21) • Checking Jet - HP Scitex FB910 | HP Scitex FB910 Printer Series - User Manual - Page 32
top center of the control panel. To change the print mode, follow these instructions. 1. On the control panel, press the Print Mode key. The print mode Unidirectional - Print From User to Service Side • Unidirectional - Print From Service to User Side The printer can print in both directions ( - HP Scitex FB910 | HP Scitex FB910 Printer Series - User Manual - Page 33
-side lamp has more hours than the user-side lamp, select Unidirectional - Print From Service to User Side. Service-side lamp Service end User-side lamp User end Fig. 2-1. Printhead carriage 3. Press a direction option to select it. In Production and High Quality modes, a menu appears with these - HP Scitex FB910 | HP Scitex FB910 Printer Series - User Manual - Page 34
heat from the UV lamps, which could result in bowing of the center of the media, and possible contact with the printheads. Thinner rigid media such as fluted polypropylene (Coroplast) are susceptible. To avoid warping, set a media delay in Printer Settings > - HP Scitex FB910 | HP Scitex FB910 Printer Series - User Manual - Page 35
modes require higher lamp settings to ensure sufficient curing. • If the ink is not curing, increase the setting. The lamps will gradually lose so increasing the setting eventually may become necessary. (For infomation about UV lamp life, see "Replacing UV Lamp Bulbs" on page 6-19.) • If the media is - HP Scitex FB910 | HP Scitex FB910 Printer Series - User Manual - Page 36
Configure Media 2-6 Before the printer will accept a print job, it must be configured handler installed) or Roll-Fed. • Rollers - sets whether the Input and Output media rollers are used (yes) or not used (no). • Weight - sets the media belt drive motor and media advance amount to handle Light - HP Scitex FB910 | HP Scitex FB910 Printer Series - User Manual - Page 37
, but reduces the chance of damage to the media belt drive motor. • Visible to Printer - if Yes, the media sensor and image sensor will be used. If No, the media sensor and image sensor will not be used (with clear films, for example). • Print Mode - quality and direction settings (see "Configure - HP Scitex FB910 | HP Scitex FB910 Printer Series - User Manual - Page 38
vacuum are sufficient for unwarped media) • Warped Media, Hold Down - media rollers used to prevent warped media from striking the printhead carriage and keep the media feeding properly. When the media rollers are used, the printable length is reduced by several inches at the leading and trailing - HP Scitex FB910 | HP Scitex FB910 Printer Series - User Manual - Page 39
head height reduces overspray, but increases the chance of the carriage or printheads striking the media. 6. Verify the height of the media rollers shown Sheet Ready foot pedal or control panel button. The printer prints on the next sheet and will use the same option settings on all of the copies - HP Scitex FB910 | HP Scitex FB910 Printer Series - User Manual - Page 40
printing a multi-sheet N-UP job, the image positioned horizontally (left-right) as defined under the menu option: Printer Settings > Margin Settings > Margins. Using the Camera to Locate the Sheets The camera is used to locate the position of each sheet as part of the load process. You can set the - HP Scitex FB910 | HP Scitex FB910 Printer Series - User Manual - Page 41
row is measured, and those measurements are used for all subsequent rows. Use the alignment pins to locate the sheets in the user end toward the service end. Stored Jobs Whenever the printer receives a print job from the RIP, the job is automatically stored in the printer's memory, on a rotating - HP Scitex FB910 | HP Scitex FB910 Printer Series - User Manual - Page 42
Available area minus the area of jobs that are currently stored in the printer memory. This is the largest job that can be stored without deleting previously • To set up a two-sided print job using Stored Jobs, press the Print Two Sides key. The printer will prompt you to select a Stored Job for the - HP Scitex FB910 | HP Scitex FB910 Printer Series - User Manual - Page 43
will prompt you for the number of copies to print. If you have multiple sheets loaded, each copy will print on a separate sheet, and the printer will prompt for additional sheets until the number of copies requested have been printed. • To lock or unlock the job, press the appropriate key. Locking - HP Scitex FB910 | HP Scitex FB910 Printer Series - User Manual - Page 44
not reprint the Stored Job. For the best color, re-send the job from the RIP instead. When printing a job, the printer checks that the currently loaded media matches the media type that was loaded when the job was stored. If different, a warning is raised. You can - HP Scitex FB910 | HP Scitex FB910 Printer Series - User Manual - Page 45
Media Fig. 2-5. Media route in the takeup system 1. If installed, detach the rigid media input and output tables from the printer, and set them aside. 2. If you will be using the takeup system, install the takeup spool (see u in Fig. 2-5). 3. Load the media centered onto the supply spool n. Note - HP Scitex FB910 | HP Scitex FB910 Printer Series - User Manual - Page 46
, discards previous settings (see page 2-16). • Restore Loaded State - loads media using the previously-used settings when rollfed media is already loaded in the printer but the printer is not in a loaded state. This can happen if the printer goes to sleep or is rebooted, or if you press the Unload - HP Scitex FB910 | HP Scitex FB910 Printer Series - User Manual - Page 47
control panel, press the Turn On Fans key. 14. Lower the input q and output media rollers r to their low- est positions. Use the adjustment cranks on both the user and service ends to lower the rollers at both ends. This will help keep wrinkles out of the media. Load and Print on - HP Scitex FB910 | HP Scitex FB910 Printer Series - User Manual - Page 48
the foam press roller p into operating position. 17. If you are not using the takeup system, go to step 23. 18. Align the cardboard takeup core under the first dancer bar, over second dancer bar t, and down to the printer side of takeup roller u. Looking down the length of the takeup roller from the - HP Scitex FB910 | HP Scitex FB910 Printer Series - User Manual - Page 49
the foam press roller p into operating position. 35. If you are not using the takeup system, or if the media is already loaded in the takeup, go under the first dancer bar, over second dancer bar t, and down to the printer side of takeup roller u. Looking down the length of the takeup roller from - HP Scitex FB910 | HP Scitex FB910 Printer Series - User Manual - Page 50
39. Tape the end of the media to printer side of takeup roller, starting in the middle and Proceed key. 42. Enter the media length or press the Esc key for an unde- fined length. The printer measures the media width. 43. Press the Proceed key. The Front Page screen appears on the control panel. - HP Scitex FB910 | HP Scitex FB910 Printer Series - User Manual - Page 51
(see "Pause Swapping Ink," below). Caution Synthetic media commonly used for inkjet printing can build up a static charge, especially in environments with low relative humidity. This charge can pose an electrostatic discharge (ESD) hazard to persons, the printer, and other equipment. It can be - HP Scitex FB910 | HP Scitex FB910 Printer Series - User Manual - Page 52
You can replace one or more ink boxes during a print by pausing the printer: 1. On the printer control panel, press the (Pause) key. 2. Remove the old profiler. This signals to the printer that the ink box is being replaced. 3. Disconnect and remove the old ink box. 4. Install and connect the new - HP Scitex FB910 | HP Scitex FB910 Printer Series - User Manual - Page 53
working jet on the same or another printhead (in Production and High Quality modes). . 3. Press the ! (Proceed) key to continue. The printer prints the prime bar pattern. The prime bars will show correctly instructions, see "AutoJet" on page 4-3 or "Manual Jet Mapping" on page 4-16. Checking Jet - HP Scitex FB910 | HP Scitex FB910 Printer Series - User Manual - Page 54
Print Jet-Out Lines 1. From the control panel Front Page screen, press the Calibrate key. The Calibrate menu appears. 2. Press Manual Calibrations. The Manual Calibrations menu appears. 3. Press Print Jet-Out Lines. The Jet-Out Lines pattern prints. Substituted jets are marked with a black square. - HP Scitex FB910 | HP Scitex FB910 Printer Series - User Manual - Page 55
Chapter 3 This chapter describes how to use the ink. • Ink System Overview (page 3-2) • Loading Ink (page 3-5) Ink Ink 3-1 - HP Scitex FB910 | HP Scitex FB910 Printer Series - User Manual - Page 56
. Profiler data are used to track ink levels, and to help ensure optimal output quality and compatibility with printer components. • Ink tubes - carry ink to the printheads, they are opaque to prevent ink curing before printing. • Printheads - permanent piezo-based printheads. • Vacuum/Pressure (VP - HP Scitex FB910 | HP Scitex FB910 Printer Series - User Manual - Page 57
ink in the drip tray, on the printheads, and elsewhere off the media from curing. You should be aware of the following characteristics of these lamps when operating the printer: WARNING UV light hazard. The UV time, you can manually switch on or off the lamps on via the control panel (Tools > Turn - HP Scitex FB910 | HP Scitex FB910 Printer Series - User Manual - Page 58
and permanent damage. If sudden removal of power occurs, contact technical support before starting the printer again. • Lamp replacement - the UV lamps will gradually lose their intensity and therefore their ability to cure the ink. At that point, you can switch the lamp intensity from Low - HP Scitex FB910 | HP Scitex FB910 Printer Series - User Manual - Page 59
disconnecting and connecting them. To protect your hands from ink stains when unloading and loading ink boxes, wear latex or nitrile gloves. Unloading an Empty Ink Box 1. Open the ink supply access door. 2. Remove the profiler corresponding to the ink you are replacing. 3. Lift the box out of its - HP Scitex FB910 | HP Scitex FB910 Printer Series - User Manual - Page 60
that the connectors are firmly engaged before proceeding. Fig. 3-2. Connecting the ink tube to the ink box 3. Invert and install the ink box into position in the holder. The position for each ink color is shown on a label below the ink box holder and on the profiler docking station. 4. Install the - HP Scitex FB910 | HP Scitex FB910 Printer Series - User Manual - Page 61
You can replace one or more ink boxes during a print by pausing the printer: 1. On the printer control panel, press the (Pause) key. 2. Remove the old profiler. This signals to the printer that the ink box is being replaced. 3. Disconnect and remove the old ink box. 4. Install and connect the new - HP Scitex FB910 | HP Scitex FB910 Printer Series - User Manual - Page 62
3-8 Loading Ink - HP Scitex FB910 | HP Scitex FB910 Printer Series - User Manual - Page 63
to calibrate the printer for the best possible output: • When to Calibrate (page 4-2) • AutoJet (page 4-3) • AutoTune (page 4-4) • Auto Calibrations (page 4-6) - AutoBiDi Calibration, AutoH2H (Head-to-Head) Calibration, AutoJet Calibration, Full AutoSet • Manual Calibrations (page 4-9) - Manual BiDi - HP Scitex FB910 | HP Scitex FB910 Printer Series - User Manual - Page 64
printer the same media) Linearization (third-party RIP manual or HP RIP documentation) Linearization of colors. Note: For Manual Calibrations if necessary. When printheads have been moved Auto Bidirectional (page 4-6) or or replaced Manual Bidirectional (page 4-13) Head calibration, run Manual - HP Scitex FB910 | HP Scitex FB910 Printer Series - User Manual - Page 65
the printer compensates for these jets by using other jets in their place, ensuring maximum print quality without reducing print speed. You can also identify and map missing jets manually from the Manual Calibrations menu (see "Manual Jet Mapping" on page 4-16). You may want to manually - HP Scitex FB910 | HP Scitex FB910 Printer Series - User Manual - Page 66
manually, the software notifies you if there are any jet or alignment problems so that they can be addressed. When AutoTune runs AutoJet at scheduled intervals, you can use or the job can be routed to the Attention queue on the HP print server. 1. On the Front Page screen, press the Settings key - HP Scitex FB910 | HP Scitex FB910 Printer Series - User Manual - Page 67
of errors is required. When a quality check fails, print jobs are sent to the HP print server's Attention queue with a disposition of "Uncalibrated Printer" (this feature may not be supported by non-HP RIPs). • OFF - no quality check is performed, all jobs will print. 2. Select a Quality Check - HP Scitex FB910 | HP Scitex FB910 Printer Series - User Manual - Page 68
Auto Calibrations The printer's piezo printheads are aligned at the factory. Head and bidirectional standpoint) in the various print modes. The higher quality modes (Production and High Quality) use jet replacement, so they can print successfully with a greater number of jets out than can - HP Scitex FB910 | HP Scitex FB910 Printer Series - User Manual - Page 69
• AutoSet Summary - when enabled, a table of the results of the Full AutoSet calibration is printed after the AutoSet test patterns. When you enable the AutoSet Summary, you can show or hide the detailed calibration data. Auto Calibrations 4-7 - HP Scitex FB910 | HP Scitex FB910 Printer Series - User Manual - Page 70
Fig. 4-1. Auto calibration patterns and reports 4-8 Auto Calibrations - HP Scitex FB910 | HP Scitex FB910 Printer Series - User Manual - Page 71
panel. Note The manual BiDi and X head calibrations are timeconsuming and can be error-prone, but is necessary when calibrating transparent media or other media that the printer's digital image sensor cannot calibrate. Before calibrating the printer, first clean the printhead jets. See "Checking - HP Scitex FB910 | HP Scitex FB910 Printer Series - User Manual - Page 72
Manual X Head Registration Precise positioning of each drop of ink is essential for optimal print quality. This is possible only if you register all printheads in the printhead assembly to each other in the X (along the length of the platen) direction. This is a two-part process: • Print a - HP Scitex FB910 | HP Scitex FB910 Printer Series - User Manual - Page 73
Use a printer's loupe or magnifying glass if the patterns are difficult to see. Manual Calibrations Fig. 4-2. Sample head ) key to change the display to: X Direction Registration Head 2: -1 If a printhead is extremely out of alignment, there may be no pattern in alignment. Since the black - HP Scitex FB910 | HP Scitex FB910 Printer Series - User Manual - Page 74
6 for each of the heads. When you have entered registration values for all of the patterns, the control panel displays this message: Registration successful. 4-12 Manual Calibrations - HP Scitex FB910 | HP Scitex FB910 Printer Series - User Manual - Page 75
Manual BiDi Registration Bidirectional registration is a method to align each of the printheads so that dot placement is accurate in both directions along the X axis (along the direction of printhead travel). The bidirectional registration pattern consists of a series of vertical lines. Half the - HP Scitex FB910 | HP Scitex FB910 Printer Series - User Manual - Page 76
Use a printer's loupe to select the pattern, since the lines press the , key to change the display to: Bidi registration Head 1: +2 If a printhead is extremely out of alignment, there may be no pattern in alignment. Since the black can perform the BiDi Registration repeat- 4-14 Manual Calibrations - HP Scitex FB910 | HP Scitex FB910 Printer Series - User Manual - Page 77
steps 5 through 7 for each of the twelve heads. When you have entered registration values for all heads, the control panel displays this message: Registration Successful Manual Calibrations 4-15 - HP Scitex FB910 | HP Scitex FB910 Printer Series - User Manual - Page 78
the prime bars and purge the printheads as necessary to ensure the maximum number of working jets. See "Checking Jet Health" on page 2-23 for instructions. 1. Press the Calibrate key from the Front Page screen, then press Manual Calibrations in the menu. 2. Press Manual Jet Mapping in the menu - HP Scitex FB910 | HP Scitex FB910 Printer Series - User Manual - Page 79
The printer prints a jet map test pattern. Manual Calibrations Fig. 4-4. Sample jet mapping pattern (Head 1 of 16) • If a line segment is missing or broken, the jet number shown next to it is out. • - HP Scitex FB910 | HP Scitex FB910 Printer Series - User Manual - Page 80
a jet. • View current bad jets - lists the bad jets on a given printhead. • Clear all bad jets - clears (marks as good) all jets currently marked as press ! (Proceed). The control panel displays a numeric keyboard that you can use to enter the number of the bad jet. 5. Enter the jet number, then - HP Scitex FB910 | HP Scitex FB910 Printer Series - User Manual - Page 81
Manual Calibrations 7. Press , and ) to select the next head number, then press ! (Proceed ) to select a head number, then press ! (Proceed). The control panel displays a numeric keyboard that you can use to enter the number of the bad jet. 11. Enter the jet number, then press the Enter key. 12. - HP Scitex FB910 | HP Scitex FB910 Printer Series - User Manual - Page 82
bad jets reported. x new hard bad jets reported. x previous soft bad jets cleared. x previous hard bad jets cleared. where x is the number of jets. 4-20 Manual Calibrations - HP Scitex FB910 | HP Scitex FB910 Printer Series - User Manual - Page 83
the media feed number displayed on the control panel changes accordingly. 1. On the Manual Calibrations menu, highlight Media Feed. 2. Press the (Menu In) key to select the option. Stitch pattern - First, allow the printer to print the following number of swaths, depending on the mode you want - HP Scitex FB910 | HP Scitex FB910 Printer Series - User Manual - Page 84
so you can verify its length with an accurate metal ruler. This is not as precise as the 34-inch (900 mm) calibration, but it uses less media. Measure and adjust the media advance as needed until the pattern is exactly 10 inches (250 mm) long. Fig. 4-5. Measure between the calibration - HP Scitex FB910 | HP Scitex FB910 Printer Series - User Manual - Page 85
option resets all registration data. Since there is no registration data after running this option, all calibration values must be reestablished by running the calibrations. Manual Calibrations 4-23 - HP Scitex FB910 | HP Scitex FB910 Printer Series - User Manual - Page 86
predictable, or linear, fashion. The process of linearization (or color calibration) involves printing and reading color test patches, and calibrating the printer to ensure that the expected and printed densities will match. This in turn will ensure optimal color matching. You should perform a color - HP Scitex FB910 | HP Scitex FB910 Printer Series - User Manual - Page 87
Chapter 5 Using the Control Panel This chapter describes the functions of the control panel. • Overview (page 5-2) • Front Page (page 5-3) • Menu Tree (page 5-7) • Menus (page 5-8) Using the Control Panel 5-1 - HP Scitex FB910 | HP Scitex FB910 Printer Series - User Manual - Page 88
Overview 5-2 The touch-screen control panel shows you the printer's current status, and enables you to interact with the printer when changing media and ink, respond to an error condition, or configure options. The control panel provides various forms of online user assistance: The ? button - HP Scitex FB910 | HP Scitex FB910 Printer Series - User Manual - Page 89
server or under the menu at Printer Settings > Printer Name • Network status • Current print mode 3. Ink levels - numeric and graphic ink levels; line marks "low ink" level 4. Media detector (red=media out, green=media detected) 5. UV lamps status (U=user side, S=service side) - black=off, yellow=on - HP Scitex FB910 | HP Scitex FB910 Printer Series - User Manual - Page 90
down the UV lamps, ionizer bar, printheads, carriage, ink pumps, and media drive motors, but maintains vacuum to the printheads to prevent ink leakage. (The ionizer bar is not switched off in Sleep mode, but may be turned off manually at its power supply, inside the cover on the service end of - HP Scitex FB910 | HP Scitex FB910 Printer Series - User Manual - Page 91
for details). 12. Purge printheads - purges the printheads to help recover missing jets. Follow a purge with a manual dab or blot of the printheads (do not wipe) with a lint-free cloth. 13. Print mode - sets print quality mode. See "Configure Printing" on page 2-2 for instructions. 14. Turn On Lamps - HP Scitex FB910 | HP Scitex FB910 Printer Series - User Manual - Page 92
25. Attention messages - blinks on the control panel when the printer detects an error condition, potential error condition, or when you make a change that requires recalibration or other action to ensure best print quality. See "Overview" on page 5-2 for more information. 5-6 Front Page - HP Scitex FB910 | HP Scitex FB910 Printer Series - User Manual - Page 93
Units Use Thickness Sensor Low Ink Warning UV Lamps Idle Time Support Rollfed Printer Name Restore All Defaults Tools System Information Maintenance Perform An Air Purge Print Recover Jets Pattern Access Printheads Print Jet-Out Lines Print Media Skew Lines Reset Reservoir Filters Reset UV Lamp - HP Scitex FB910 | HP Scitex FB910 Printer Series - User Manual - Page 94
Mode only • Print Menus (page 5-16) • Service Menus - for use by factory, technical support, and authorized service providers Calibrate Printer To display this menu, press the Calibrate button on the Front Page screen. For instructions on using these options, see Chapter 4, Calibrating the - HP Scitex FB910 | HP Scitex FB910 Printer Series - User Manual - Page 95
printer's digital imaging sensor. Inaccurate judgments by the operator during these tests could result in substandard output. See "Manual Calibrations" on page 4-9 for instructions. • Manual Bidi Registration • Manual X Head Registration • Manual Jet Mapping - the manual all printhead calibration - HP Scitex FB910 | HP Scitex FB910 Printer Series - User Manual - Page 96
the media alignment bar to just before the printhead carriage. • Print Zone - under the printhead carriage. • Printing Delay - slows throughput the print, which shows the job name, ink, media, date and time printed, print mode, lamps setting, printer, embedded software version, plus write-in blanks - HP Scitex FB910 | HP Scitex FB910 Printer Series - User Manual - Page 97
from the right edge) and leading margin (vertical or y distance from the leading edge). Since the image appears upside down as it emerges from the printer, the upper left corner of the image will appear at this point. • Print Position - when the printed image does not span the entire width of - HP Scitex FB910 | HP Scitex FB910 Printer Series - User Manual - Page 98
printer will finish curing any printed areas before skipping white space. • Head Height off Media - automatically raises the rail to set the printhead more ink). • Measure Media - for cut-sheet media, you can choose various levels of precision for finding the left (user end), right (service end), - HP Scitex FB910 | HP Scitex FB910 Printer Series - User Manual - Page 99
amount of ink remaining in the ink box supply at which the printer will display a "low ink" message on the control panel. • Support Rollfed - enables or disables support for the rollfed media supply and takeup system. If the system does not appear to be working, check this menu item. • UV Lamps Idle - HP Scitex FB910 | HP Scitex FB910 Printer Series - User Manual - Page 100
Printheads - moves the printhead carriage to the service end ink counts to zero. See "Replace Ink Filters" on page 6-15 for instructions. • Reset UV Lamp Hours - resets the lamp's elapsed operating time clock to zero. The printer displays a warning message when the UV lamps have been in service - HP Scitex FB910 | HP Scitex FB910 Printer Series - User Manual - Page 101
fills the printheads with ink. • Empty Heads (Fill With Air) - fills the printheads with air. User Diagnostics User Diagnostics presents an interactive troubleshooting program to diagnose problems before calling technical support. It walks you through a series of tests and checks for certain printer - HP Scitex FB910 | HP Scitex FB910 Printer Series - User Manual - Page 102
head motion failures and printhead purges, are now saved to a log file for troubleshooting by technical support personnel. The file c3.txt is saved on the computer running the Software RIP in the C:\Program Files folder. Alternatively, the log can be printed (Service Printer > Print Info Pages) and - HP Scitex FB910 | HP Scitex FB910 Printer Series - User Manual - Page 103
6-11) • Clean the Drip Tray (page 6-14) • Replace Ink Filters (page 6-15) • UV Lamp Operation and Maintenance (page 6-17) • Clean the Quartz Windows (page 6-20) • Clean the Ionizer Bar (page 6-22) • Printhead Procedures (page 6-24) • Power Down and Restart (page 6-25) Maintaining the Printer 6-1 - HP Scitex FB910 | HP Scitex FB910 Printer Series - User Manual - Page 104
location. See "Replace Ink Filters" on page 6-15. Replace all four filters as a set, to prevent ink pump failure. The control panel will display a Warning message when 20 liters of ink have passed through the set of filters. You may continue printing past this point, but printhead fill errors may - HP Scitex FB910 | HP Scitex FB910 Printer Series - User Manual - Page 105
" on page 6-19. The control panel warns you when either of the UV lamp bulbs have been illuminated for 500 hours, but they may be usable for many more hours beyond that point. Bulb life will vary. The bulbs must be replaced when they no longer cure the UV ink sufficiently. Maintenance Schedule 6-3 - HP Scitex FB910 | HP Scitex FB910 Printer Series - User Manual - Page 106
high-precision electronic instrument that is easily damaged. Use extreme caution when cleaning and handling the encoder belt and tables. 2. Stand at the user end of the printer, next to the control panel. 3. Hold a clean, lint-free allow cured ink on the belt to soak with isopropyl alcohol before wiping - HP Scitex FB910 | HP Scitex FB910 Printer Series - User Manual - Page 107
Media Drive Belt Encoder 5. Open the right-most (user end) access door above the belt on the output side of the printer. The encoder is located at the edge of the media drive belt. Fig. 6-1. Media drive belt encoder 6. Remove the four Phillips head screws that attach - HP Scitex FB910 | HP Scitex FB910 Printer Series - User Manual - Page 108
cover or the screwdriver to touch the encoder wheel. Caution The media drive belt encoder is a high-precision electronic instrument that is easily damaged. Use extreme caution when cleaning and handling the encoder assembly. 10. Close the access door. 6-6 Clean the Media Drive Belt and Encoder - HP Scitex FB910 | HP Scitex FB910 Printer Series - User Manual - Page 109
located on the corresponding sides of the printer. To clean, wipe the media rollers with a lint-free cloth. To remove ink, wipe with a minimal amount of TOUCH THE PRINTHEADS, especially the inkjet orifice plates. Contact with the ink could cause the ink to coagulate, rendering the printhead unusable - HP Scitex FB910 | HP Scitex FB910 Printer Series - User Manual - Page 110
Service end Rail Fig. 6-4. Location of carriage bearings and rail The carriage rail carries the printhead carriage across the width of the printer. As dust and ink , behind the belt. Move the carriage manually or press Tools > Maintenance > Access Printheads on the control panel menu so you - HP Scitex FB910 | HP Scitex FB910 Printer Series - User Manual - Page 111
. It usually does not get dirty. 1. Move the user endcap cabinet away from the printer. Remove the screws that attach the cabinet to the printer. As you move the cabinet away from the printer, avoid pulling the grounding cable and other cables from their connection points. 2. Remove the eight - HP Scitex FB910 | HP Scitex FB910 Printer Series - User Manual - Page 112
bearing Fig. 6-6. Carriage bearings, top view, user-side pair shown 4. Clean the user- and service-side inside bearings. Insert a moistened cotton swab into the bearing cleaning window, and clean the bearing by manually pushing the carriage to the left and right. Repeat once or twice. Remove any - HP Scitex FB910 | HP Scitex FB910 Printer Series - User Manual - Page 113
drop onto the media drive belt and louvers. The ink will smoke if it contacts heated louvers. 5. Open the output-side door of the user-end cabinet, or carefully wheel the cabinet away from the printer. 6. Use a lint-free cloth to dab the printheads, not a paper towel, which could shed fibers that - HP Scitex FB910 | HP Scitex FB910 Printer Series - User Manual - Page 114
jets (indicated by a printed line) are working, the printer is ready to print. • If the Prime Bars still show missing jets, map them out (see "Manual Jet Mapping" on page 4-16, or "AutoJet" on page 4-3) or contact technical support for further instructions. 12. Close the cabinet door or replace the - HP Scitex FB910 | HP Scitex FB910 Printer Series - User Manual - Page 115
Recover Missing Ink Jets 6-13 - HP Scitex FB910 | HP Scitex FB910 Printer Series - User Manual - Page 116
Clean the Drip Tray 1. When the printer is idle, open the output-side door of the user-end cabinet. 2. Slide the drip tray straight and level toward you until it clears its rails, and pour any uncured ink into a waste receptacle. Cured ink is not hazardous waste. If you place the waste receptacle - HP Scitex FB910 | HP Scitex FB910 Printer Series - User Manual - Page 117
Ink Filters The control panel displays a Warning message on the control panel when 20 liters of ink have passed through the filters. Replace all four filters as a set if possible. Failure to replace the filters will eventually cause the filters to clog and prevent ink from reaching the printheads - HP Scitex FB910 | HP Scitex FB910 Printer Series - User Manual - Page 118
the endcap cabinet door, or replace the access panel. 9. On the Front Page screen, press the Tools key. 10. Press Maintenance. 11. Press Reset Reservoir Filters. If you are not replacing the entire set of filters, you can reset the count for an individual filter. 6-16 Replace Ink Filters - HP Scitex FB910 | HP Scitex FB910 Printer Series - User Manual - Page 119
to allow the lamps to cool down properly will damage the lamps. If you disconnect the power cable from the back of the printer or disconnect the green power cable from the lamp assembly before the cool down sequence has finished, you will damage the lamps. UV Lamp Operation and Maintenance 6-17 - HP Scitex FB910 | HP Scitex FB910 Printer Series - User Manual - Page 120
of the UV lamp bulbs Page > Print Mode). • If the lamps are not curing the ink with the lamps set to Low, increase the setting to Medium or instructions). If the lamps are still not curing printed output after taking these steps, contact Technical Services for assistance in diagnosing the problem - HP Scitex FB910 | HP Scitex FB910 Printer Series - User Manual - Page 121
in ink curing anomolies. To avoid this, switch between left-only and right-only printing as needed to equalize the lamp hours. (See "Configure Printing" on page 2-2 for instructions.) The printer software will display a Warning message if the difference between the right and left lamps' service - HP Scitex FB910 | HP Scitex FB910 Printer Series - User Manual - Page 122
snowblindness or welder's flash). AVOID LOOKING DIRECTLY AT THE UV LIGHT. VORSICHT UV Licht hoher Intensität. Bitte vermeiden Sie es, direkt in that the ink can be cured. To perform this procedure, you will need • Protective gloves and safety glasses • Lint-free (cleanroom) cloths • HP Scitex MF50 - HP Scitex FB910 | HP Scitex FB910 Printer Series - User Manual - Page 123
moistened with HP Scitex MF50 Flushing Solution. 5. With a new lint-free cloth, dry-polish the quartz windows to ensure that no smearing or residue remains. 6. If the carriage is at the service end, from the Front Page screen of the control panel, press the Access Heads key. The printhead carriage - HP Scitex FB910 | HP Scitex FB910 Printer Series - User Manual - Page 124
, or an incomplete cable connection. The ionizer bar is attached to the printhead carriage rail. 1. Switch off power to the ionizer bar. The ionizer bar's power supply is mounted inside the cover on the lower service end of the printer. The power switch is located on the side of the power supply - HP Scitex FB910 | HP Scitex FB910 Printer Series - User Manual - Page 125
be no buzzing sound, and the orange light will remain off; otherwise, repeat this procedure. Tip If the printer is located in a high-humidty environ- ment, or if you have not noticed problems associ- ated with static discharge, the ionizer bar may not be needed. Switching off the ionizer bar - HP Scitex FB910 | HP Scitex FB910 Printer Series - User Manual - Page 126
restarting the printer after an extended power down period, this function fills the empty printheads with ink. • Fill Heads with Ink - fills the printheads with ink, one color at a time. Should only be done with empty printheads. • Empty Heads (Fill With Air) - empties all printheads by using air - HP Scitex FB910 | HP Scitex FB910 Printer Series - User Manual - Page 127
the vacuum system by using the auxiliary 24 volt power supply. This will prevent ink from running out of the printheads. See Appendix A, Specifications for instructions. If the printer will be powered down for an extended period, contact Technical Services for instructions. Power Down and Restart - HP Scitex FB910 | HP Scitex FB910 Printer Series - User Manual - Page 128
6-26 Power Down and Restart - HP Scitex FB910 | HP Scitex FB910 Printer Series - User Manual - Page 129
Appendix A Specifications Specifications A-1 - HP Scitex FB910 | HP Scitex FB910 Printer Series - User Manual - Page 130
cm) 49 inches (124 cm) 121inches (307 cm) 179 inches (454 cm) Printer without tables: Tables only: 1675 pounds (760 kg) 150 pounds (68 kg) Temperature non-condensing Safety: CE, UL, c-UL Emissions: FCC-A, CE Immunity: CE Power used: 200-240 VAC, three phase (3φ), 50/60 Hz, 16 Amps maxi- mum - HP Scitex FB910 | HP Scitex FB910 Printer Series - User Manual - Page 131
outlet. 16 piezo-electric inkjet printheads utilizing Micro-Quad™ Jet Technology. 600 x 600 dpi, 600x300 dpi (as supported by the RIP) HP Scitex FB240 4-color (CMYK) flexible UV cure inks, off-head ink system. Dual carriage-mounted 850-watt shuttered UV lamps. Unidirectional modes (right-only - HP Scitex FB910 | HP Scitex FB910 Printer Series - User Manual - Page 132
at the printheads and provides air pressure for purging. Since relative pressure is maintained, the printer can be operated feeding. Pneumatically-operated media rollers and media alignment bar. Front and rear roller tables support rigid materials up to 98.4 inches (250 cm) in width and 80 inches ( - HP Scitex FB910 | HP Scitex FB910 Printer Series - User Manual - Page 133
Appendix B Troubleshooting This appendix explains how to prevent and diagnose printing problems and provides information about getting technical support. • Troubleshooting Checklist (page B-2) • Warranty Claims (page B-8) • Diagnostics (page B-10) • Hewlett-Packard Technical Services (page B-11) - HP Scitex FB910 | HP Scitex FB910 Printer Series - User Manual - Page 134
2-3? YES: Go to question 3. NO: The following could be the problem: • There may be a hardware problem with the printer's internal components. Follow the diagnostic routine on the control panel to determine the problem. Call technical support as directed by the control panel. 3. Can you send a file - HP Scitex FB910 | HP Scitex FB910 Printer Series - User Manual - Page 135
. Refer to the print server manual for more information. • Your problem is not covered in this checklist. Contact technical support. NO: The following could be the problem: • Banding or general poor image quality - the printheads may need to be calibrated (see Chapter 4, Calibrating the Printer - HP Scitex FB910 | HP Scitex FB910 Printer Series - User Manual - Page 136
. Head strikes may indicate that the printhead height is too low; see "Head Height Off Media" on page 512 for instructions. If head strikes become a recur frequently, contact technical support for an edge retainer that can be attached to the printer. Head Strike or Carriage Motion Error Cause - HP Scitex FB910 | HP Scitex FB910 Printer Series - User Manual - Page 137
a purge. The carriage will travel to the service side, allowing access to the printhead jetting orifices. 2. Moisten an approved cleaning cloth with HP Scitex MF50 Flushing Solution Solution. Beginning with the #16 printhead, lightly dab the printhead orifice plate with the moistened cleaning cloth - HP Scitex FB910 | HP Scitex FB910 Printer Series - User Manual - Page 138
. If the encoder on the media drive motor (at the service end of the printer) detects more than one inch (25 mm) of difference between slowly onto the belt. Ink Not Curing Cause: Lamp failure, possibly due to overheating, disconnected, or shutter fault, which the printer can detect and report via - HP Scitex FB910 | HP Scitex FB910 Printer Series - User Manual - Page 139
there was a problem with the Services. (Roll-fed printing) Perform a Media Feed Calibration to ensure accurate media advance. Shutter Errors The UV curing system uses shutters to block and expose the UV lamps as needed to cure jetted ink or prevent curing of the ink on the printheads service-side - HP Scitex FB910 | HP Scitex FB910 Printer Series - User Manual - Page 140
. The piezo printheads are designed to remain in service for the life of the printer. The printer incorporates many automatic and manual features for preventing clogs from occurring, and for recovering inkjets that do become clogged (see "Recover Missing Ink Jets" on page 6-11). The warranty - HP Scitex FB910 | HP Scitex FB910 Printer Series - User Manual - Page 141
supply due to improper handling of the ink or ink system • Printheads which have not been properly maintained as defined in the User Manual, and printheads with jet-outs that AutoJet is able to substitute in Production print mode • Service (including upgrades and expansions) performed by anyone who - HP Scitex FB910 | HP Scitex FB910 Printer Series - User Manual - Page 142
The printer includes a series of self-diagnostic tests designed to help technical support solve printer hardware problems. If one of the tests encounters an error, and error message appears, which includes: • Error code - always write down this code for future reference by technical support • Brief - HP Scitex FB910 | HP Scitex FB910 Printer Series - User Manual - Page 143
Hewlett-Packard Technical Services For service and support, contact Hewlett-Packard Technical Services: • World Wide Web: www.colorspan.com • Internet E-mail: [email protected] United States and Canada: • Telephone: (800) 925-0563 or (952) 944-4040 • Fax: (952) 944-8509 Latin America: • Telephone: - HP Scitex FB910 | HP Scitex FB910 Printer Series - User Manual - Page 144
and Accessories Consult HP or your HP representative for an updated listing of supported ink and media. Use only genuine HP inks and flushing solution in the printer. Use of any other inks or cleaning fluids could damage the printer and will void the warranty. Supplies Sales • North America: (800 - HP Scitex FB910 | HP Scitex FB910 Printer Series - User Manual - Page 145
Index Index-1 - HP Scitex FB910 | HP Scitex FB910 Printer Series - User Manual - Page 146
5-10 Service Printer 5-15 User Diagnostics 5-15 warnings 5-2 Warnings and Actions 5-16 Index-2 D Default Registration Data 4-23 Diagnostics B-10 E Eject Sheets to Input Side 5-12 Empty Heads 5-15 ESD hazard 2-21 ESD hazards 1-15 F Fill Heads With Flush 5-15 Fill Heads With Ink 5-15 Filters 6-15 - HP Scitex FB910 | HP Scitex FB910 Printer Series - User Manual - Page 147
ink filters 6-15 Manual BiDi Registration 4-13 Manual Calibrations 4-9, 5-9 Manual Jet Mapping 4-16 Manual R Recover Jets Pattern 1-8 Replace Printhead 5-15 Reset Reservoir Filters 5-14 Restore All Defaults 5-13 12 T Tips 2-21 Troubleshooting B-1 U UV lamps extending service life 6-19 quartz windows - HP Scitex FB910 | HP Scitex FB910 Printer Series - User Manual - Page 148
Index-4
-
 1
1 -
 2
2 -
 3
3 -
 4
4 -
 5
5 -
 6
6 -
 7
7 -
8
-
9
-
10
-
11
-
12
-
13
-
14
-
15
-
16
-
17
-
18
-
19
-
20
-
21
-
22
-
23
-
24
-
25
-
26
-
27
-
28
-
29
-
30
-
31
-
32
-
33
-
34
-
35
-
36
-
37
-
38
-
39
-
40
-
41
-
42
-
43
-
44
-
45
-
46
-
47
-
48
-
49
-
50
-
51
-
52
-
53
-
54
-
55
-
56
-
57
-
58
-
59
-
60
-
61
-
62
-
63
-
64
-
65
-
66
-
67
-
68
-
69
-
70
-
71
-
72
-
73
-
74
-
75
-
76
-
77
-
78
-
79
-
80
-
81
-
82
-
83
-
84
-
85
-
86
-
87
-
88
-
89
-
90
-
91
-
92
-
93
-
94
-
95
-
96
-
97
-
98
-
99
-
100
-
101
-
102
-
103
-
104
-
105
-
106
-
107
-
108
-
109
-
110
-
111
-
112
-
113
-
114
-
115
-
116
-
117
-
118
-
119
-
120
-
121
-
122
-
123
-
124
-
125
-
126
-
127
-
128
-
129
-
130
-
131
-
132
-
133
-
134
-
135
-
136
-
137
-
138
-
139
-
140
-
141
-
142
-
143
-
144
-
145
-
146
-
147
-
148
 |
 |

0706472 Revision A
HP Scitex FB910 Printer
User Manual