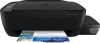
HP Smart Tank Wireless 450 Setup Poster
HP Smart Tank Wireless 450 Manual
 |
View all HP Smart Tank Wireless 450 manuals
Add to My Manuals
Save this manual to your list of manuals |
HP Smart Tank Wireless 450 manual content summary:
- HP Smart Tank Wireless 450 | Setup Poster - Page 1
Start here - HP Smart Tank Wireless 450 | Setup Poster - Page 2
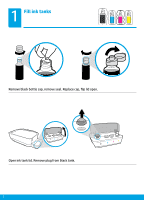
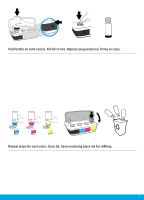
1 Fill ink tanks Remove black bottle cap, remove seal. Replace cap, flip lid open. Open ink tank lid. Remove plug from black tank. 2 - HP Smart Tank Wireless 450 | Setup Poster - Page 3
Hold bottle on tank nozzle. Fill ink to line. Replace plug and press firmly to close. Repeat steps for each color. Close lid. Save remaining black ink for refilling. 3 - HP Smart Tank Wireless 450 | Setup Poster - Page 4
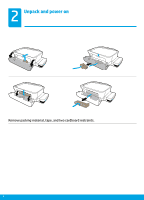
2 Unpack and power on Remove packing material, tape, and two cardboard restraints. 4 - HP Smart Tank Wireless 450 | Setup Poster - Page 5
Plug in power cord and turn on printer. Connect USB cable only when prompted during software installation. 5 - HP Smart Tank Wireless 450 | Setup Poster - Page 6
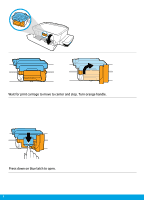
Wait for print carriage to move to center and stop. Turn orange handle. Press down on blue latch to open. 6 - HP Smart Tank Wireless 450 | Setup Poster - Page 7
Remove and discard orange plastic piece. Handle carefully to avoid ink stains. 7 - HP Smart Tank Wireless 450 | Setup Poster - Page 8
3 Install printheads Remove plugs from tops of printheads, then remove tape from contacts using pull tabs. Slide in printheads until they snap. Firmly close blue latch. 8 - HP Smart Tank Wireless 450 | Setup Poster - Page 9
IMPORTANT! Keep blue latch closed after printhead installation. Close printhead access door, then close front door. 9 - HP Smart Tank Wireless 450 | Setup Poster - Page 10
4 Load paper Pull out input tray. Load plain white paper and adjust guide. Pull out output tray and extender. 10 - HP Smart Tank Wireless 450 | Setup Poster - Page 11
3 Press (Resume) for 3 seconds. Wait for alignment page to print when blinking "P" becomes "A". Place alignment page on scanner glass. Printer might make faint sounds temporarily. Press (Color Copy) to complete printhead alignment. Continue setup when "A" becomes "0". 11 - HP Smart Tank Wireless 450 | Setup Poster - Page 12
setup at 123.hp.com 123.hp.com 123.hp.com 123.hp.com 123.hp.com 123.hp.com Enter 123.hp.com in a web browser on your computer or mobile device to download and install the HP printer software or HP Smart app. Note for Windows® users: You can also order a printer software CD at www.support.hp - HP Smart Tank Wireless 450 | Setup Poster - Page 13
Always maintain proper ink levels Always refill ink before it falls below lower line. Fill ink to upper line. Some ink might be left in the bottles. Product service or repairs required as a result of filling the ink tanks improperly and/or using non-HP ink will not be covered under warranty. 13 - HP Smart Tank Wireless 450 | Setup Poster - Page 14
Keep latch closed After setup, do not open the blue latch unless installing new printheads or moving printer outside home or office. 14 - HP Smart Tank Wireless 450 | Setup Poster - Page 15
Moving printer after setup Short Distance: If you are moving the printer within your home or office, keep blue latch closed, and keep printer level. Long Distance: If you are moving the printer outside your home or office, visit www.support.hp.com or contact HP. 15 - HP Smart Tank Wireless 450 | Setup Poster - Page 16
Windows is either a registered trademark or trademark of Microsoft Corporation in the United States and/or other countries. Printed in English © Copyright 2018 HP Development Company, L.P. 16 *Z4B56-90037* *Z4B56-90037* Z4B56-90037
-
 1
1 -
 2
2 -
 3
3 -
 4
4 -
 5
5 -
 6
6 -
 7
7 -
8
-
9
-
10
-
11
-
12
-
13
-
14
-
15
-
16
 |
 |

Start here