HP Visualize b1000 hp Visualize b1000, c3000, c3600 workstations parts replace - Page 25
CD ROM Drive
 |
View all HP Visualize b1000 manuals
Add to My Manuals
Save this manual to your list of manuals |
Page 25 highlights
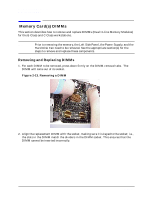
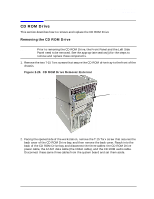
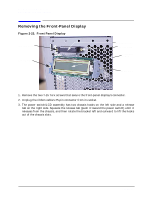
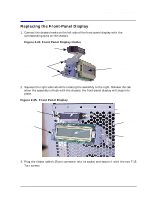
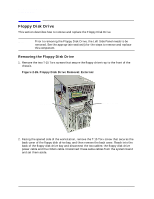
Parts Removal and Replacement CD ROM Drive CD ROM Drive This section describes how to remove and replace the CD ROM Drive Removing the CD ROM Drive NOTE Prior to removing the CD ROM Drive, the Front Panel and the Left Side Panel need to be removed. See the appropriate section(s) for the steps to remove and replace these components. 1. Remove the two T-15 Torx screws that secure the CD ROM drive tray to the front of the chassis. Figure 2-20. CD ROM Drive Removal: External T-15 Torx Screw T-15 Torx Screw 2. Facing the opened side of the workstation, remove the T-15 Torx screw that secures the back cover of the CD ROM Drive bay, and then remove the back cover. Reach into the back of the CD ROM Drive bay and disconnect the three cables: the CD ROM Drive power cable, the ATAPI data cable (the ribbon cable), and the CD ROM audio cable. Disconnect these same three cables from the system board and set them aside. Chapter 2 25
-
 1
1 -
2
-
3
-
4
-
5
-
6
-
7
-
8
-
9
-
10
-
11
-
12
-
13
-
14
-
15
-
16
-
17
-
18
-
19
-
 20
20 -
 21
21 -
 22
22 -
 23
23 -
 24
24 -
 25
25 -
 26
26 -
 27
27 -
 28
28 -
 29
29 -
 30
30 -
31
-
32
-
33
-
34
-
35
-
36
-
37
-
38
-
39
-
40
-
41
-
42
-
43
-
44
-
45
-
46
-
47
-
48
 |
 |
