HP Visualize c3000 hp Visualize b1000 and c3000 workstations owner's guide (a4 - Page 109
Installing I/O Cards
 |
View all HP Visualize c3000 manuals
Add to My Manuals
Save this manual to your list of manuals |
Page 109 highlights
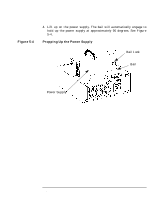
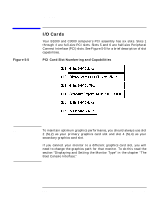
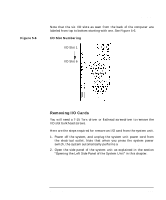
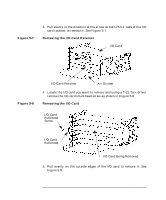
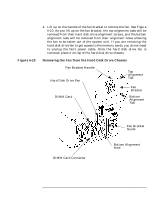
NOTE Changing Your Computer Hardware Configuration I/O Cards Installing I/O Cards To install an I/O card into your system unit, follow these steps. Slots two and four are the graphics card slots. The primary graphics card slot is slot number two and the secondary graphics card slot is slot number four. 1. Open the left side panel of the system unit as explained in the section "Opening the Left Side Panel of the System Unit" in this chapter. 2. Locate the appropriate slot for the I/O card that is to be installed. See Figure 5-5. 3. Unscrew the T-15 Torx screw and remove the bulkhead blank of the slot you have chosen. If no blank is present, you may skip to step four. 4. Pull evenly in the direction of the arrow on both PULL tabs of the I/O card retainer to remove it. See Figure 5-7. 5. Insert the I/O card into the slot you have chosen with the bulkhead appropriately positioned. See Figure 5-8. If the card is full length, the non-bulkhead end of the card should be placed in the I/O card guide. Press firmly and evenly on the I/O card until it is in the connector. Screw the T-15 Torx screw into the I/O card's bulkhead using 6 inch-pounds of torque. This will secure the I/O card. 6. Replace the I/O card retainer by placing the bottom retainer hook in the slot on the air divider and the clips on the PULL tabs into their slots on the chassis wall. See Figure 5-7. 7. Close the left side panel of the system unit by following the procedure in the section "Closing the Left Side Panel of the System Unit" in this chapter. Chapter 5 109
-
 1
1 -
2
-
3
-
4
-
5
-
6
-
7
-
8
-
9
-
10
-
11
-
12
-
13
-
14
-
15
-
16
-
17
-
18
-
19
-
20
-
21
-
22
-
23
-
24
-
25
-
26
-
27
-
28
-
29
-
30
-
31
-
32
-
33
-
34
-
35
-
36
-
37
-
38
-
39
-
40
-
41
-
42
-
43
-
44
-
45
-
46
-
47
-
48
-
49
-
50
-
51
-
52
-
53
-
54
-
55
-
56
-
57
-
58
-
59
-
60
-
61
-
62
-
63
-
64
-
65
-
66
-
67
-
68
-
69
-
70
-
71
-
72
-
73
-
74
-
75
-
76
-
77
-
78
-
79
-
80
-
81
-
82
-
83
-
84
-
85
-
86
-
87
-
88
-
89
-
90
-
91
-
92
-
93
-
94
-
95
-
96
-
97
-
98
-
99
-
100
-
101
-
102
-
103
-
 104
104 -
 105
105 -
 106
106 -
 107
107 -
 108
108 -
 109
109 -
 110
110 -
 111
111 -
 112
112 -
 113
113 -
 114
114 -
115
-
116
-
117
-
118
-
119
-
120
-
121
-
122
-
123
-
124
-
125
-
126
-
127
-
128
-
129
-
130
-
131
-
132
-
133
-
134
-
135
-
136
-
137
-
138
-
139
-
140
-
141
-
142
-
143
-
144
-
145
-
146
-
147
-
148
-
149
-
150
-
151
-
152
-
153
-
154
-
155
-
156
-
157
-
158
-
159
-
160
-
161
-
162
-
163
-
164
-
165
-
166
-
167
-
168
-
169
-
170
-
171
-
172
-
173
-
174
-
175
-
176
-
177
-
178
-
179
-
180
-
181
-
182
-
183
-
184
-
185
-
186
-
187
-
188
-
189
-
190
-
191
-
192
-
193
-
194
-
195
-
196
-
197
-
198
-
199
-
200
-
201
-
202
-
203
-
204
-
205
-
206
-
207
-
208
-
209
-
210
-
211
-
212
-
213
-
214
-
215
-
216
-
217
-
218
-
219
-
220
-
221
-
222
-
223
-
224
-
225
-
226
-
227
-
228
-
229
-
230
-
231
-
232
-
233
-
234
-
235
-
236
-
237
-
238
-
239
-
240
-
241
-
242
-
243
-
244
-
245
-
246
 |
 |
