HP Visualize c3000 hp Visualize b1000 and c3000 workstations owner's guide (a4 - Page 187
Display, Monitor Configuration, Modify Monitor Type, Actions, the default, Modify, Monitor, Entry
 |
View all HP Visualize c3000 manuals
Add to My Manuals
Save this manual to your list of manuals |
Page 187 highlights
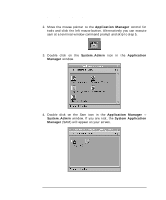
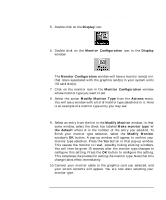
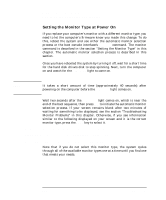
The Boot Console Interface Displaying and Setting the Monitor Type 5. Double click on the Display icon. 6. Double click on the Monitor Configuration icon in the Display window. The Monitor Configuration window will have a monitor icon(s) in it that is/are associated with the graphics card(s) in your system units I/O card slot(s). 7. Click on the monitor icon in the Monitor Configuration window whose monitor type you want to set. 8. Select the action Modify Monitor Type from the Actions menu. You will see a window with a list of monitor type selections in it. Here is an example of a monitor type entry you may see: Entry Width Height Hz Font Description 1 1280 1024 75 10x20 PCI 9. Select an entry from the list in the Modify Monitor window. In that same window, select the check box labeled Make monitor type 'n' the default where n is the number of the entry you selected. To finish your monitor type selection, select the Modify Monitor window's OK button. A pop-up window will appear to confirm your monitor type selection. Press the Yes button in that pop-up window. This causes the monitor to reset, possibly hiding existing windows. You will then be given 15 seconds after the monitor type changes to configure this setting. Press the OK button to configure the setting. This completes the process for setting the monitor type. Note that this change takes effect immediately. 10. Connect your monitor cable to the graphics card you selected, and your screen contents will appear. You are now done selecting your monitor type. Chapter 6 187
-
 1
1 -
2
-
3
-
4
-
5
-
6
-
7
-
8
-
9
-
10
-
11
-
12
-
13
-
14
-
15
-
16
-
17
-
18
-
19
-
20
-
21
-
22
-
23
-
24
-
25
-
26
-
27
-
28
-
29
-
30
-
31
-
32
-
33
-
34
-
35
-
36
-
37
-
38
-
39
-
40
-
41
-
42
-
43
-
44
-
45
-
46
-
47
-
48
-
49
-
50
-
51
-
52
-
53
-
54
-
55
-
56
-
57
-
58
-
59
-
60
-
61
-
62
-
63
-
64
-
65
-
66
-
67
-
68
-
69
-
70
-
71
-
72
-
73
-
74
-
75
-
76
-
77
-
78
-
79
-
80
-
81
-
82
-
83
-
84
-
85
-
86
-
87
-
88
-
89
-
90
-
91
-
92
-
93
-
94
-
95
-
96
-
97
-
98
-
99
-
100
-
101
-
102
-
103
-
104
-
105
-
106
-
107
-
108
-
109
-
110
-
111
-
112
-
113
-
114
-
115
-
116
-
117
-
118
-
119
-
120
-
121
-
122
-
123
-
124
-
125
-
126
-
127
-
128
-
129
-
130
-
131
-
132
-
133
-
134
-
135
-
136
-
137
-
138
-
139
-
140
-
141
-
142
-
143
-
144
-
145
-
146
-
147
-
148
-
149
-
150
-
151
-
152
-
153
-
154
-
155
-
156
-
157
-
158
-
159
-
160
-
161
-
162
-
163
-
164
-
165
-
166
-
167
-
168
-
169
-
170
-
171
-
172
-
173
-
174
-
175
-
176
-
177
-
178
-
179
-
180
-
181
-
 182
182 -
 183
183 -
 184
184 -
 185
185 -
 186
186 -
 187
187 -
 188
188 -
 189
189 -
 190
190 -
 191
191 -
 192
192 -
193
-
194
-
195
-
196
-
197
-
198
-
199
-
200
-
201
-
202
-
203
-
204
-
205
-
206
-
207
-
208
-
209
-
210
-
211
-
212
-
213
-
214
-
215
-
216
-
217
-
218
-
219
-
220
-
221
-
222
-
223
-
224
-
225
-
226
-
227
-
228
-
229
-
230
-
231
-
232
-
233
-
234
-
235
-
236
-
237
-
238
-
239
-
240
-
241
-
242
-
243
-
244
-
245
-
246
 |
 |
