HP Visualize c3000 hp Visualize b1000, c3000, c3600 workstations parts replace - Page 37
Removing and Replacing the Fan, Removing and Replacing the Speaker, Replacing the Fan and Speaker
 |
View all HP Visualize c3000 manuals
Add to My Manuals
Save this manual to your list of manuals |
Page 37 highlights
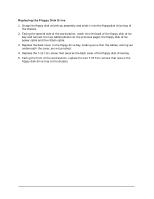
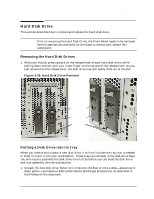
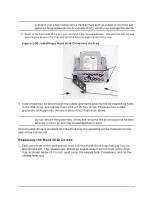
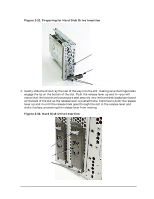
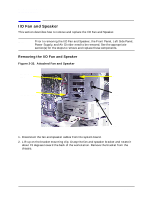
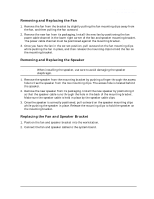
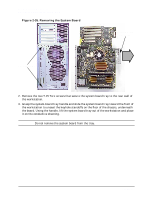
Parts Removal and Replacement I/O Fan and Speaker Removing and Replacing the Fan 1. Remove the fan from the bracket by slightly pulling the fan mounting clips away from the fan, and then pulling the fan outward. 2. Remove the new fan from its packaging. Install the new fan by positioning the fan power cable channel in the lower right corner of the fan and speaker mounting bracket. The power cable channel must be positioned against the mounting bracket. 3. Once you have the fan in the correct position, pull outward on the fan mounting clips while pushing the fan in place, and then release the mounting clips to hold the fan on the mounting bracket. Removing and Replacing the Speaker CAUTION When installing the speaker, use care to avoid damaging the speaker diaphragm. 1. Remove the speaker from the mounting bracket by pushing a finger through the access hole to free the speaker from the two mounting clips. The access hole is located behind the speaker. 2. Remove the new speaker from its packaging. Install the new speaker by positioning it so that the speaker cable runs through the hole in the back of the mounting bracket. Make sure the speaker cable is held in place by the speaker cable clips. 3. Once the speaker is correctly positioned, pull outward on the speaker mounting clips while pushing the speaker in place. Release the mounting clips to hold the speaker on the mounting bracket. Replacing the Fan and Speaker Bracket 1. Position the fan and speaker bracket into the workstation. 2. Connect the fan and speaker cables to the system board. Chapter 2 37
-
 1
1 -
2
-
3
-
4
-
5
-
6
-
7
-
8
-
9
-
10
-
11
-
12
-
13
-
14
-
15
-
16
-
17
-
18
-
19
-
20
-
21
-
22
-
23
-
24
-
25
-
26
-
27
-
28
-
29
-
30
-
31
-
 32
32 -
 33
33 -
 34
34 -
 35
35 -
 36
36 -
 37
37 -
 38
38 -
 39
39 -
 40
40 -
 41
41 -
 42
42 -
43
-
44
-
45
-
46
-
47
-
48
 |
 |