HP Vs15 HP w15e LCD Monitor - Page 22
Optimizing Digital Conversion, Identifying Monitor Conditions
 |
UPC - 829160547435
View all HP Vs15 manuals
Add to My Manuals
Save this manual to your list of manuals |
Page 22 highlights
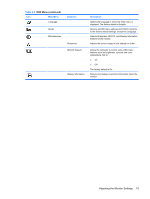
Optimizing Digital Conversion Two controls in the on-screen display can be adjusted to improve image performance: Pixel Clock and Phase. NOTE: The Pixel Clock and Phase controls are adjustable only when using an analog input. These controls are not adjustable for digital inputs. The Pixel Clock must first be set correctly since the Phase settings are dependent on the main Pixel Clock setting. Use these controls only when the auto-adjustment function does not provide a satisfactory image. ● Pixel Clock-Increases/decreases the value to minimize any vertical bars or stripes visible on the screen background. ● Phase-Increases/decreases the value to minimize video distortion or video jitter. NOTE: When using the controls, you will obtain the best results by using the auto-adjustment feature. When adjusting the Pixel Clock and Phase values, if the monitor images become distorted, continue adjusting the values until the distortion disappears. To restore the factory settings, select Yes from the Recall menu in the on-screen display. Identifying Monitor Conditions Special messages will appear on the monitor screen when identifying the following monitor conditions: ● Out of Range!-Indicates the monitor does not support the input signal because the resolution and/or refresh rate are set higher than the monitor supports. ● No Signal Detected!-Indicates the monitor is not receiving a video signal from the PC on the monitor video input connector. Check to determine if the PC or input signal source is off or in the power saving mode. ● Auto Adjusting...-Indicates the auto-adjustment function is active. ● Signal Cable Not Connected!-Indicates the video cable is not properly connected to the computer. ● Nonpreset Mode!-Indicates a non-preset timing is being used. 16 Chapter 4 Operating the Monitor
-
 1
1 -
2
-
3
-
4
-
5
-
6
-
7
-
8
-
9
-
10
-
11
-
12
-
13
-
14
-
15
-
16
-
 17
17 -
 18
18 -
 19
19 -
 20
20 -
 21
21 -
 22
22 -
 23
23 -
 24
24 -
 25
25 -
 26
26 -
 27
27 -
28
-
29
-
30
-
31
-
32
-
33
 |
 |
