HP Workstation x4000 hp workstation x4000 - Technical Reference manual - Windo - Page 165
Installing a Graphics Card, Removing the Graphics Card Retaining Screw
 |
View all HP Workstation x4000 manuals
Add to My Manuals
Save this manual to your list of manuals |
Page 165 highlights
Figure 10-12 Installing or Replacing Parts and Accessories Graphics Card Removing the Graphics Card Retaining Screw NOTE Installing a Graphics Card To install a graphics card: 1. If you are replacing an existing card, remove the current card (see page 162). 2. Unscrew and remove the rear slot panel that corresponds AGP Pro 110 4X connector. The screw you removed is used to retain the graphics card. If you are installing a full-length graphics card, you must remove the graphics board retaining screw near the front of the chassis as shown in Figure 10-13. Chapter 10 163
-
 1
1 -
2
-
3
-
4
-
5
-
6
-
7
-
8
-
9
-
10
-
11
-
12
-
13
-
14
-
15
-
16
-
17
-
18
-
19
-
20
-
21
-
22
-
23
-
24
-
25
-
26
-
27
-
28
-
29
-
30
-
31
-
32
-
33
-
34
-
35
-
36
-
37
-
38
-
39
-
40
-
41
-
42
-
43
-
44
-
45
-
46
-
47
-
48
-
49
-
50
-
51
-
52
-
53
-
54
-
55
-
56
-
57
-
58
-
59
-
60
-
61
-
62
-
63
-
64
-
65
-
66
-
67
-
68
-
69
-
70
-
71
-
72
-
73
-
74
-
75
-
76
-
77
-
78
-
79
-
80
-
81
-
82
-
83
-
84
-
85
-
86
-
87
-
88
-
89
-
90
-
91
-
92
-
93
-
94
-
95
-
96
-
97
-
98
-
99
-
100
-
101
-
102
-
103
-
104
-
105
-
106
-
107
-
108
-
109
-
110
-
111
-
112
-
113
-
114
-
115
-
116
-
117
-
118
-
119
-
120
-
121
-
122
-
123
-
124
-
125
-
126
-
127
-
128
-
129
-
130
-
131
-
132
-
133
-
134
-
135
-
136
-
137
-
138
-
139
-
140
-
141
-
142
-
143
-
144
-
145
-
146
-
147
-
148
-
149
-
150
-
151
-
152
-
153
-
154
-
155
-
156
-
157
-
158
-
159
-
 160
160 -
 161
161 -
 162
162 -
 163
163 -
 164
164 -
 165
165 -
 166
166 -
 167
167 -
 168
168 -
 169
169 -
 170
170 -
171
-
172
-
173
-
174
-
175
-
176
-
177
-
178
-
179
-
180
-
181
-
182
-
183
-
184
-
185
-
186
-
187
-
188
-
189
-
190
-
191
-
192
-
193
-
194
-
195
-
196
-
197
-
198
-
199
-
200
-
201
-
202
-
203
-
204
-
205
-
206
-
207
-
208
-
209
-
210
-
211
-
212
-
213
-
214
-
215
-
216
-
217
-
218
-
219
-
220
-
221
-
222
-
223
-
224
-
225
-
226
-
227
-
228
-
229
-
230
-
231
-
232
-
233
-
234
-
235
-
236
-
237
-
238
 |
 |
Installing or Replacing Parts and Accessories
Graphics Card
Chapter 10
163
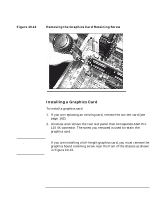
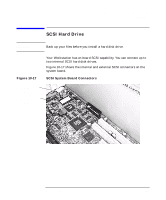
Figure 10-12
Removing the Graphics Card Retaining Screw
Installing a Graphics Card
To install a graphics card:
1.
If you are replacing an existing card, remove the current card (see
page 162).
2.
Unscrew and remove the rear slot panel that corresponds AGP Pro
110 4X connector. The screw you removed is used to retain the
graphics card.
NOTE
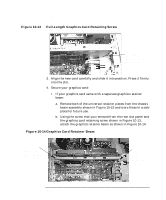
If you are installing a full-length graphics card, you must remove the
graphics board retaining screw near the front of the chassis as shown
in Figure 10-13.