HP Z3200 HP Designjet Z3200ps Photo Printer Series - User Guide [English] - Page 169
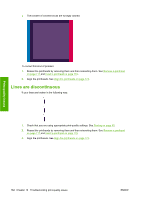
The image is incomplete (clipped at the bottom), The image is clipped
 |
UPC - 884420403371
View all HP Z3200 manuals
Add to My Manuals
Save this manual to your list of manuals |
Page 169 highlights
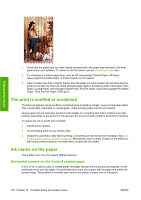
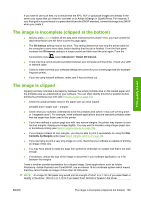
Print-quality issues If you have to use such files, try to ensure that the EPS, PDF or grayscale images are already in the same color space that you intend to use later on in Adobe InDesign or QuarkXPress. For instance, if your final goal is to print the job in a press that follows the SWOP standard, convert the image into SWOP when you create it. The image is incomplete (clipped at the bottom) ● Did you press Cancel before all the data were received by the printer? If so, you have ended the data transmission and will have to print the page again. ● The I/O timeout setting may be too short. This setting determines how long the printer waits for the computer to send more data, before deciding that the job is finished. From the front panel, increase the I/O timeout setting to a longer period and then send the print again. From the Connectivity menu , select Advanced > Select I/O timeout. ● There may be a communications problem between your computer and the printer. Check your USB or network cable. ● Check to make sure that your software settings are correct for your current page size (for example, long-axis prints). ● If you are using network software, make sure it has not timed out. The image is clipped Clipping normally indicates a discrepancy between the actual printable area on the loaded paper and the printable area as understood by your software. You can often identify this kind of problem before printing by previewing your print (see Preview a print on page 51). ● Check the actual printable area for the paper size you have loaded. printable area = paper size - margins ● Check what your software understands to be the printable area (which it may call "printing area" or "imageable area"). For example, some software applications assume standard printable areas that are larger than those used in this printer. ● If you have defined a custom page size with very narrow margins, the printer may impose its own minimal margins, clipping your image slightly. You may want to consider using a larger paper size, or borderless printing (see Select margins options on page 49). ● If your image contains its own margins, you may be able to print it successfully by using the Clip Contents by Margins option (see Select margins options on page 49). ● If you are trying to print a very long image on a roll, check that your software is capable of printing an image of that size. ● You may have asked to rotate the page from portrait to landscape on a paper size that is not wide enough. ● If necessary, reduce the size of the image or document in your software application, so it fits between the margins. There is another possible explanation for a clipped image. Some applications, such as Adobe Photoshop, Adobe Illustrator and CorelDRAW, use an internal 16-bit coordinate system which means that they cannot handle an image of more than 32,768 pixels. NOTE: An image 32,768 pixels long would print at a length of 54.61 in or 1.39 m if you select Best or Quality in the driver, 109.23 in or 2.78 m if you select Fast, Normal or Speed in the driver. ENWW The image is incomplete (clipped at the bottom) 159
-
 1
1 -
2
-
3
-
4
-
5
-
6
-
7
-
8
-
9
-
10
-
11
-
12
-
13
-
14
-
15
-
16
-
17
-
18
-
19
-
20
-
21
-
22
-
23
-
24
-
25
-
26
-
27
-
28
-
29
-
30
-
31
-
32
-
33
-
34
-
35
-
36
-
37
-
38
-
39
-
40
-
41
-
42
-
43
-
44
-
45
-
46
-
47
-
48
-
49
-
50
-
51
-
52
-
53
-
54
-
55
-
56
-
57
-
58
-
59
-
60
-
61
-
62
-
63
-
64
-
65
-
66
-
67
-
68
-
69
-
70
-
71
-
72
-
73
-
74
-
75
-
76
-
77
-
78
-
79
-
80
-
81
-
82
-
83
-
84
-
85
-
86
-
87
-
88
-
89
-
90
-
91
-
92
-
93
-
94
-
95
-
96
-
97
-
98
-
99
-
100
-
101
-
102
-
103
-
104
-
105
-
106
-
107
-
108
-
109
-
110
-
111
-
112
-
113
-
114
-
115
-
116
-
117
-
118
-
119
-
120
-
121
-
122
-
123
-
124
-
125
-
126
-
127
-
128
-
129
-
130
-
131
-
132
-
133
-
134
-
135
-
136
-
137
-
138
-
139
-
140
-
141
-
142
-
143
-
144
-
145
-
146
-
147
-
148
-
149
-
150
-
151
-
152
-
153
-
154
-
155
-
156
-
157
-
158
-
159
-
160
-
161
-
162
-
163
-
 164
164 -
 165
165 -
 166
166 -
 167
167 -
 168
168 -
 169
169 -
 170
170 -
 171
171 -
 172
172 -
 173
173 -
 174
174 -
175
-
176
-
177
-
178
-
179
-
180
-
181
-
182
-
183
-
184
-
185
-
186
-
187
-
188
-
189
-
190
-
191
-
192
-
193
-
194
-
195
-
196
-
197
-
198
-
199
-
200
-
201
-
202
-
203
-
204
-
205
 |
 |
