HP Z3200 HP Designjet Z3200ps Photo Printer Series - User Guide [English] - Page 183
Reinsert printheads procedure, Image Quality Maintenance menu procedure
 |
UPC - 884420403371
View all HP Z3200 manuals
Add to My Manuals
Save this manual to your list of manuals |
Page 183 highlights
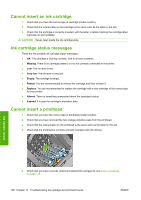
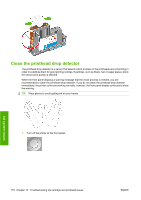
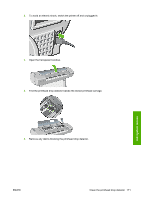
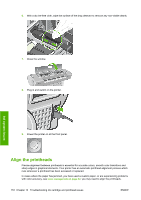
NOTE: If the paper has jammed, it is recommended that you reinsert the printheads and initiate the realignment procedure with the Image Quality Maintenance menu . TIP: Photo paper is recommended for the best quality; plain, bond and thin coated papers provide acceptable but marginal results. Do not use transparent or semi-transparent paper to align the printheads. Reinsert printheads procedure 1. If the realignment process is running and the wrong paper is loaded, press the Cancel key on the front panel. Do not print if the realignment process has been canceled. You can restart the alignment with the Image Quality Maintenance menu procedure. 2. Load the paper you wish to use, see Paper handling on page 25. You can use a roll or cut sheet, however, it must be A3 landscape or larger (420 by 297 mm). Photo paper is recommended for the best results. NOTE: If you are using an A3 cut sheet, ensure it is loaded so the larger side feeds into the printer. Do not use transparent or semi-transparent paper to align the printheads. 3. Remove and re-insert all the printheads, see Remove a printhead on page 117 and Insert a printhead on page 119. This starts the printhead alignment procedure. 4. Ensure the transparent window is closed, as a strong light source near the printer during printhead realignment can affect alignment. Ink system issues 5. The process takes about six minutes. Wait until the front-panel display shows the process complete before using the printer. NOTE: The printer prints a calibration image. Do not worry about the image. The front-panel display shows any errors in the process. Image Quality Maintenance menu procedure 1. Load the paper you wish to use, see Paper handling on page 25. You can use a roll or cut sheet, however, it must be A3 landscape or larger (420 by 297 mm). Photo paper is recommended for the best results; plain, bond and thin coated papers provide acceptable but marginal results. NOTE: If you are using an A3 cut sheet, ensure it is loaded so the larger side feeds into the printer. Do not use transparent or semi-transparent paper to align the printheads. 2. From the front panel, select the Image Quality Maintenance menu icon , then Align printheads. The printer checks to see if it has enough paper to run the realignment. ENWW Align the printheads 173
-
 1
1 -
2
-
3
-
4
-
5
-
6
-
7
-
8
-
9
-
10
-
11
-
12
-
13
-
14
-
15
-
16
-
17
-
18
-
19
-
20
-
21
-
22
-
23
-
24
-
25
-
26
-
27
-
28
-
29
-
30
-
31
-
32
-
33
-
34
-
35
-
36
-
37
-
38
-
39
-
40
-
41
-
42
-
43
-
44
-
45
-
46
-
47
-
48
-
49
-
50
-
51
-
52
-
53
-
54
-
55
-
56
-
57
-
58
-
59
-
60
-
61
-
62
-
63
-
64
-
65
-
66
-
67
-
68
-
69
-
70
-
71
-
72
-
73
-
74
-
75
-
76
-
77
-
78
-
79
-
80
-
81
-
82
-
83
-
84
-
85
-
86
-
87
-
88
-
89
-
90
-
91
-
92
-
93
-
94
-
95
-
96
-
97
-
98
-
99
-
100
-
101
-
102
-
103
-
104
-
105
-
106
-
107
-
108
-
109
-
110
-
111
-
112
-
113
-
114
-
115
-
116
-
117
-
118
-
119
-
120
-
121
-
122
-
123
-
124
-
125
-
126
-
127
-
128
-
129
-
130
-
131
-
132
-
133
-
134
-
135
-
136
-
137
-
138
-
139
-
140
-
141
-
142
-
143
-
144
-
145
-
146
-
147
-
148
-
149
-
150
-
151
-
152
-
153
-
154
-
155
-
156
-
157
-
158
-
159
-
160
-
161
-
162
-
163
-
164
-
165
-
166
-
167
-
168
-
169
-
170
-
171
-
172
-
173
-
174
-
175
-
176
-
177
-
 178
178 -
 179
179 -
 180
180 -
 181
181 -
 182
182 -
 183
183 -
 184
184 -
 185
185 -
 186
186 -
 187
187 -
 188
188 -
189
-
190
-
191
-
192
-
193
-
194
-
195
-
196
-
197
-
198
-
199
-
200
-
201
-
202
-
203
-
204
-
205
 |
 |