HP Z800 HP xw8600, xw9400 and Z800 Workstations - Nvidia Quadro FX5800 Graphic - Page 7
Step 4—Connecting the power, Step 5—Installing the card support, HP xw8600 and xw9400 Workstations
 |
UPC - 884962082454
View all HP Z800 manuals
Add to My Manuals
Save this manual to your list of manuals |
Page 7 highlights
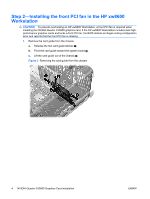
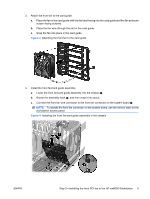
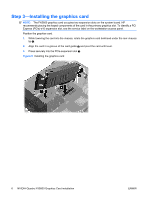
Step 4-Connecting the power 1. Close the expansion slot retention clamp to secure the card in the slot . 2. Connect the 6-to-8 pin auxiliary power adapter cable, supplied with this kit, to the workstation auxiliary power supply 2, and then to the FX5800 card . NOTE: No connection is made at point . If a label covers the outlet at , do not remove it. Figure 6 Installing the 6-to-8 pin power adapter cable Step 5-Installing the card support HP xw8600 and xw9400 Workstations To prepare and install the card support bracket: 1. Insert an additional arm in the card support , if applicable. 2. Slide the arm back to lock it into place 2. 3. Hook the support bracket in the openings along the edge of the rear of the chassis . 4. Compress the spring of the support arm until the arm locks into place . Figure 7 Installing a card support (HP xw8600 and xw9400 Workstations) ENWW Step 4-Connecting the power 7
-
 1
1 -
 2
2 -
 3
3 -
 4
4 -
 5
5 -
 6
6 -
 7
7 -
 8
8
 |
 |
