HP s5160f Upgrade and Service - Page 42
Caution, Important - motherboard
 |
UPC - 884420975267
View all HP s5160f manuals
Add to My Manuals
Save this manual to your list of manuals |
Page 42 highlights
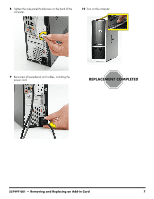
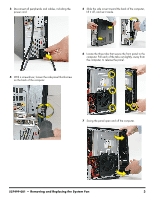
8 Locate the CD/DVD drive in its cage, and the fan below it. CAUTION: Note there are two fans in the computer. For this procedure, you remove the system fan directly below the drive cage (shown in the rectangle), not the processor fan to the left (shown with the circle and X). 10 Push in the metal tab (1) above the fan as you tip out the top of the fan (2), and lift the fan (3) partway out of the computer. 1 2 9 Remove the system fan screw. 3 11 Trace the system fan cable (1) to the motherboard, disconnect it (2), and set the fan aside. Write down where it was connected so you have that information when you install the new fan. IMPORTANT: Recording the plug location and orientation helps ensure you correctly install the replacement fan. 2 1 4 537499-001 - Removing and Replacing the System Fan
-
 1
1 -
2
-
3
-
4
-
5
-
6
-
7
-
8
-
9
-
10
-
11
-
12
-
13
-
14
-
15
-
16
-
17
-
18
-
19
-
20
-
21
-
22
-
23
-
24
-
25
-
26
-
27
-
28
-
29
-
30
-
31
-
32
-
33
-
34
-
35
-
36
-
 37
37 -
 38
38 -
 39
39 -
 40
40 -
 41
41 -
 42
42 -
 43
43 -
 44
44 -
 45
45 -
 46
46 -
 47
47 -
48
-
49
-
50
-
51
-
52
-
53
-
54
-
55
-
56
 |
 |
