Hitachi CR13VA Instruction Manual - Page 11
Dismounting the blade
 |
UPC - 717709005617
View all Hitachi CR13VA manuals
Add to My Manuals
Save this manual to your list of manuals |
Page 11 highlights
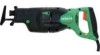
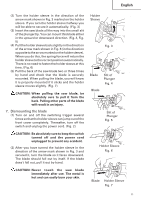
English (2) Turn the holder sleeve in the direction of the arrow mark shown in Fig. 3 marked on the holder sleeve. If you turn the holder sleeve halfway you will be able to secure it automatically. (Fig. 3) (3) Insert the saw blade all the way into the small slit of the plunger tip. You can mount this blade either in the upward or downward direction. (Fig. 4, Fig. 5) (4) Pull the holder sleeve back slightly in the direction of the arrow mark shown in Fig. 6 (in the direction opposite to the arrow marked on the holder sleeve). When you do this, the spring force will return the holder sleeve to the correct position automatically. There is no need to fasten the holder sleeve at this time. (Fig. 6) (5) Pull the back of the saw blade two or three times by hand and check that the blade is securely mounted. When pulling the blade, you will know it is properly mounted if it clicks and the holder sleeve moves slightly. (Fig. 7) CAUTION: When pulling the saw blade, be absolutely sure to pull it from the back. Pulling other parts of the blade will result in an injury. 7. Dismounting the blade (1) Turn on and off the switching trigger several times so that the holder sleeve can jump out of the front cover completely. Thereafter, turn off the switch and unplug the power cord. (Fig. 2) CAUTION: Be absolutely sure to keep the switch turned off and the power cord unplugged to prevent any accident. (2) After you have turned the holder sleeve in the direction of the arrow mark shown in Fig. 3 and secured it, turn the blade so it faces downward. The blade should fall out by itself. If the blade does't fall out, pull it out by hand. CAUTION: Never touch the saw blade immediately after use. The metal is hot and can easily burn your skin. Holder Sleeve Fig. 3 Blade Slit of Plunger Fig. 4 Blade Slit of Plunger Fig. 5 Holder Sleeve Fig. 6 Blade Holder Sleeve Fig. 7 11
-
 1
1 -
2
-
3
-
4
-
5
-
 6
6 -
 7
7 -
 8
8 -
 9
9 -
 10
10 -
 11
11 -
 12
12 -
 13
13 -
 14
14 -
 15
15 -
 16
16 -
17
-
18
-
19
-
20
-
21
-
22
-
23
-
24
-
25
-
26
-
27
-
28
-
29
-
30
-
31
-
32
-
33
-
34
-
35
-
36
-
37
-
38
-
39
-
40
-
41
-
42
-
43
-
44
-
45
-
46
-
47
-
48
-
49
-
50
-
51
-
52
-
53
-
54
-
55
-
56
-
57
-
58
-
59
-
60
 |
 |
