Hitachi DH40MRY Instruction Manual - Page 7
Assembly And Operation - specifications
 |
UPC - 717709012141
View all Hitachi DH40MRY manuals
Add to My Manuals
Save this manual to your list of manuals |
Page 7 highlights
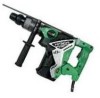
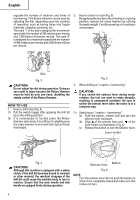
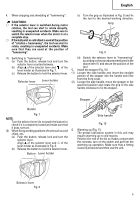
SPECIFICATIONS Motor Power Source Current Capacity No-Load Speed Full-load Blow Weight Single-Phase, Series Commutator Motor. Single-Phase, 120 V 60 Hz 9.2 A Drill Bit: 1-9/16" (40 mm) Core Bit: 4-1/8" (105 mm) 240 - 480/min 1,320 - 2,650/min 15.0 lbs (6.8 kg) English ASSEMBLY AND OPERATION APPLICATIONS Rotation and hammering function ⅜ Drilling anchor holes ⅜ Drilling holes in concrete Hammering function only ⅜ Crushing concrete, chipping, digging, and squaring (by applying optional accessories) PRIOR TO OPERATION 1. Power source Ensure that the power source to be utilized conforms to the power source requirements specified on the product nameplate. 2. Power switch Ensure that the switch is in the OFF position. If the plug is connected to a receptacle while the switch is in the ON position, the power tool will start operating immediately and can cause serious injury. 3. Extension cord When the work area is far away from the power source, use an extension cord of sufficient thickness and rated capacity. The extension cord should be kept as short as practicable. WARNING: Damaged cord must be replaced or repaired. 5. Confirming condition of the environment: Confirm that the work site is placed under appropriate conditions conforming to prescribed precautions. 6. How to install tool CAUTION: For tools such as a drill bit and a bull point, use only Hitachi genuine parts. (1) Clean, then smear the tool shank with the grease provided in the green tube. (2) To attach the tool (SDS max shank), insert it into the hole until it contacts the innermost end of the hole as illustrated in Fig. 2. If you continue to turn the tool with slight pressure, you can feel a spot where there is a hitch. At that spot, pull the grip to the direction of an arrow mark and insert the tool all the way until it hits the innermost end. Releasing the grip reverts the grip and secures the tool in place. Tool Grip Fig. 2 4. Check the receptacle If the receptacle only loosely accepts the plug, the (3) Pull the tool to make sure it is locked completely. receptacle must be repaired. Contact a licensed (4) To remove the tool, fully pull the grip in the electrician to make appropriate repairs. direction of the arrow and pull out the tool. If such a fautly receptacle is used, it may cause 7. Regulating the number of rotations and overheating, resulting in a serious hazard. hammering (Fig. 3) This Rotary Hammer is equipped with a built-in electronic control circuit that can adjust and 7
-
 1
1 -
 2
2 -
 3
3 -
 4
4 -
 5
5 -
 6
6 -
 7
7 -
 8
8 -
 9
9 -
 10
10 -
 11
11 -
 12
12 -
13
-
14
-
15
-
16
-
17
-
18
-
19
-
20
-
21
-
22
-
23
-
24
-
25
-
26
-
27
-
28
-
29
-
30
-
31
-
32
-
33
-
34
-
35
-
36
-
37
-
38
-
39
-
40
-
41
-
42
-
43
-
44
-
45
-
46
-
47
-
48
 |
 |
