Hitachi DV-P543U Owners Guide - Page 6
Fig. 1], Fig. 2]
 |
View all Hitachi DV-P543U manuals
Add to My Manuals
Save this manual to your list of manuals |
Page 6 highlights
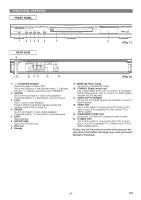
FUNCTIONAL OVERVIEW FRONT PANEL 1 2345 6 7 REAR VIEW 9 8 [Fig. 1] 10 11 12 13 14 [Fig. 2] 1. y/I (POWER/STANDBY) Switch the player to ON or OFF. (As to the indication of the Operate switch, "I" indicates ON and "y" indicates electrical power STANDBY). 2. SKIP/FR Go to previous chapter or track during playback. Press and hold for 1.5 seconds for a reverse search. 3. PLAY Start or resume disc playback. Press to switch progressive scanning mode and interlace mode. (refer to page 5) 4. FF/SKIP Go to next chapter or track during playback. Press and hold for 1.5 seconds for a forward search. 5. STOP Stop playback. 6. OPEN/CLOSE Open/close the disc tray. 7. Disc tray 8. Display 9. MAIN (AC Power Cord) Connect to a standard AC outlet. 10. COAXIAL (Digital audio out) Use coaxial digital audio out to connect to a compatible Dolby Digital receiver. Use to connect to a Dolby Digital decoder or DTS decoder. 11. AUDIO OUT (Left/Right) Connect to the AUDIO inputs of an amplifier, receiver or stereo system. 12. VIDEO OUT Use a video cable to connect one of the jack to Video input on your A/V-compatible TV, wide screen TV, or Stereo system. 13. COMPONENT VIDEO OUT Connect to a TV with the Component video in jacks. 14. S-VIDEO OUT Use S-Video cable to connect this jack to the S-Video jack on your A/V-compatible TV or wide screen TV for a higher quality picture. Caution: Do not touch the inner pins of the jacks on the rear panel. Electrostatic discharge may cause permanent damage to the player. -6- EN
-
 1
1 -
 2
2 -
 3
3 -
 4
4 -
 5
5 -
 6
6 -
 7
7 -
 8
8 -
 9
9 -
 10
10 -
 11
11 -
 12
12 -
13
-
14
-
15
-
16
-
17
-
18
-
19
-
20
-
21
-
22
-
23
-
24
 |
 |
