Hitachi G23SR Instruction Manual - Page 12
Wheel Assembly and Disassembly. - angle grinder
 |
View all Hitachi G23SR manuals
Add to My Manuals
Save this manual to your list of manuals |
Page 12 highlights
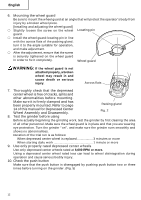
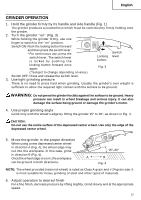
English 6. Mounting the wheel guard Be sure to mount the wheel guard at an angle that will protect the operator's body from injury by a broken wheel piece. [Installing and adjusting the wheel guard] ⅜ Slightly loosen the screw on the wheel Locating pin guard. ⅜ Install the wheel-guard-locating pin in line with the across flats of the packing gland, turn it to the angle suitable for operation, and make adjustment. ⅜ After the adjustment, ensure that the screw is securely tightened on the wheel guard in order to fix it completely. Wheel guard WARNING: If the wheel guard is not attached properly, a broken wheel may result in and cause death or serious injury. Across flats 7. Thoroughly check that the depressed center wheel is free of cracks, splits and other abnomalities before mounting. Make sure it is firmly clamped and has been properly mounted. Refer to page Packing gland 14 of this manual for Depressed Center Wheel Assembly and Disassembly. Fig. 2 8. Test the grinder before using Before actually beginning the grinding work, test the grinder by first clearing the area of all other personnel. Make sure the wheel guard is in place and that you are wearing eye protection. Turn the grinder "on", and make sure the grinder runs smoothly and shows no abnormalities. Duration of the trial run is as follows: When depressed center wheel is replaced 3 minutes or more When starting daily work 1 minute or more 9. Use only properly rated depressed center wheels Use only depressed center wheels rated at 6,600 RPM or more. Using a depressed center wheel rated less can lead to wheel disintegration during operation and cause serious bodily injury. 10. Check the push button Make sure that the push button is disengaged by pushing push button two or three times before turning on the grinder. (Fig. 5) 12
-
 1
1 -
2
-
3
-
4
-
5
-
6
-
 7
7 -
 8
8 -
 9
9 -
 10
10 -
 11
11 -
 12
12 -
 13
13 -
 14
14 -
 15
15 -
 16
16 -
 17
17 -
18
-
19
-
20
-
21
-
22
-
23
-
24
-
25
-
26
-
27
-
28
-
29
-
30
-
31
-
32
-
33
-
34
-
35
-
36
-
37
-
38
-
39
-
40
-
41
-
42
-
43
-
44
-
45
-
46
-
47
-
48
-
49
-
50
-
51
-
52
 |
 |
