Hitachi WH18DFL Instruction Manual - Page 11
Assembly And Operation - battery
 |
UPC - 717709012752
View all Hitachi WH18DFL manuals
Add to My Manuals
Save this manual to your list of manuals |
Page 11 highlights
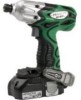
English ASSEMBLY AND OPERATION APPLICATIONS ⅜ Driving and removing of small screws, small bolts, etc. 1. Insert the plug of battery charger into the receptacle. When the plug of battery charger has been inserted into the receptacle, the charge status lamp will REMOVAL AND INSTALLATION METHOD blink in red. (At 1-second intervals) OF BATTERY ⅜ How to install the battery. Align the battery with the groove in tool handle and slip it into place. Always insert it all the way until it locks in place WARNING: Do not use the electrical cord if damaged. Have it repaired immediately. with a little click, If not, it may accidentally fall out of the tool, causing injury to you or someone around you (Fig. 3). ⅜ How to remove the battery. Withdraw battery from the tool handle while pressing the latch (2 pcs) of the battery (Fig. 3). 2. Insert the battery to the battery charger. Insert the battery into the battery charger as shown in Fig. 4. Make sure it contacts the bottom of the battery charger. Handle Insert Latch Battery Charge status lamp (red) Overheat lamp (green) Pull out Push Fig. 3 Battery Fig. 4 CHARGING METHOD NOTE: Before plugging into the receptacle, make sure the following points. ⅜ The power source voltage is stated on the nameplate. ⅜ The cord is not damaged. WARNING: Do not charge at voltage higher than indicated on the nameplate. If charged at voltage higher than indicated on the nameplate, the charger will burn out. 3. Charging ⅜ When the battery is connected to the battery charger, charging will commence and the charge status lamp will light in red. (See Table 2) NOTE: If the charge status lamp flikers in red, pull out the plug from the receptacle and check if the battery is properly mounted. 11
-
 1
1 -
2
-
3
-
4
-
5
-
 6
6 -
 7
7 -
 8
8 -
 9
9 -
 10
10 -
 11
11 -
 12
12 -
 13
13 -
 14
14 -
 15
15 -
 16
16 -
17
-
18
-
19
-
20
-
21
-
22
-
23
-
24
-
25
-
26
-
27
-
28
-
29
-
30
-
31
-
32
-
33
-
34
-
35
-
36
-
37
-
38
-
39
-
40
-
41
-
42
-
43
-
44
-
45
-
46
-
47
-
48
-
49
-
50
-
51
-
52
-
53
-
54
-
55
-
56
 |
 |
