Hitachi X1250 User Manual
Hitachi X1250 - XGA LCD Projector Manual
 |
UPC - 050585150638
View all Hitachi X1250 manuals
Add to My Manuals
Save this manual to your list of manuals |
Hitachi X1250 manual content summary:
- Hitachi X1250 | User Manual - Page 1
TEMP LAMP STANDBY/ON LENS SHIFT BNG COMPONENT S-VIDEO VIDEO MENU INTER RESET FOCUS ZOOM RGB M1-D INPUT KEYSTONE SEARCH Projector CP-X1200/CP-X1250 User's Manual - Operating Guide Thank you for purchasing this projector. WARNING Before using, read the "User's Manual - Safety Guide" and - Hitachi X1250 | User Manual - Page 2
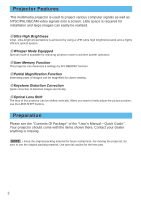
User's Manual - Quick Guide". Your projector should come with the items shown there. Contact your dealer anything is missing. NOTE • Keep the original packing material for future reshipment. For moving the projector, be sure to use the original packing material. Use special caution for the lens part - Hitachi X1250 | User Manual - Page 3
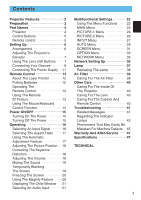
OPTION Menu 33 NETWORK Menu 35 Network Setting Up 36 Lamp 37 Replacing The Lamp ʜʜʜʜʜ38 Air Filter 39 Caring For The Air Filterʜʜʜʜ39 Other Care 40 Caring For The Inside Of The Projector 40 Caring For The Lens ʜʜʜʜʜ40 Caring For The Cabinet And Remote Control 40 Troubleshooting 41 Related - Hitachi X1250 | User Manual - Page 4
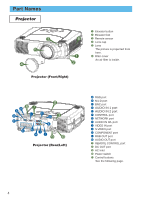
projected from here. 6 Filter cover An air filter is inside. Projector (Front/Right) - AB 8 7 D L F LENS SHIFT COMPONENTBNG S-VIDEO RGB M1-D INPUT INTER KEYSTONE SEARCH RESET VIDEO STANDBY/ON MENU TEMP LAMP G FOCUS ZOOM 3 E AUDIO IN1 REMOTE CONTROL CONTROL NETWORK AUDIO IN2 RGB - Hitachi X1250 | User Manual - Page 5
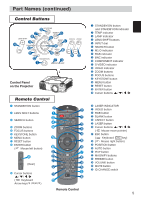
u VIDEO = STANDBY/ON 1 23 TEMP LAMP FOCUS w ZOOM q TEMP LAMP STANDBY/ON LENS SHIFT BNG COMPONENT S-VIDEO VIDEO MENU INTER RESET FOCUS ZOOM RGB M1-D INPUT KEYSTONE SEARCH Control Panel on the Projector Remote Control 1 STANDBY/ON button 4 LENS SHIFT buttons 6 SEARCH button q ZOOM - Hitachi X1250 | User Manual - Page 6
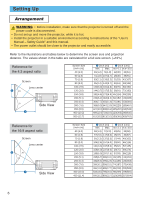
projector, while it is hot. • Install the projector in a suitable environment according to instructions of the "User's Manual - Safety Guide" and this manual. • The power outlet should be close to the projector ) Reference for the 16:9 aspect ratio Screen Lens center b m n a Side View Screen - Hitachi X1250 | User Manual - Page 7
The lens of this projector can be shifted vertically. When you want to finely adjust the picture position, use the LENS SHIFT buttons of the projector. LENS SHIFT LENS SHIFT buttons Projector LASER INDICATOR STANDBY/ON VIDEO RGB ++ LENS SHIFT FOCUS -- + ZOOM - BLANK ASPECT LASER Remote control - Hitachi X1250 | User Manual - Page 8
other devices to the projector, read thoroughly the "User's Manual - Safety Guide", this manual and the manual of each device to the new resolution on Windows. Then the resolution will go back to the original. It might be recommended to use other CRT or TFT monitors to change the resolution. NOTE - Hitachi X1250 | User Manual - Page 9
. See the rear of the projector. You can see the ports. Examples of connection with a computer LENS SHIFT COMPONENTBNG S-VIDEO RGB M1-D INPUT INTER KEYSTONE SEARCH RESET VIDEO STANDBY/ON MENU TEMP LAMP FOCUS ZOOM AUDIO IN1 REMOTE CONTROL CONTROL NETWORK AUDIO IN2 RGB RGB OUT R/CR - Hitachi X1250 | User Manual - Page 10
Player Projector Audio out (R) Audio out (L) Video out R-AUDIO IN-L VIDEO R-AUDIO IN AUDIO IN-L H VIDEO IN I ■ If using a s-video signal S-video out S-video cable J S -VIDEO Audio out (R) Audio out (L) R-AUDIO IN-L VIDEO R-AUDIO IN H AUDIO IN-L AUDIO IN1 REMOTE CONTROL CONTROL NETWORK - Hitachi X1250 | User Manual - Page 11
cord to the AC inlet of the projector. 2 Firmly plug the power cord's plug into the outlet. LENS SHIFT COMPONENTBNG S-VIDEO RGB M1-D INPUT INTER KEYSTONE SEARCH RESET VIDEO STANDBY/ON MENU TEMP LAMP FOCUS ZOOM AUDIO IN1 REMOTE CONTROL CONTROL NETWORK AUDIO IN2 RGB RGB OUT R/CR/PR - Hitachi X1250 | User Manual - Page 12
VIDEO RGB + STANDBY/ON ZOOM + - + - - LENS SHIFT FOCUS ASPECT LASER BLANK NEXT PREVIOUS ENTER INTERLINK ELECTRONICS JQA P S C MADE IN CHINA MENU AUTO ESPCOSITMIOANGNOFNRYOESFEFPTinFPREKEEZYVESOTLOUNMMEEUTSEEARCH 1 2 3 ID CHANGE This remote control has a laser pointer in place - Hitachi X1250 | User Manual - Page 13
KEYSTONE SEARCH RESET MENU M1-D INPUT TEMP LAMP INTER RGB LENS SHIFT BNG COMPONENT S-VIDEO STANDBY/ON VIDEO LENS SHIFT COMPONENTBNG S-VIDEO RGB M1-D INPUT INTER KEYSTONE SEARCH RESET VIDEO STANDBY/ON MENU TEMP LAMP FOCUS ZOOM AUDIO IN1 REMOTE CONTROL CONTROL NETWORK AUDIO IN2 - Hitachi X1250 | User Manual - Page 14
. memo The USB control can be used with Windows 95 OSR 2.1 or higher. It may not be possible to use the remote control, depending on the computer's configurations and mouse drivers. memo The function can be used only for the functions illustrated on the right. memo The projector would be enumerated - Hitachi X1250 | User Manual - Page 15
will begin blanking orange. Then the STANDBY/ON indicator will stop blinking LENS SHIFT COMPONENTBNG S-VIDEO RGB M1-D INPUT INTER KEYSTONE SEARCH RESET VIDEO STANDBY/ON MENU TEMP LAMP FOCUS ZOOM AUDIO IN1 REMOTE CONTROL CONTROL NETWORK AUDIO IN2 RGB RGB OUT AUDIO OUT CR/PR Ca/Pa - Hitachi X1250 | User Manual - Page 16
button Press the SEARCH button of the projector or the remote control. Pressing the button automatically cycles through input LENS SHIFT COMPONENTBNG S-VIDEO RGB M1-D INPUT INTER KEYSTONE SEARCH RESET VIDEO STANDBY/ON MENU TEMP LAMP FOCUS ZOOM AUDIO IN1 REMOTE CONTROL CONTROL NETWORK - Hitachi X1250 | User Manual - Page 17
LENS SHIFT FOCUS -- + ZOOM - BLANK ASPECT LASER PREVIOUS NEXT ENTER ESC MENU POSITION RESET AUTO MAGNFY PinP VOLUME ON FREEZE MUTE OFF KEYSTONE SEARCH 1 2 3 ID CHANGE will be automatically adjusted. memo Make sure that the application window is set to its maximum size prior to attempting to use - Hitachi X1250 | User Manual - Page 18
a few seconds. LASER INDICATOR STANDBY/ON VIDEO RGB ++ LENS SHIFT FOCUS -- + ZOOM - BLANK ASPECT LASER PREVIOUS NEXT ENTER ESC MENU POSITION RESET AUTO MAGNFY PinP VOLUME ON FREEZE MUTE OFF KEYSTONE SEARCH 1 2 3 ID CHANGE Correcting The Keystone Distortion 1 Press the KEYSTONE button. As - Hitachi X1250 | User Manual - Page 19
seconds. VOLUME 16 LASER INDICATOR STANDBY/ON VIDEO RGB +++ LENS SHIFT FOCUS ZOOM --- BLANK ASPECT LASER PREVIOUS NEXT ENTER ESC MENU POSITION RESET AUTO MAGNFY PinP VOLUME ON FREEZE MUTE OFF KEYSTONE SEARCH 1 2 3 ID CHANGE MUTE button Temporarily Blanking The Screen 1 Press the BLANK button - Hitachi X1250 | User Manual - Page 20
finish if a remote control's button that changes some display state (ex. blanking the screen, displaying a dialog or a menu, adjusting the picture, changing the input signal) is pressed, or a button of projector is pressed. LASER INDICATOR STANDBY/ON VIDEO RGB ++ LENS SHIFT FOCUS -- + ZOOM - Hitachi X1250 | User Manual - Page 21
with a picture of a video signal will appear. 2 Press the PinP button again to change the size of the child window or close the window. Small child window Large child window LASER INDICATOR STANDBY/ON VIDEO RGB ++ LENS SHIFT FOCUS -- + ZOOM - BLANK ASPECT LASER PREVIOUS NEXT ENTER No child - Hitachi X1250 | User Manual - Page 22
AUTO SCREEN OPTION NETWORK : SELECT VOLUME SPEAKER IR REMOTE IR REMOTE ID LAMP TIME FILTER TIME SERVICE RESET 16 TURN ON ALL 1234 h 4321 h MENU MAIN PICTURE-1 PICTURE-2 INPUT AUTO SCREEN OPTION NETWORK : SELECT VOLUME SPEAKER IR REMOTE IR REMOTE ID LAMP TIME FILTER TIME SERVICE RESET 16 TURN ON - Hitachi X1250 | User Manual - Page 23
be performed. Perform each operation in accordance with the instructions in the table below. MENU MAIN PICTURE-1 PICTURE-2 INPUT AUTO SCREEN OPTION NETWORK : SELECT BRIGHT CONTRAST ASPECT WHISPER MIRROR LANGUAGE [Language] RESET +0 +0 4:3 NORMAL NORMAL ENGLISH Item BRIGHT CONTRAST ASPECT WHISPER - Hitachi X1250 | User Manual - Page 24
operation in accordance with the instructions in the table below. MENU MAIN PICTURE-1 PICTURE-2 INPUT AUTO SCREEN OPTION NETWORK : SELECT GAMMA COLOR BAL memo The R, G and B can be selected only when the : SELECT USER is selected under the COLOR TEMP. GAMMA GAMMA Adjust the gamma data using the - Hitachi X1250 | User Manual - Page 25
function.: LOAD1 LOAD2 LOAD3 LOAD4 MY MEMORY SAVE1 SAVE2 SAVE3 SAVE4 This projector has 4 numbered memories for adjustment data. Performing the SAVE1, SAVE2, the picture automatically depending on the data. RESET Select the EXECUTE using the button to reset the PICTURE-1 menu items. : EXECUTE - Hitachi X1250 | User Manual - Page 26
table below can INPUT AUTO H SIZE OVER SCAN 1344 95 be performed. Perform each operation in accordance with the SCREEN OPTION RESET instructions in the table below. NETWORK : SELECT memo This menu cannot be selected at a M1-D signal. Item V POSITION H POSITION V POSITION H SIZE OVER SCAN - Hitachi X1250 | User Manual - Page 27
, the items shown in the table below can be performed. Perform each operation in accordance with the instructions in the table below. MENU MAIN PICTURE-1 PICTURE-2 INPUT AUTO SCREEN OPTION NETWORK : SELECT COLOR SPACE AUTO COMPONENT COMPONENT VIDEO AUTO 3D-YCS TURN OFF VIDEO NR LOW P. INP - Hitachi X1250 | User Manual - Page 28
Window". Select the display position of the child window using the / buttons. : memo About the child window, please refer to the section "Displaying the Child Window". Select a signal input port to display just when the projector item. RESET Select the EXECUTE using the button to reset the INPUT - Hitachi X1250 | User Manual - Page 29
instructions in the table below. MENU MAIN PICTURE-1 PICTURE-2 INPUT AUTO SCREEN OPTION NETWORK : SELECT ADJUST POWER OFF POWER ON SEARCH RESET memo Make sure that the application window is set to its maximum size time is set to 1 to 99, the projector lamp will go off and the STANDBY/ON indicator - Hitachi X1250 | User Manual - Page 30
VIDEO button selects the COMPONENT port. memo If no signal is found or the projector is unstable to find an input signal at any of its ports, it will it was in prior to the search. Select the EXECUTE using the button to reset the AUTO menu items. : EXECUTE CANCEL The items of the AUTO menu are - Hitachi X1250 | User Manual - Page 31
instructions in the table below. MENU MAIN PICTURE-1 PICTURE-2 INPUT AUTO SCREEN OPTION NETWORK : SELECT BLANK BLACK START UP ORIGINAL MyScreen MyScreen SIZE x1 MyScreen LOCK TURN OFF MENU POSITION MESSAGE TURN ON RESET and the ORIGINAL screens will change to the BLACK screen after - Hitachi X1250 | User Manual - Page 32
of the "Detecting ..." The indication of the input signal by input change. The indication of the aspect ratio by changing the aspect ratio. The indication of "FOCUS" by adjusting the focus. Select the EXECUTE using the button to reset the SCREEN menu items. : EXECUTE CANCEL The items of the SCREEN - Hitachi X1250 | User Manual - Page 33
can be performed. Perform each operation in accordance with the instructions in the table below. MENU MAIN PICTURE-1 PICTURE-2 INPUT AUTO SCREEN OPTION NETWORK : SELECT VOLUME SPEAKER IR REMOTE IR REMOTE ID LAMP TIME FILTER TIME SERVICE RESET 16 TURN ON ALL 1234 h 4321 h Item VOLUME SPEAKER IR - Hitachi X1250 | User Manual - Page 34
SERVICE RESET Description Pressing the (or the ENTER) button calls the SERVICE menu. SERVICE Menu Select an item using the / buttons, and press the (or the ENTER) button to per form each function. : SERVICE FANSPEED AUTO ADJUST LENS TYPE LENS LOCK : SELECT FANSPEED AUTO ADJUST LENS TYPE LENS - Hitachi X1250 | User Manual - Page 35
section "Network Setting Up". MENU MAIN PICTURE-1 PICTURE-2 INPUT AUTO SCREEN OPTION NETWORK : SELECT SETUP DHCP INFORMATION RESET TURN NETWORK menu. NETWORK - SETUP IP ADRRESS 192 . 168 . 1 . 24 ESC :RETURN ENT :NEXT The IP Address is identification number of the projector on the Network. - Hitachi X1250 | User Manual - Page 36
Gateway and the DHCP (on/off) using a Web Browser of the computer connected to the Network. Although it needs a Web Browser of Internet Explorer 4.0 or higher. Input the same IP address as set to the projector, to the Web Browser of the computer connected to LAN. ex. Case of IP Address = 192 - Hitachi X1250 | User Manual - Page 37
there are electrical problems elsewhere besides the lamp. If this happens, contact your local dealer or a service representative. • Handle with care: jolting or scratching could cause the lamp bulb to burst during use. • If the indicators or a message prompts you to replace the lamp (see the section - Hitachi X1250 | User Manual - Page 38
prompts you to replace the lamp, replace the lamp as soon as possible. 1 Turn off the projector, and unplug the power cord. Allow the lamp bulb to cool for at least 45 minutes. 2 Contact your dealer to prepare a new lamp. Tell the dealer your lamp type number. If the projector is mounted on - Hitachi X1250 | User Manual - Page 39
the cleaned air filter or a new air filter, and replace the filter cover. Hold the release button of the air filter while 5 Turn on the projector power, and reset the filter timer. (1) While the projector running, press the MENU button to TEMP LAMP STANDBY/ON pulling out it. LENS SHIFT BNG - Hitachi X1250 | User Manual - Page 40
2 years. Caring For The Lens 1 Turn off the projector, and unplug the power cord. 2 Lightly wipe the lens with a commercially available lens-cleaning wipe. Do not touch the lens directly with your hand. Caring For The Cabinet And Remote Control 1 Turn off the projector, and unplug the power cord - Hitachi X1250 | User Manual - Page 41
your dealer or service company. memo Although these messages will be automatically disappeared around several minutes, it will be reappeared every time the power is turned on. Message CHANGE THE LAMP AFTER REPLACING LAMP, RESET THE LAMP TIMER. Description The time the lamp timer has counted - Hitachi X1250 | User Manual - Page 42
Troubleshooting (continued) Related Messages (continued) Message Description CLEAN THE AIR FILTER POWER OFF FIRST, THEN CLEAN THE AIR FILTER. AFTER CLEANING THE AIR FILTER, RESET THE FILTER TIMER. The time the filter timer has counted has reached 100 hours. Please clear or change the air filter - Hitachi X1250 | User Manual - Page 43
on again. • Is there blockage of the air passage aperture? • Is the air filter dirty? • Does the peripheral temperature exceed 35°C? If the same indication is displayed after the treatment, please change the lamp by referring to the section "Lamp". (This table is continued to the following page - Hitachi X1250 | User Manual - Page 44
Red It is time to clean the air filter, or there is no air filter. Please immediately turn the power OFF, and clean or change the air filter by referring to the section "Air Filter". After cleaning or changed the lamp, please be sure to reset the filter timer. After the treatment, resent the power - Hitachi X1250 | User Manual - Page 45
Troubleshooting (continued) Phenomena That May Easily Be Mistaken For Machine Defects WARNING • Never use the projector , contact your dealer or service company. Before requesting repair, projector has sufficiently cooled down, please make confirmation of the attachment state of the lamp and lamp - Hitachi X1250 | User Manual - Page 46
, or Perform picture adjustments by changing the COLOR BAL R, COLOR BAL Replace the lamp. 23 23 35, 36 Either the focus and/or horizontal phase settings are not Pictures appear properly. Adjust the focus using the focus buttons, and/or H PHASE using the 16 blurry. menu function. The lens - Hitachi X1250 | User Manual - Page 47
are subject to change without notice. Item Product name Liquid crystal panel Panel size Drive system Pixels Lens Lamp Speaker Power supply Power consumption Temperature range Size Weight (mass) Ports Optional Parts Lamp Air filter Others Specification Liquid crystal projector 2.5 cm - Hitachi X1250 | User Manual - Page 48
-
 1
1 -
 2
2 -
 3
3 -
 4
4 -
 5
5 -
 6
6 -
 7
7 -
8
-
9
-
10
-
11
-
12
-
13
-
14
-
15
-
16
-
17
-
18
-
19
-
20
-
21
-
22
-
23
-
24
-
25
-
26
-
27
-
28
-
29
-
30
-
31
-
32
-
33
-
34
-
35
-
36
-
37
-
38
-
39
-
40
-
41
-
42
-
43
-
44
-
45
-
46
-
47
-
48
 |
 |

1
Projector
CP-X1200/CP-X1250
CP-X1200/CP-X1250
User's Manual - Operating Guide
User's Manual - Operating Guide
Thank you for purchasing this projector.
TRADEMARK ACKNOWLEDGMENT :
• VGA and XGA are registered trademarks of the International Business Machines Corporation.
• Apple and Mac are registered trademarks of Apple Computer, Inc.
• VESA and SVGA are trademarks of the Video Electronics Standard Association.
• Windows is a registered trademark of Microsoft Corporation.
• Internet Explorer is a trademark of Microsoft Corporation.
All other trademarks are the property of their respective owners.
WARNING
Before using, read the "User's Manual - Safety Guide" and
these manuals to ensure correct usage through understanding. After reading,
store them in a safe place for future reference.
• The information in this manual is subject to change without notice.
• The manufacturer assumes no responsibility for any errors that may appear in this manual.
• The reproduction, transmission or use of this document or contents is not permitted without
express written authority.
NOTE