Honeywell CT3455 Owner's Manual - Page 11
Adjust System On-Time, Clock Display, As Required
 |
View all Honeywell CT3455 manuals
Add to My Manuals
Save this manual to your list of manuals |
Page 11 highlights
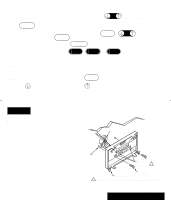
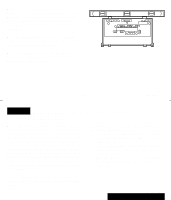
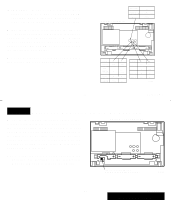
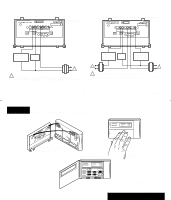
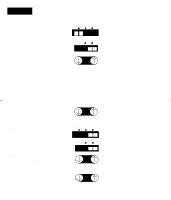
s Remove wallplate from wall, and drill 3/16 inch holes in wall (if drywall) as marked. For firmer material such as plaster or wood, drill 7/32 inch holes. Gently tap anchors (provided) into drilled holes until flush with the wall. s Reposition wallplate over holes, pulling wires through wiring opening. Loosely insert two mounting screws into holes. s Level for appearance only; thermostat functions properly even when not level. Tighten mounting screws. LEVEL M611B 17 69-0733-3 STEP 6 Adjust System On-Time, Clock Display, As Required s The thermostat on-time is factory-set for a warm air, gas or oil heating system. If you are installing it on another type of system, the ontime must be adjusted accordingly by setting screws 1A and 1B on the back of the thermostat, using the heating system table in the illustration as a guide. The system on-time should be optimized with the type of system to minimize room temperature swings. Setting the screw out one turn means turning the screw approximately 360° counterclockwise, or about one complete turn. First, turn both screws in completely, then adjust for system type: • Hot Water or High Efficiency-Set at the Gravity Air/Water setting (1A-out one turn, 1B-out one turn). • Gas/Oil Warm Air-Set at the Hot Water or High Efficiency setting (1A-leave in, 1B- out one turn). • Electric Warm Air-Leave at the Gas/ Oil Warm Air setting (1A-leave in, 1B- leave in). In the unlikely event that you want longer furnace on-time, readjust screws 1A and/or 1B as follows: 18 69-0733-3 INSTALLATION
-
 1
1 -
2
-
3
-
4
-
5
-
 6
6 -
 7
7 -
 8
8 -
 9
9 -
 10
10 -
 11
11 -
 12
12 -
 13
13 -
 14
14 -
 15
15 -
 16
16 -
17
-
18
-
19
-
20
 |
 |
