Honeywell CT3455 Owner's Manual - Page 4
Remove Old Thermostat
 |
View all Honeywell CT3455 manuals
Add to My Manuals
Save this manual to your list of manuals |
Page 4 highlights
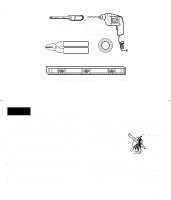
s Acquire tools and items as needed (below). CROSS-RECESSED SCREWDRIVER HAND OR POWER DRILL WITH 3/16 INCH DRILL BIT, IF NEEDED, TO DRILL HOLES IN WALL WIRE CUTTER/STRIPPER OR SHARP KNIFE, IF NEEDED, TO STRIP WIRES MASKING TAPE, IF NEEDED, TO LABEL WIRES AS DISCONNECTED FROM OLD THERMOSTAT LEVEL, IF NEEDED, TO LEVEL THERMOSTAT FOR APPEARANCE M878B 3 69-0733-3 STEP 2 Remove Old Thermostat s Test to make certain that your heating and cooling systems are working properly. If either does not work, contact your local heating/air conditioning dealer. To avoid compressor damage, do not operate the cooling system when outdoor temperature is below 50°F (10°C). s Turn off power to system at the furnace, or at the fuse/circuit breaker panel. s Carefully unpack your new thermostat and wallplate; save package of screws, instructions and receipt. s Remove the cover from the old thermostat. If it does not snap off when pulled firmly from the bottom, check for a screw used to lock on the cover. s Loosen screws holding thermostat to subbase, wallplate or wall, and lift away. s Disconnect wires from old thermostat or subbase. As you disconnect each wire, use masking tape to label it with the old terminal designation. If there are only two wires, they do WIRES THROUGH not need to be labeled. WALL OPENING Wrap wires around pencil to keep them from falling back into the wall, as shown. M5136 Replacing a clock thermostat that has C or C1 clock terminals? If you are replacing a Honeywell Chronotherm® Thermostat, you may find one or two wires that go to the C or C1 clock terminals on the Chronotherm® Thermostat wiring wallplate. Do 4 69-0733-3
-
 1
1 -
 2
2 -
 3
3 -
 4
4 -
 5
5 -
 6
6 -
 7
7 -
 8
8 -
 9
9 -
 10
10 -
11
-
12
-
13
-
14
-
15
-
16
-
17
-
18
-
19
-
20
 |
 |
