Honeywell CT87N Owner's Manual
Honeywell CT87N Manual
 |
View all Honeywell CT87N manuals
Add to My Manuals
Save this manual to your list of manuals |
Honeywell CT87N manual content summary:
- Honeywell CT87N | Owner's Manual - Page 1
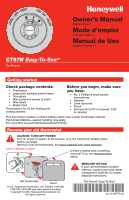
ON 7 COOL • O • • AUTO 8 CT87N Easy-To-SeeTM The Round® Owner's Manual English: Page 1 Mode d'emploi Français: Page 6 Manual de Uso Español: Página 11 Getting started Check package contents: • Thermostat • Large print subbase switch labels • Coverplate • Wall anchors & screws (2 each) • Wire - Honeywell CT87N | Owner's Manual - Page 2
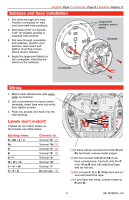
CT87N Easy-To-SeeTM • Owner's Manual Label wires and remove old wallplate Use a screwdriver to disconnect wires one by one. As you disconnect each wire, wrap it with the label matching the letter on your old thermostat. (Adhesive labels are supplied in your thermostat package.) Remove the old - Honeywell CT87N | Owner's Manual - Page 3
labels on the subbase. Large-print subbase switch labels Subbase Coverplate Wiring 1. Match each labeled wire with same letter on wires will be connected to both R and Rc terminals, remove metal jumper. [2] Do not connect both O and B if you have a heat pump. Connect only the O wire. Wrap B wire - Honeywell CT87N | Owner's Manual - Page 4
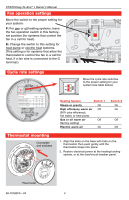
the fan in a call for heat, if a fan wire is connected to the G terminal.) Cycle rate settings E F Move the cycle rate switches to the proper setting for your system (see table below). Thermostat mounting Coverplate and subbase Heating System Switch 1 Steam or gravity On High efficiency - Honeywell CT87N | Owner's Manual - Page 5
to set, a click is heard every two degrees as the temperature is adjusted. Temperature Current indoor temperature. CAUTION: EQUIPMENT DAMAGE HAZARD Do not operate cooling system when outdoor temperature is below 50°F. 1-year limited warranty Honeywell warrants this product, excluding battery - Honeywell CT87N | Owner's Manual - Page 6
• O FF • HEAT 6 FAN ON 7 • • AUTO 8 Owner's Manual English: Page 1 Mode d'emploi Français: Page 6 Manual de Uso Español: Página 11 CT87N Easy-To-SeeTM The Round® Pour commencer Vérifier le contenu de Avant de commencer, s'assurer l'emballage : d'avoir à portée de la main : • Thermostat - Honeywell CT87N | Owner's Manual - Page 7
(sans compter les fils C ou C1), vous avez probablement acheté le mauvais modèle de thermostat. Il faut cesser immédiatement l'installation et composer le 1-800-468-1502 pour obtenir des conseils. Installation de la plaque de raccordement 1. Faire passer les fils par l'ouverture de la plaque de - Honeywell CT87N | Owner's Manual - Page 8
CT87N Easy-To-SeeTM • Mode d'emploi Installation de la plaque murale et de la plaque de raccordement 1. [1] Si des fils doivent être raccordés à la fois à la borne R et à la borne Rc du nouveau thermostat, retirer le cavalier métallique. [2] Ne pas raccorder à la fois la borne O et la borne B si le - Honeywell CT87N | Owner's Manual - Page 9
fil du ventilateur est raccordé à la borne G.) Réglages du nombre de cycles Déplacer les interrupteurs de réglage du nombre de cycles en fonction de votre système (consulter le tableau ci-dessous). Montage du thermostat Plaque murale et plaque de raccordement Système de chauffage Interrupteurs - Honeywell CT87N | Owner's Manual - Page 10
CT87N Easy-To-SeeTM • Mode d'emploi Fonctionnement Sélecteur du système Sélecteur du ventilateur • Cool : Commande le fonc- • On : Le ventilateur fonc- tionnement du système de tionne sans interruption. refroidissement. • Auto : Le ventilateur • Heat : Commande le fonc- fonctionne - Honeywell CT87N | Owner's Manual - Page 11
COOL • O FF • HEAT 6 FAN ON 7 • • AUTO 8 Owner's Manual English: Page 1 Mode d'emploi Français: Page 6 Manual de Uso Español: Página 11 CT87N Easy-To-SeeTM The Round 790; 7,476,988 y otras patentes pendientes. © 2009 Honeywell International Inc. Todos los derechos reservados. AVISO DE MERCURIO - Honeywell CT87N | Owner's Manual - Page 12
CT87N Easy-To-SeeTM • Manual de Uso Rotule los cables y retire la vieja placa de montaje Use un destornillador para desconectar los cables uno a uno. A medida que desconecte cada cable, pé - Honeywell CT87N | Owner's Manual - Page 13
English: Page 1 • Français: Page 6 • Español: Página 11 Instalación de placa de montaje 1. Hale los cables a través del agujero para los cables. Coloque la placa de cubierta en la pared, nivele y marque las posiciones de los agujeros. 2. Realice los agujeros (de 3/16 de pulgada para tablarroca o de - Honeywell CT87N | Owner's Manual - Page 14
CT87N Easy-To-SeeTM • Manual de Uso Ajuste de funcionamiento del ventilador Fije el interruptor para su sistema: F: Para los sistemas de calefacción a gas o petróleo, deje el interruptor de - Honeywell CT87N | Owner's Manual - Page 15
Todos los sistemas están apagados. FF • HEAT el sistema de FAN ON refrigeración o calefacción. COOL • O • • AUTO 8 Indicadores 67 DE APTITUD PARA UN USO producto se debe devolver a la siguiente dirección: Honeywell PARTICULAR, SE LIMITA POR ELLO A LA DURACIÓN DE Return Goods, Dock - Honeywell CT87N | Owner's Manual - Page 16
CT87N Easy-To-SeeTM • Owner's Manual Need Help? For assistance with this product please visit http://yourhome.honeywell.com or call Honeywell Customer Care toll-free at 1-800-468-1502 Besoin d'aide? Pour obtenir de l'aide et apprendre à faire fonctionner votre produit Honeywell, veuillez consulter
-
 1
1 -
 2
2 -
 3
3 -
 4
4 -
 5
5 -
 6
6 -
 7
7 -
8
-
9
-
10
-
11
-
12
-
13
-
14
-
15
-
16
 |
 |
Owner’s Manual
English: Page 1
Mode d’emploi
Français: Page 6
Manual de Uso
Español: Página 11
CT87N
Easy-To-See
TM
The Round
®
® U.S. Registered Trademark. U.S. Patents 7,159,789;
7,159,790; 7,476,988 and other patents pending.
Copyright © 2009, Honeywell International Inc.
All rights reserved.
C
O
O
L
•
O
F
F
•
H
E
A
T
F
A
N
O
N
•
•
A
U
T
O
6
7
8
69-1919EFS-04
The Round
®
Easy-To-See
TM
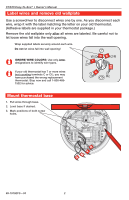
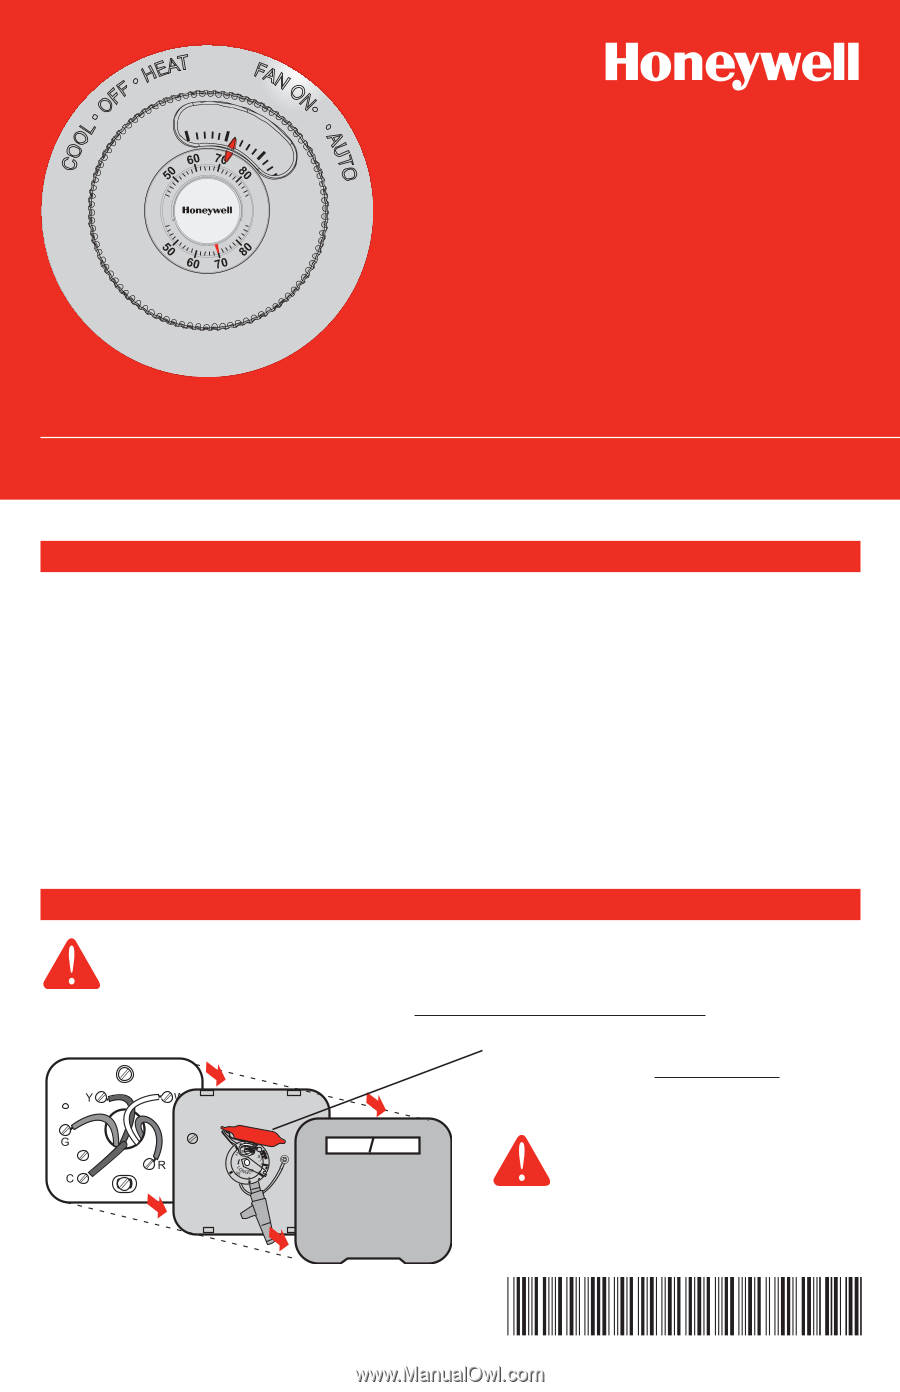
CAUTION: TURN OFF POWER
Turn off power to system at the furnace, or at the fuse/circuit breaker panel
before you begin.
Remove cover and thermostat, but leave wallplate with wires attached.
MERCURY NOTICE
If your old thermostat contains
mercury, contact your local waste
management authority for proper
disposal instructions.
Is there a sealed tube containing
mercury? If so, see mercury notice
below.
Leave wallplate in place.
Old thermostat
Cover
Check package contents:
•
Thermostat
•
Large print subbase switch labels
•
Coverplate
•
Wall anchors & screws (2 each)
•
Wire labels
•
Braille Card
Thermostat is for 24 Vac heating and
cooling systems
Before you begin, make sure
you have:
•
No. 2 Phillips & small pocket
screwdrivers
•
Hammer
•
Level (optional)
•
Pencil
•
Drill and bit (3/16” for drywall, 7/32”
for plaster)
Getting started
Remove your old thermostat
This thermostat contains a Lithium battery which may contain Perchlorate material.
Perchlorate Material—special handling may apply,
See www.dtsc.ca.gov/hazardouswaste/perchlorate