Honeywell RPWL800A1002/W Owner's Manual
Honeywell RPWL800A1002/W - Honeyywell VisioCam Wireless Camera/Push Button Manual
 |
UPC - 085267334310
View all Honeywell RPWL800A1002/W manuals
Add to My Manuals
Save this manual to your list of manuals |
Honeywell RPWL800A1002/W manual content summary:
- Honeywell RPWL800A1002/W | Owner's Manual - Page 1
Installation and Use VISIOCAMTM RCWL8000A and RPWL800A Wireless Video Chime System 69-2108EFS_A.indd 1 69-2108EFS-01 11/30/2007 1:51:44 PM - Honeywell RPWL800A1002/W | Owner's Manual - Page 2
you have chosen! (See 'Setting up', beginning on the next page.) THE VISIOCAM SYSTEM Your Honeywell wireless video entry system uses radio signals to transmit a video picture of the caller from the door camera to the receiver. The system is expandable, so you can install additional surveillance - Honeywell RPWL800A1002/W | Owner's Manual - Page 3
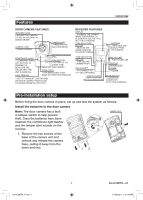
AFTER THE CALL BUTTON IS PRESSED TUNE SELECTION BUTTON - SELECTS THE CHIME TUNE FOR THE DOOR CAMERA ANTENNA - RECEIVES THE SIGNAL FROM THE CAMERA TUNE SELECTION VISIOCAM BUTTON - FOR SECOND CAMERA/PUSH RCA SOCKET - TO CONNECT TO A TV SET (OPTIONAL) CHIME FLASHER BATTERY INDICATOR MIC VOLUME - Honeywell RPWL800A1002/W | Owner's Manual - Page 4
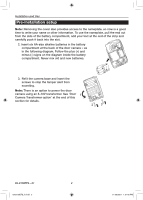
strip and carefully push it back into the slot. 2. Insert six AA-size alkaline batteries in the battery compartment at the back of the door camera - as in the following diagram. Follow the plus (+) and minus (-) signs on the diagram inside the battery compartment. Never mix old and new batteries - Honeywell RPWL800A1002/W | Owner's Manual - Page 5
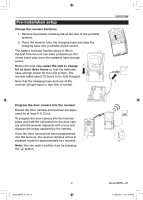
the charging base and rear of the receiver will get warm in use: this is normal. VISIOCAM 2 Program the door camera into the receiver Ensure the door camera and receiver are separated by at least 6 ft. (2 m). To program the door camera into the receiver, press and hold the call button on the door - Honeywell RPWL800A1002/W | Owner's Manual - Page 6
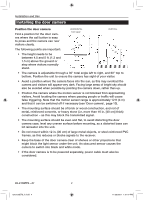
cause false triggering. Note that the motion sensor range is approximately 12 ft (4 m) and that it can be switched off if necessary (see 'Door camera', page 10). • The mounting surface should be of brick or wood construction, and not of metal, reinforced concrete, or heavy stone (i.e. more than 16 - Honeywell RPWL800A1002/W | Owner's Manual - Page 7
channel if channel 3 is no better. Refer to the troubleshooting section for more information on interference reduction. 3. The door camera has not been programmed into the receiver (refer to page 3). Adjust the camera angle With the door camera at the intended position, you may need to adjust the - Honeywell RPWL800A1002/W | Owner's Manual - Page 8
Installation and Use Installing the door camera Mount the door camera Do not mount the camera in wet conditions as moisture or condensation will affect the internal parts. Once you have tested the system in place, mount the camera onto a wall or door as follows: 1. Remove the two screws underneath - Honeywell RPWL800A1002/W | Owner's Manual - Page 9
the base and the door camera body, for later service access. Do not fit batteries. 2. Secure the door camera in place. Check that camera with batteries for a trial test, then you must program the door camera with the receiver by following the 'program the door camera into the receiver' instructions - Honeywell RPWL800A1002/W | Owner's Manual - Page 10
is off the charging base and needs recharging. Chime flasher Flashes to indicate a call when the chime volume control is in position 0 or 2*. Display brightness Activate the door camera by pressing its call button, then adjust the receiver display for best viewing by using the four position - Honeywell RPWL800A1002/W | Owner's Manual - Page 11
The alert is also triggered when you undo the cover to replace batteries in the door camera. MIC volume [For future use] The topmost control along the side (see diagram on page 8) will control the volume produced from a microphone. Adjust for optimum listening level. Scan button When used in a multi - Honeywell RPWL800A1002/W | Owner's Manual - Page 12
switch the motion sensor off, press and hold the call button on the camera for more than ten seconds. The confidence indicator blinks rapidly to confirm that remains on for two seconds to confirm. Note: Power loss to the camera or a change of batteries will reset the sensor back on. 69-2108EFS-01 - Honeywell RPWL800A1002/W | Owner's Manual - Page 13
said RCA input (refer to TV set instructions). When the door camera is activated, the VisioCam receiver will chime and the TV will default channel manually in order to display the image. Auto switching function not available. Adding a door push The receiver will respond to a Visiocam door push - Honeywell RPWL800A1002/W | Owner's Manual - Page 14
will become hot to the touch! • Do not allow any rain or moisture to become trapped inside the door camera, as it may damage the internal parts. • Avoid replacing door camera batteries during wet weather. • Do not take the products apart; there are precision components inside which are easily - Honeywell RPWL800A1002/W | Owner's Manual - Page 15
Troubleshooting VISIOCAM The system does not work... • Make sure the door camera is powered, refer to below. • Make sure the receiver is powered, refer to below. • Move the receiver closer to the door camera to receive a better signal. • If new, make sure the door camera a likely problem, move the - Honeywell RPWL800A1002/W | Owner's Manual - Page 16
and Use Troubleshooting A beep-beep tone sounds for 30 seconds... This is an alert triggered by the tamper switch indicating someone is trying to unscrew and remove the door camera. Check outside immediately. The tone may sound if the screws that mount the front of the door camera to the - Honeywell RPWL800A1002/W | Owner's Manual - Page 17
ASpbeocuitfiycoautironnesw thermostat VISIOCAM Door Camera Receiver Power requirement 110V AC ±10% via charger Battery type RF output level - Honeywell RPWL800A1002/W | Owner's Manual - Page 18
with your local authority or retailer for recycling advice. Honeywell International Inc. ACS, Environmental and Combustion Controls 1985 Douglas Drive, Golden Valley, MN 55422 www.honeywell.com ® U.S. Registered Trademark. © 2007 Honeywell International Inc. 69-2108EFS-01 M.S. 11-07 69-2108EFS_A - Honeywell RPWL800A1002/W | Owner's Manual - Page 19
Guide d'installation et mode d'emploi VISIOCAMTM RCWL8000A et RPWL800A Système de carillon vidéo sans fil 69-2108EFS_A.indd 17 11/30/2007 2:00:34 PM - Honeywell RPWL800A1002/W | Owner's Manual - Page 20
Guide d'installation et mode d'emploi Table des matières Description du produit 19 Le système VisioCam 18 Vérification du contenu de la bo et recyclage 34 Merci d'avoir choisi ce produit Honeywell. Nous vous demandons de respecter les instructions pour bien installer le produit et en faire une - Honeywell RPWL800A1002/W | Owner's Manual - Page 21
LA LUMIÈRE AMBIANTE ET FAIT PASSER LA CAMÉRA DU MODE COULEUR AU MODE NOIR ET BLANC LORSQU'IL NE FAIT PAS ASSEZ CLAIR VISIOCAM RÉCEPTEUR AFFICHEUR - AFFICHE L'IMAGE DE LA CAMÉRA PENDANT ENVIRON 30 SECONDES APRÈS QUE LE BOUTON D'APPEL A ÉTÉ ACTIONNÉ BOUTON MÉLODIE - SÉLECTIONNE LA MÉLODIE DE - Honeywell RPWL800A1002/W | Owner's Manual - Page 22
Guide d'installation et mode d'emploi Avant l'installation Remarque : le fait de retirer le couvercle donne également accès à la plaque d'identité; il est donc opportun d'y écrire maintenant - Honeywell RPWL800A1002/W | Owner's Manual - Page 23
pour se recharger complète- ment. Noter que le socle de chargement et l'arrière du récepteur chauffent pendant l'utilisation : cela est parfaitement normal. VISIOCAM 2 Programmation de la caméra de porte dans le récepteur Voir à ce que la caméra de porte et le récepteur soient séparés d'au - Honeywell RPWL800A1002/W | Owner's Manual - Page 24
Guide d'installation et mode d'emploi Installation de la caméra de porte alarmes seront déclenchées. Noter que le détecteur capte le mouvement à 4 m (12 pi) environ et peut être mis hors service au besoin (voir la section «Caméra de porte» à la page 28). • L'unité doit être montée sur une surface - Honeywell RPWL800A1002/W | Owner's Manual - Page 25
Installation de la caméra de porte VISIOCAM Positionnement du récepteur Le récepteur doit être placé à portée de la caméra (généralement moins de 20 m [60 pi] dans un bâtiment classique). Test du - Honeywell RPWL800A1002/W | Owner's Manual - Page 26
Guide d'installation et mode d'emploi Installation de la caméra de porte Fixation de la caméra de porte Ne pas fixer la caméra dans des conditions humides car l'humidité et la condensation affecteront les parties internes. Une fois que le système en place a été vérifié, fixer la caméra sur un - Honeywell RPWL800A1002/W | Owner's Manual - Page 27
Installation de la caméra de porte VISIOCAM Option de transformateur de caméra de porte Pour les un essai, il faut dans ce cas programmer la caméra de porte avec le récepteur en suivant les instructions de la section «Programmer la caméra de porte dans le récepteur». 69-2108EFS_A.indd 25 25 69 - Honeywell RPWL800A1002/W | Owner's Manual - Page 28
Guide d'installation et mode d'emploi Installation du récepteur Utilisation du récepteur Lorsqu'on appuie sur le bouton d'appel de la caméra de porte, le récepteur - Honeywell RPWL800A1002/W | Owner's Manual - Page 29
Installation du récepteur VISIOCAM Sélection de la mélodie du carillon La mélodie du carillon du récepteur peut être modifiée en appuyant sur le bouton ' '. Les choix de mélodie du - Honeywell RPWL800A1002/W | Owner's Manual - Page 30
Guide d'installation et mode d'emploi Caméra de porte Détecteur de mouvement Le dé ra enfoncé pendant plus de dix secondes. La lampe témoin clignote rapidement, pour confirmer la mise hors service du détecteur. Pour réactiver le détecteur de mouvement, maintenir le bouton d'appel enfoncé pendant plus - Honeywell RPWL800A1002/W | Owner's Manual - Page 31
téléviseur au moyen du câble RCA fourni. Raccorder la fiche stéréo au récepteur VisioCam et la fiche jaune à la prise RCA de l'entrée AV du téléviseur. Ré (1-4) et être programmée dans le récepteur. Se référer aux instructions fournies avec l'unité supplémentaire ou lire la section suivante «Pour - Honeywell RPWL800A1002/W | Owner's Manual - Page 32
Guide d'installation et mode d'emploi Entretien et utilisation SOIN ET ENTRETIEN • pas laisser la pluie ou l'humidité entrer dans la caméra de porte, car cela pourrait endommager les pièces internes. • Éviter de remplacer les piles de la caméra de porte par temps humide. • Ne pas démonter les - Honeywell RPWL800A1002/W | Owner's Manual - Page 33
Dépannage VISIOCAM Le système ne fonctionne pas... • Vérifier que la caméra de porte est bien sous tension. Voir ci-dessous. • Vérifier que le récepteur est - Honeywell RPWL800A1002/W | Owner's Manual - Page 34
Guide d'installation et mode d'emploi Dépannage Le récepteur sonne puis émet un double bip... Ce signal indique que les piles de la caméra de porte - Honeywell RPWL800A1002/W | Owner's Manual - Page 35
Caractéristiques techniques VISIOCAM Caméra de porte Récepteur Alimentation 110 V c.a. ± 10 % Sortie vidéo S.O. 1 Vpp 75 ohms Changement couleur / noir et blanc Luminosité : environ 100 lux Température de service -10°C à 40°C 14°F à 104°F 0°C à 40°C 32°F à 104°F Poids 340 g (13 oz. - Honeywell RPWL800A1002/W | Owner's Manual - Page 36
rebut avec les ordures ménagères. Veuillez recycler partout où les services adéquats sont à disposition. Contactez votre municipalité ou votre détaillant pour obtenir des conseils en matière de recyclage. Honeywell International Inc. SRA, Régulateurs d'ambiance et de combustion 1985 Douglas Drive - Honeywell RPWL800A1002/W | Owner's Manual - Page 37
Instalación y uso VISIOCAMTM RCWL8000A y RPWL800A Sistema inalámbrico de campanilla con video Visiocam 69-2108EFS_A.indd 35 11/30/2007 2:00:41 PM - Honeywell RPWL800A1002/W | Owner's Manual - Page 38
y reciclaje 52 Garantía 52 Gracias por elegir este producto Honeywell. Por favor siga las instrucciones que se describen a continuación érase a la "Preparación", a partir de la próxima página). EL SISTEMA VISIOCAM Su sistema de video inalámbrico para la puerta utiliza señales de radio para - Honeywell RPWL800A1002/W | Owner's Manual - Page 39
SELECCIONA LA MELODÍA DE LA CAMPANILLA PARA LA CÁMARA DE LA PUERTA ANTENA - RECIBE LA SEÑAL DE LA CÁMARA BOTÓN DE SELECCIÓN VISIOCAM DE LA MELODÍA - PARA LA SEGUNDA CÁMARA/PULSADOR TOMACORRIENTE RCA - PARA CONECTARSE A APARATO DE TV (OPCIONAL) LUZ INTERMITENTE DE LA CAMPANILLA INDICADOR DE - Honeywell RPWL800A1002/W | Owner's Manual - Page 40
Instalación y uso Configuración de la pre-instalación Nota: retirar la cubierta también proporciona acceso a la placa de identificación, de modo que ahora es el momento preciso para escribir su nombre u otra información. Para utilizar la placa de identificación, hale hacia afuera el extremo del lado - Honeywell RPWL800A1002/W | Owner's Manual - Page 41
horas estar totalmente cargado. Observe que la base de carga y la parte posterior del receptor se tornarán tibios cuando estén en uso: esto es normal. VISIOCAM 2 Programe la cámara de la puerta en el receptor Cerciórese de que la cámara de la puerta y el receptor estén separados por al menos - Honeywell RPWL800A1002/W | Owner's Manual - Page 42
Instalación y uso Instalación de la cámara de la puerta Ubique la cámara de la puerta Elija una posición para la cámara de la puerta donde el botón de llamada sea fácil de presionar y la cámara pueda "captar" a los visitantes claramente. Los siguientes puntos son importantes: VISTA SUPERIOR - Honeywell RPWL800A1002/W | Owner's Manual - Page 43
Instalación de la cámara de la puerta VISIOCAM Ubicación del receptor El receptor deberá ubicarse dentro del alcance de la cámara de la puerta (es decir a menos de 30 m en un edificio promedio). - Honeywell RPWL800A1002/W | Owner's Manual - Page 44
Instalación y uso Instalación de la cámara de la puerta Monte la cámara de la puerta No monte la cámara en ambientes húmedos ya que la humedad o la condensación afectarán las partes internas. Una vez que haya probado el sistema en su lugar, monte la cámara en la pared o puerta como sigue: 1. - Honeywell RPWL800A1002/W | Owner's Manual - Page 45
Instalación de la cámara de la puerta VISIOCAM Opción de transformador para la cámara de la puerta Para instalaciones donde el uso es frecuente, un promedio de más de cinco usos por día, la cámara - Honeywell RPWL800A1002/W | Owner's Manual - Page 46
cuando el receptor no está en la base de carga y necesita recarga. Luz intermitente de la campanilla Destella para indicar una llamada cuando el control de volumen de la campanilla está en la posición 0 o 2*. Brillo de la pantalla Active la cámara de puerta presionando su botón de llamada y ajuste - Honeywell RPWL800A1002/W | Owner's Manual - Page 47
Instalación del receptor VISIOCAM Selección de melodía de la campanilla La melodía del receptor reemplazar las baterías en la cámara de la puerta. Volumen del MIC [Para uso futuro] El control superior del costado (ver diagrama) controlará el volumen producido por un micrófono. Regule para lograr el - Honeywell RPWL800A1002/W | Owner's Manual - Page 48
Instalación y uso Cámara de la puerta Sensor de movimiento El sensor PIR ('Infrarojo pasivo') activa la cámara de la puerta automáticamente. El receptor produce un sonido "metálico" y muestra la imagen de la cámara de la puerta durante aproximadamente 30 segundos. En caso de no necesitar el sensor - Honeywell RPWL800A1002/W | Owner's Manual - Page 49
el receptor a un televisor por medio del accesorio conductor AV que se suministra. Conecte el enchufe de estéreo a la unidad receptora de la Visiocam y enchufe el RCA amarillo a la entrada AV del televisor. Coloque el canal del televisor al canal AV pre-establecido para dicha entrada RCA (refi - Honeywell RPWL800A1002/W | Owner's Manual - Page 50
Instalación y uso Mantenimiento y uso CUIDADO Y MANTENIMIENTO • Las huellas digitales o el sucio en el lente de la cámara pueden causar una imagen poco nítida o borrosa. Ocasionalmente utilice un paño suave y húmedo para limpiar la superficie. No utilice productos de limpieza. El exceso de - Honeywell RPWL800A1002/W | Owner's Manual - Page 51
Localización y solución de problemas VISIOCAM El sistema no funciona... • Verifique que la cámara de la puerta tenga energía, refiérase a la información que se encuentra más abajo • Verifique que la cámara - Honeywell RPWL800A1002/W | Owner's Manual - Page 52
Instalación y uso Troubleshooting El receptor suena, seguido de dos tonos... Esto indica carga baja en la batería de la cámara de la puerta. Cambie las baterías de - Honeywell RPWL800A1002/W | Owner's Manual - Page 53
Especificaciones VISIOCAM Cámara de la puerta Receptor Requerimientos de electricidad 110 V AC ±10% por medio del cargador Tipo de batería 6 Baterías alcalinas AA 3 baterías NiMH - Honeywell RPWL800A1002/W | Owner's Manual - Page 54
prueba de compra es necesaria; esto no afecta sus derechos legales. Si necesita mayor información sobre su producto, llame a la línea de ayuda de Honeywell al 1-800-468-1502. DESECHO Y RECICLAJE Las baterías y los desechos procedentes de productos eléctricos no deberán colocarse con los residuos dom - Honeywell RPWL800A1002/W | Owner's Manual - Page 55
VISIOCAM 69-2108EFS_A.indd 53 53 69-2108EFS-01 11/30/2007 1:52:08 PM - Honeywell RPWL800A1002/W | Owner's Manual - Page 56
Inc. ACS, Environmental and Combustion Controls 1985 Douglas Drive, Golden Valley, MN 55422 www.honeywell.com Marca registrada de los EE. UU. © 2007, Honeywell International Inc. 69-2108EFS-01 M.S. 11-07 69-2108EFS_A.indd 54 Impreso en los EE. UU., en papel reciclado que contiene por lo
-
 1
1 -
 2
2 -
 3
3 -
 4
4 -
 5
5 -
 6
6 -
 7
7 -
8
-
9
-
10
-
11
-
12
-
13
-
14
-
15
-
16
-
17
-
18
-
19
-
20
-
21
-
22
-
23
-
24
-
25
-
26
-
27
-
28
-
29
-
30
-
31
-
32
-
33
-
34
-
35
-
36
-
37
-
38
-
39
-
40
-
41
-
42
-
43
-
44
-
45
-
46
-
47
-
48
-
49
-
50
-
51
-
52
-
53
-
54
-
55
-
56
 |
 |
Installation
and Use
VISIOCAM
TM
RCWL8000A and RPWL800A
Wireless Video Chime System
69-2108EFS-01
69-2108EFS_A.indd
1
11/30/2007
1:51:44 PM