Honeywell TH5110D1006 Installation Guide - Page 2
Wallplate installation - instructions
 |
UPC - 085267256988
View all Honeywell TH5110D1006 manuals
Add to My Manuals
Save this manual to your list of manuals |
Page 2 highlights
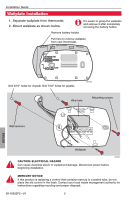
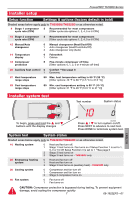
Installation Guide Wallplate installation 1. Separate wallplate from thermostat. 2. Mount wallplate as shown below. Remove battery holder. It's easier to grasp the wallplate and remove it after completely removing the battery holder. Pull here to remove wallplate from new thermostat. ENGLISH Drill 3/16" holes for drywall. Drill 7/32" holes for plaster. M29368 Wire hole Mounting screws Wall anchors Wallplate M29369 ! CAUTION: ELECTRICAL HAZARD Can cause electrical shock or equipment damage. Disconnect power before beginning installation. ! MERCURY NOTICE If this product is replacing a control that contains mercury in a sealed tube, do not place the old control in the trash. Contact your local waste management authority for instructions regarding recycling and proper disposal. 69-1922EFS-01 2
-
 1
1 -
 2
2 -
 3
3 -
 4
4 -
 5
5 -
 6
6 -
 7
7 -
 8
8 -
9
-
10
-
11
-
12
-
13
-
14
-
15
-
16
-
17
-
18
-
19
-
20
-
21
-
22
-
23
-
24
 |
 |
