Hoover F5807 Manual - Page 5
Deep cleaner description - cleaner model
 |
View all Hoover F5807 manuals
Add to My Manuals
Save this manual to your list of manuals |
Page 5 highlights
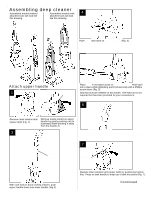
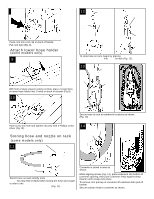
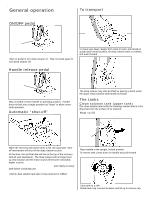
15 (B) Models with hose rack TAB (A) 2 1 3 4 5 The nozzle is stored in the area between the cord hooks (Fig. 15). Place brushes of nozzle on top of Tab (A) as shown. Gently push the nozzle downward while pivoting it into the nozzle holder (B). Deep cleaner description The assembled deep cleaner will look like the drawing . Models without hose rack 1 2 17 16 6 7 85 9 10 11 12 13 4 14 18 17 15 19 17 16 7 8 9 10 11 12 13 14 17 15 5 5 19 18 1. Hand grip 2. Solution trigger: press to release clean solution. 3. Hose* 4. Hose holders*: wrap hose around holers for storage. 5. Cord hooks: wrap cord around hooks for storage. The top hook can be rotated right or left for quick and easy cord release. 6. Stair/upholstery nozzle* 7. Carrying handle 8. Clean solution tank handle 9. Clean solution tank cap/ measuring cup 10. Clean solution tank: holds cleaning solution. 11. Recovery tank lid 12. Recovery tank: holds dirty solution. 13. Recovery tank "front panel" 14. Hood 15. Nozzle 16. Upholstery and stair cleaning connection*: push door open to connect stair/upholstery nozzle "solution tube". 17. Recovery tank latches: one on each side of tank. 18. ON/OFF pedal 19. Handle release pedal: step on pedal to lower handle to operating position. *Some models only This deep cleaner is intended for household use. Assembly - Deep cleaner description 5
-
 1
1 -
 2
2 -
 3
3 -
 4
4 -
 5
5 -
 6
6 -
 7
7 -
 8
8 -
 9
9 -
 10
10 -
 11
11 -
12
-
13
-
14
 |
 |
