Hoover ONEPWR Cordless High-Capacity Wet/Dry Utility Vacuum Product Manual - Page 8
Maintenance
 |
View all Hoover ONEPWR Cordless High-Capacity Wet/Dry Utility Vacuum manuals
Add to My Manuals
Save this manual to your list of manuals |
Page 8 highlights
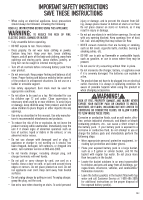
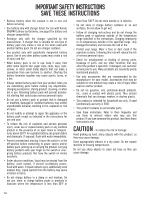
MAINTENANCE • Remove the dry use filter. • Inspect filter, lightly shake any dust or dirt from the filter, or replace as necessary. • Empty the collection container; wash out if necessary. • Reinstall dry use filter. • Before replacing the lid, make sure all pieces are completely dry. • Replace lid and lock securely. Liquid Waste: • Remove the battery pack. • Unlock the four locking latches and remove the lid. • Empty the collection container; wash out if necessary. Before replacing the lid, make sure all pieces are completely dry. • Replace lid and lock securely. WARNING! Do not turn unit upside down as liquid may enter the motor unit and cause damage. Cleaning/Replacing the Dry Use Filter See Figure 10, page 10 • Remove the battery pack. • Unlock the two locking latches and remove the lid. • Remove the dry use filter by pulling the filter upward. • Lightly shake any dust or dirt off the filter or replace as needed. • Reinstall the filter by aligning the filter to the bottom of the tank and pressing firmly into place. • NOTE: Make sure the filter is seated properly for dry vacuuming. Remove the filter for wet vacuuming. Storage • Clean all foreign material from the wet/dry vac. • Clean the outside of the collection container with warm water and mild soap. • Empty and clean the collection container, flexible hose, nozzles, and attachments with warm water and mild soap and allow to completely dry before storage. • Store flexible hose and attachments inside the collection container or on the lid. • The collection container should be disinfected as needed and before prolonged storage. • Store indoors in a place that is inaccessible to children. Keep away from corrosive agents such as garden chemicals and de-icing salts. PG.7
-
 1
1 -
2
-
 3
3 -
 4
4 -
 5
5 -
 6
6 -
 7
7 -
 8
8 -
 9
9 -
 10
10 -
 11
11 -
 12
12 -
 13
13 -
14
-
15
-
16
-
17
-
18
-
19
-
20
-
21
-
22
-
23
-
24
-
25
-
26
-
27
-
28
-
29
 |
 |
