Hoover ONEPWR WindTunnel Evolve Pet Elite Cordless Vacuum Product Manual Engli - Page 2
Charging The Battery, Assembly, Instructions, Product Overview, Operation, Maintenance
 |
View all Hoover ONEPWR WindTunnel Evolve Pet Elite Cordless Vacuum manuals
Add to My Manuals
Save this manual to your list of manuals |
Page 2 highlights
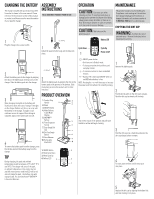
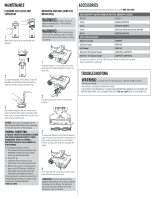
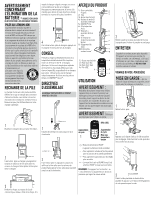
CHARGING THE BATTERY The charger included with your Evolve may differ from what is shown in this user manual. Please reference the Accessories section of this manual or contact us at Hoover.com for more information of your specific charger. ASSEMBLY INSTRUCTIONS FULLY ASSEMBLE PRODUCT PRIOR TO USE. 1 Plug the charger into a power outlet. click 1 Install the wand into the body until it clicks into place. OPERATION CAUTION: Use extra care when cleaning on stairs. To avoid personal injury or damage, and to prevent the cleaner from falling, always place cleaner at bottom of stairs or on floor. Do not place cleaner on stairs or furniture, as it may result in injury or damage. CAUTION: Not to be used for grooming a pet. Battery LED MAINTENANCE This product contains no serviceable parts. If appliance is not working as it should, has been dropped, damaged, left outdoors, or dropped into water, call customer service at 1-800-944-9200 prior to continuing use. EMPTYING THE DIRT CUP WARNING: To reduce the risk of personal injury - Remove the battery before cleaning and servicing. Cycle Down 1 Cycle Up Power on/off 2 Attach the battery pack to the charger by aligning the ribs on the battery pack to the grooves in the charger. Slide the battery pack into the charger. click 2 Attach the battery pack by aligning the ribs on the battery pack to the grooves in the product. Slide the battery pack into the product until it clicks into place. 3 When charging, the lights on the battery will illuminate to show the state of charge. If the light on the charger flashes red, there is an error with the battery or the charger. Try again or call customer service for support. Once charge is complete, lights on the battery will turn off. 4 To remove the battery pack from the charger, press the latches and pull the battery away from the charger. TIP During charging, the pack and ambient temperature should be between 41°F to 86°F (5°C and 30°C). The charger will sense if the pack, or ambient temperature, is too cold or too hot, and will return an error code (red LED will be on) and not charge the pack. Use battery only with charger listed. For use with Hoover® ONEPWR™ Lithium Ion Batteries. PRODUCT OVERVIEW 1. Comfort Grip 1 Handle 4 2 2. Wand 3 3. ON/OFF Button 4. Mode Buttons & LED Mode Display 5. ONEPWR™ Battery 5 6. Filter/Separator Access 6 7. Easy Empty Dirt Cup 7 8. Dirt Cup Empty Button 8 9. Hose Release 10. Removable 9 Brush Roll 10 1. ON/OFF Button 4 2. Mode Cycle Down 3. Mode Cycle Up 4. Battery LED 2 3 1 • ON/OFF power button. • Unit turns on in Default mode. • To increase runtime for hard floors and everyday messes. • To increase suction for more embedded messes. • Battery LED is illuminated WHITE when on and RED when battery is low. NOTE: Pressing the - or + will decrease or increase the power level from where it is currently running. 2 Step on the nozzle of the product and pull back handle to recline and begin cleaning. 1 Remove the battery pack. 2 Push down the latch on the dirt cup to release. Rock the dirt cup backwards off the body. 3 Hold the dirt cup over a trash bin and press the dirt cup release button to empty. 4 To close, push the door until it locks back into place. 5 Replace the dirt cup by aligning the bottom first and then rocking it into place.
-
 1
1 -
 2
2 -
 3
3 -
 4
4 -
 5
5 -
 6
6 -
 7
7 -
 8
8 -
9
-
10
-
11
-
12
 |
 |
