Hotpoint GSM1800NBB Installation Instructions - Page 3
Installation Preparation - dishwasher parts
 |
View all Hotpoint GSM1800NBB manuals
Add to My Manuals
Save this manual to your list of manuals |
Page 3 highlights
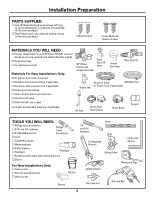
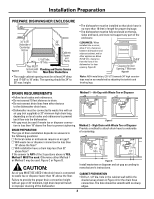
Installation Preparation PARTS SUPPLIED: Two #8 Phillips flat head wood screws, 5/8" long to secure dishwasher to underside of countertop (in literature package). Two Phillips head, color matched toekick screws (in literature package). 2 Wood Screws 2 Color Matched Toekick Screws MATERIALS YOU WILL NEED : Ferrule, compression nut and 90° Elbow (3/8"NPT external thread on one end, opposite end sized to fit water supply) Thread seal tape UL Listed wire nuts (3) Materials For New Installations Only: Air gap for drain hose, if required Waste tee for house plumbing, if applicable Electrical cable or power cord, if applicable Screw type hose clamps Strain relief for electrical connection. Hand shut-off valve Water line 3/8" min. copper Coupler for extending drain line, if applicable 90° Elbow, Ferrule and Compression Nut Hand Shut-Off Valve Thread Seal Tape Wire Nuts (3) Electrical Cable Hot Water line (or Power Cord, if applicable) Waste Tee Air Gap Screw Type Hose Clamps Strain Relief Coupler TOOLS YOU WILL NEED: Phillips head screwdriver 5/16" and 1/4" nutdriver 6" Adjustable wrench Phillips Head Screwdriver Level Carpenters square Measuring tape Safety glasses Flashlight Flashlight Bucket to catch water when flushing the line Gloves For New Installations Only: Tubing cutter Drill and appropriate bits Hole saw set Bucket Gloves 1/4" and 5/16" Nutdriver Level 6" Adjustable Wrench Tubing Cutter Carpenters Square Safety Glasses Measuring Tape Hole Saw Set Drill and Bits 2
-
 1
1 -
 2
2 -
 3
3 -
 4
4 -
 5
5 -
 6
6 -
 7
7 -
 8
8 -
 9
9 -
10
-
11
-
12
-
13
 |
 |
