Hotpoint HDA3500NBB Installation Instructions
Hotpoint HDA3500NBB - Dishwasher w/ 5 Wash Cycles 6PUSHBTN Manual
 |
View all Hotpoint HDA3500NBB manuals
Add to My Manuals
Save this manual to your list of manuals |
Hotpoint HDA3500NBB manual content summary:
- Hotpoint HDA3500NBB | Installation Instructions - Page 1
Appliances Installation Instructions Built-In Dishwasher If you have questions, call 800.GE.CARES1800.432.2737} or visit our website at: www.ge.com BEFORE YOU BEGIN Read these instructions completely and carefullg. IM PORTANT- Observe all governing codes and ordinances. • Note to Installer - Be - Hotpoint HDA3500NBB | Installation Instructions - Page 2
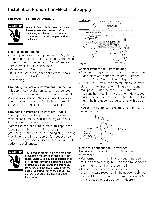
PARTS SUPPLIED IN INSTALLATION PACKAGE: [] Two 8-18 x 5/8" Phillips heod wood screws [] Junction box cover and #10 hex head screw [] Drain hose (78" long) and hose clamp [] - Hotpoint HDA3500NBB | Installation Instructions - Page 3
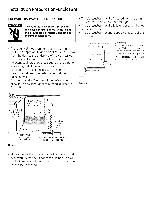
for proper drainage. • The dishwasher must be fullg enclosed on the top, sides, and back. • The dishwasher must not support ang part of the enclosure. • The and Plumb Floor MUST be Even with Room Floor Plumbing and Electric Service Must Enter Shaded Area Figure A • Hake sure the floor is level - Hotpoint HDA3500NBB | Installation Instructions - Page 4
waste tee or disposer and the air gap according to the manufacturer's instructions. CAUTION An air gap MUST BE USED if the drain hose or 32" minimum, high drain loop will result in improper draining of the dishwasher, which mag cause damage. Cabinet Preparation Drill a 1-1/2" diameter hole in the - Hotpoint HDA3500NBB | Installation Instructions - Page 5
terminal or lead on the appliance. Grounding Instructions-Power Cord Models This appliance must be shock. Check with a qualified electrician or service representative if gou are in doubt that the Electrical Connection to Dishwasher Electrical connection is on the right front of dishwasher. • For - Hotpoint HDA3500NBB | Installation Instructions - Page 6
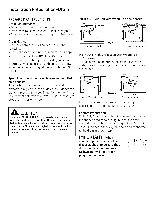
as under the sink. (Optional, but strongly recommended and may be required by local codes.) • The water connection is on the left side of the dishwasher. Install the hot water inlet line, using 3/8" or larger copper tubing. Route the line as shown in Figure F and extend forward at least 19" from - Hotpoint HDA3500NBB | Installation Instructions - Page 7
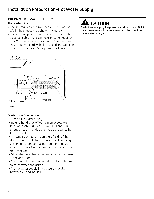
hose and drain hose clamp-Step 7 • Owners' Manual-Steps 18 and 21 • Product Samples and/or coupons . STEP 2: CHECK DOOR BALANCE • With the dishwasher on the wood base, check the door balance mlnside fFrame Figure G Tip: Avoid service calls for door balance problems Make sure the spring end is fully - Hotpoint HDA3500NBB | Installation Instructions - Page 8
is 6 feet. Power Cord Kit WX09X70910 available for purchase from an authorized GE Appliance Dealer, meets these requirements. 90 EIb w / Tape Figure K _Water Valve Bracket m se Juncti n B x Bracket STEP 7: INSTALL DRAIN HOSE TO DISHWASHER DRAIN PORT Skip this step if drain hose has been pre - Hotpoint HDA3500NBB | Installation Instructions - Page 9
part number GPF10S. Hose Stop Do not use this port if present STEP 9: INSERT DRAIN HOSE AND POWER CORD, IF USED, THROUGH CABINET • Upright the dishwasher GPF65 kit is available from authorized GE appliance dealers. • Refer to Figure P and follow the instructions included in Side- the kit. - Hotpoint HDA3500NBB | Installation Instructions - Page 10
leveled when the level indicator is centered left to right and front to back. The dishwasher door should close without hitting the sides of the tub. • Replace the lower rock. Tip: Avoid unnecessarg service charges for poor wash performance and rack operation. Pull the dish racks half wag out - Hotpoint HDA3500NBB | Installation Instructions - Page 11
compression nut. Hot Water SupplU Line C untert p Bracket Side M unt Brackets( pti nal) Figure T Tip: Avoid unnecessary service charges for leaks or control panel damage. Make sure the dishwasher is centered in the cabinet and the door opens and closes freely without hitting the adjacent cabinets - Hotpoint HDA3500NBB | Installation Instructions - Page 12
to a disposer, check to be sure that the drain plug has been removed. Dishwasher will not drain if plug is left in place. • Connect drain line to hose with a screw tgpe clamp. Drain _4 RePmluogve Tip: Avoid unnecessary service call charges for a no drain complaint Make sure any excess drain hose - Hotpoint HDA3500NBB | Installation Instructions - Page 13
If the dishwasher came with a factory-installed power cord and you want to convert it to a permanent connection, refer to the instructions on page the dishwasher door and remove all foam and cardboard packaging. [] Read the Owner's Manual to familiarize yourself with the operation of the dishwasher. - Hotpoint HDA3500NBB | Installation Instructions - Page 14
C_;_ Options 0 [] For dial models, press the normal and hot start pads, if model has them, and then turn control dial just enough to start dishwasher. Be careful not to turn the dial past the first water fill. Dial should point to "Hot Start Option" or "Hot Prewash Option" depending on - Hotpoint HDA3500NBB | Installation Instructions - Page 15
the access panel and toekick. STEP 21: LITERATURE [] Leave the Owners' Hanual, Installation Instructions, samples, and/or coupons with consumer. IMPORTANT - Screws are not interchangeable. To prevent damage to gour dishwasher, use the proper screw in the proper location. Do not mix screw tgpes or - Hotpoint HDA3500NBB | Installation Instructions - Page 16
to the dishwasher harness bg connecting like-colored wires. Figure CC • Return to Step 16 in these instructions to complete the conversion. / / / / / / Figure BB Remove StroinRelief Disconnect Powercord \ -\ \ Figure CC Conversion Harness SPECIFICATIONS SUBJECT TO CHANGE WITHOUT NOTICE GE
-
 1
1 -
 2
2 -
 3
3 -
 4
4 -
 5
5 -
 6
6 -
 7
7 -
8
-
9
-
10
-
11
-
12
-
13
-
14
-
15
-
16
 |
 |
Appliances
Installation
Instructions
Built-In
Dishwasher
If you have questions,
call 800.GE.CARES1800.432.2737} or visit our website
at:
www.ge.com
BEFORE YOU BEGIN
Read these instructions
completely
and
carefullg.
IMPORTANT-
Observe
all
governing
codes
and
ordinances.
• Note to Installer
- Be sure to leave these
instructions
for the consumer
and local inspector's
use.
• Note to Consumer
- Keep these instructions
with
your Owner's
Manual for future
reference.
• Skill Level-
Installation
of this dishwasher
requires
basic mechanical,
electrical
and plumbing
skills.
Proper
installation
is the responsibility
of
the installer.
Product
failure
due to improper
installation
is not covered
under
the GE
Appliance
Warranty.
See warranty
information.
• Completion
Time - I to 3 Hours.
New installations
require
more time than replacement
installations.
IMPORTANT-
The dishwasher
MUST be
installed
to
allow
for future
removal
from
the
enclosure
if service
is required.
If you received
a
damaged
dishwasher,
you should
immediately
contact
your
dealer
or builder.
Optional
Accessories
- See the Owner's
Manual for
available
custom
panel kits.
FOR YOUR SAFETY
Read
and
observe
all
CAUTIONS
and
WARNINGS
shown throughout theseinstructions.
While
performinginstallations
describedinthisbooklet,
gloves
and
safetgglassesshouldbeworn.
READ CAREFULLY.
KEEP THESE INSTRUCTIONS.