Hotpoint HDA3500NBB Installation Instructions - Page 15
Leave the Owners
 |
View all Hotpoint HDA3500NBB manuals
Add to My Manuals
Save this manual to your list of manuals |
Page 15 highlights
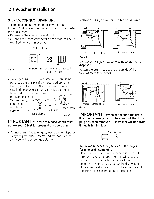
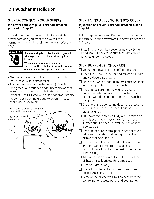
Dishwasher Installation STEP 20: REPLACE ACCESS PANEL AND TOEKICK In this step gou will need the panels and the two screws set aside in Step 4. There are two tgpes of screws used. The 8-32 x 1/4" screws are used at the top of the access panel and should still be in place. The 10-16 x ]/8" screws are used at the bottom of the access panel and secure both the access panel and toekick. STEP 21: LITERATURE [] Leave the Owners' Hanual, Installation Instructions, samples, and/or coupons with consumer. IMPORTANT - Screws are not interchangeable. To prevent damage to gour dishwasher, use the proper screw in the proper location. Do not mix screw tgpes or lengths. • Place the toekick against the legs of the dishwasher. • Remove the two 8-32 x 1//4" machine thread screws. • Align the access panel to the dishwasher. • Select the two 8-32 x 1//4" machine thread screws just removed and insert them through the top holes in the access panel and into the dishwasher frame. • Tighten these screws. • Align the toekick and make sure the bottom edge is against the floor. • Insert and tighten the two 10-16 x 3/8" sheet metal thread screws, making sure the bottom edge of the toekick stags in contact with the floor. Remove, then Reinstall and Tighten 8-52 x 1/4" Machine Thread Screws Access Panel Install and Tighten 10-16 x 3/8" Sheet Hetal Thread Screws Figure AA Tip: Prevent tub damage and reduce sound from under the dishwasher Use the machine thread screws in the top holes and the sheet metal thread screws in the bottom holes. Hake sure the toekick is against the floor.
-
 1
1 -
2
-
3
-
4
-
5
-
6
-
7
-
8
-
9
-
 10
10 -
 11
11 -
 12
12 -
 13
13 -
 14
14 -
 15
15 -
 16
16
 |
 |
