Husqvarna AUTOMOWER 450X EPOS Owner Manual - Page 16
To install objects on the map, EPOS confirmed
 |
View all Husqvarna AUTOMOWER 450X EPOS manuals
Add to My Manuals
Save this manual to your list of manuals |
Page 16 highlights
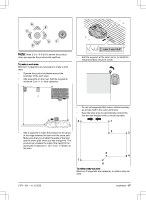
A work area is specified by virtual boundaries. Maximum 20 work areas and secondary areas can be installed on a map. There are two types of work areas: • A work area that has a charging station in it or connected to it with a transport path where the product operates automatically. • A secondary area is a work area with no charging station and no transport path. The product must be moved manually to and from the work area. A transport path is a specified path between the docking point in front of the charging station and a work area. The product can operate automatically in this path, but does not cut grass. A transport path can temporarily be enabled and disabled in the app. Stay-out zones can be made if there are areas where the product must not operate. A stay-out zone is specified by virtual boundaries. Stay-out zones can temporarily be enabled and disabled in the app. A maintenance point is a specified position where the product can be parked at. This can for example be used for a service point where maintenance of the product is done. The maintenance point is connected to the docking point with a path. To install objects on the map, operate the product with the appDrive installation to add waypoints on the map. Refer to To install objects on the map on page 16. 3.8.7.1 To install objects on the map The waypoints (A) are positions that makes the virtual boundaries and paths (B). The lines are straight between the waypoints. Add a number of waypoints to make smooth curves. You can adjust the positions of the waypoints in the app after the installation of the map. Note: The position of the waypoint when you install a work area or a stay-out zone is in the front left corner of the product. Note: The position of the waypoint when you install a transport path or a path to a maintenance point is in the middle of the product between the drive wheels. A B CAUTION: Do not lift and move the product between the waypoints when you install the map objects. Use appDrive for a correct installation. • Make sure that you are near the product and connected to the product with the app with Bluetooth®. • Make sure that the status is EPOS confirmed in the appDrive. • Select the object you want to install and use the buttons in the appDrive installation to operate the product. • Use the up button (A) to move the product forward. • Use the down button (B) to move the product rearward. • Use the left arrow button (C) to rotate the product to the left. • Use the right arrow button (D) to rotate the product to the right. • Use the center button (E) as a joystick to move and rotate the product in any direction. • Use the waypoint button (F) to add a waypoint in the map. 16 - Installation 1970 - 001 - 10.10.2022
-
 1
1 -
2
-
3
-
4
-
5
-
6
-
7
-
8
-
9
-
10
-
 11
11 -
 12
12 -
 13
13 -
 14
14 -
 15
15 -
 16
16 -
 17
17 -
 18
18 -
 19
19 -
 20
20 -
 21
21 -
22
-
23
-
24
-
25
-
26
-
27
-
28
-
29
-
30
-
31
-
32
-
33
-
34
-
35
-
36
-
37
-
38
-
39
-
40
-
41
-
42
-
43
-
44
 |
 |
