IBM 849130u Installation Guide - Page 25
Installing, adapter
 |
UPC - 000435947147
View all IBM 849130u manuals
Add to My Manuals
Save this manual to your list of manuals |
Page 25 highlights
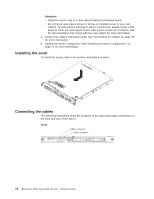
Installing an adapter The following notes describe the types of adapters that the server supports and other information that you must consider when installing an adapter: v Locate the documentation that comes with the adapter and follow those instructions in addition to the instructions in this section. If you have to change switch settings or jumper settings on the adapter, follow the instructions that come with the adapter. v The adapter slots are on the riser-card assembly. You must first remove the riser-card assembly to access the adapter slots. v Depending on the riser-card assembly in the server, the server contains either two peripheral component interconnect-extended (PCI-X) adapter slots or one PCI-X slot and one PCI Express slot. See the ServerProven list at http://www.ibm.com/servers/eserver/serverproven/compat/us/ for a list of riser cards and adapters that you can use with the server. v You can install one full-height three-quarter-length adapter in expansion slot 1 and one low-profile half-length adapter in expansion slot 2. v The server supports the following adapters: - PCI-X: 3.3 V or universal adapters - PCI Express: PCI Express x8 1.0a adapters Note: If you use a legacy PCI adapter (32 bit/33 MHz) or a slower-speed PCI-X adapter in a hot-swap SAS/SATA system, the hard-disk drive performance will be degraded. v The server uses a rotational interrupt technique to configure PCI-X adapters so that you can install PCI-X adapters that do not support sharing of PCI-X interrupts. v The optional Remote Supervisor Adapter II can be installed only in PCI-X slot 1. v You can install an optional RAID controller to enable you to configure the internal hard disk drives into disk arrays. See your RAID controller option documentation for complete instructions for installing a RAID controller and for additional information about RAID controllers. Note: Some operating systems, such as SCO 6.0 and UnixWare 7.14, do not support RAID. See http://www.ibm.com/servers/eserver/serverproven/compat/us/ to determine whether a supported operating system supports RAID. v The optional ServeRAID™ -7t SATA controller can be installed only in PCI-X slot 2. The low-profile bracket that comes with the controller is required for you to install the controller. v The optional ServeRAID 8i controller can be installed only in PCI-X slot 2. The low-profile bracket that comes with the controller is required for you to install the controller. Remove the large expansion-slot bracket that comes preinstalled on the controller, and install the low-profile bracket. v The server scans the PCI-X slots to assign system resources. If you have not changed the default startup sequence, the server starts the devices in the following order: the CD drive first; then, depending on the model, the PCI-X slots 1 and 2, or the PCI-X slot and the PCI Express slot, and then the integrated Ethernet controllers. Chapter 2. Installing options 13
-
 1
1 -
2
-
3
-
4
-
5
-
6
-
7
-
8
-
9
-
10
-
11
-
12
-
13
-
14
-
15
-
16
-
17
-
18
-
19
-
 20
20 -
 21
21 -
 22
22 -
 23
23 -
 24
24 -
 25
25 -
 26
26 -
 27
27 -
 28
28 -
 29
29 -
 30
30 -
31
-
32
-
33
-
34
-
35
-
36
-
37
-
38
-
39
-
40
-
41
-
42
-
43
-
44
-
45
-
46
-
47
-
48
-
49
-
50
-
51
-
52
-
53
-
54
-
55
-
56
-
57
-
58
-
59
-
60
-
61
-
62
-
63
-
64
-
65
-
66
-
67
-
68
-
69
-
70
-
71
-
72
 |
 |
