IBM 8676 Option Installation Guide - Page 34
Attention, Handling static-sensitive devices
 |
UPC - 087944770107
View all IBM 8676 manuals
Add to My Manuals
Save this manual to your list of manuals |
Page 34 highlights
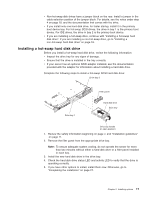
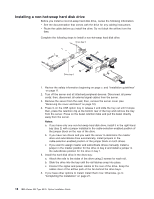
Attention: To avoid damage and to ensure proper server operation, review the following information before you install a microprocessor: v Ensure that the microprocessors are the same type, have the same cache size, and have the same clock speed. v Ensure that the microprocessor internal and external clock frequencies are identical. v See the ServerProven list at http://www.ibm.com/pc/compat/ for a list of microprocessors supported by the server. A new microprocessor comes in a kit with a VRM and a heat sink. Complete the following steps to install a microprocessor: 1. Review the safety information beginning on page v, and "Installation guidelines" on page 11. 2. Turn off the server and all attached peripheral devices. Disconnect all power cords; then, disconnect all external signal cables from the server. 3. Remove the server from the rack; then, remove the server cover (see "Removing the cover and bezel" on page 12). Determine the socket where the microprocessor is to be installed. Attention: v Avoid touching the components and gold-edge connectors on the microprocessor. Ensure that the microprocessor is completely and correctly seated in the socket. Incomplete insertion might cause damage to the system board or to the microprocessor. v When you handle static-sensitive devices, take precautions to avoid damage from static electricity. For information about handling these devices, see "Handling static-sensitive devices" on page 11. Note: A new microprocessor comes in a kit with a VRM and a heat sink. 4. If you are installing a microprocessor in the microprocessor 2 socket, first install a VRM in the microprocessor 2 VRM slot (J42) and remove the protective cover from the microprocessor 2 socket; then, lift the microprocessor-release lever to the open position. Microprocessor connector Microprocessorrelease lever Note: The microprocessor-release lever is on the side of the socket that faces the rear of the server. 5. Install the microprocessor: a. Touch the static-protective package containing the new microprocessor to any unpainted metal surface on the server; then, remove the microprocessor from the package. b. Position the microprocessor over the microprocessor socket as shown in the following illustration. Carefully press the microprocessor into the socket. 22 IBM xSeries 335 Type 8676: Option Installation Guide
-
 1
1 -
2
-
3
-
4
-
5
-
6
-
7
-
8
-
9
-
10
-
11
-
12
-
13
-
14
-
15
-
16
-
17
-
18
-
19
-
20
-
21
-
22
-
23
-
24
-
25
-
26
-
27
-
28
-
 29
29 -
 30
30 -
 31
31 -
 32
32 -
 33
33 -
 34
34 -
 35
35 -
 36
36 -
 37
37 -
 38
38 -
 39
39 -
40
-
41
-
42
-
43
-
44
-
45
-
46
-
47
-
48
-
49
-
50
-
51
-
52
-
53
-
54
-
55
-
56
-
57
-
58
-
59
-
60
-
61
-
62
-
63
-
64
 |
 |
