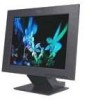
IBM 9511HG2 User Guide
IBM 9511HG2 - T 54H - 15.1" LCD Monitor Manual
 |
UPC - 087944573609
View all IBM 9511HG2 manuals
Add to My Manuals
Save this manual to your list of manuals |
IBM 9511HG2 manual content summary:
- IBM 9511HG2 | User Guide - Page 1
23- 3111 5;1: QN Setup Hardware Requirements This monitor requires a computer with a suitable on-board sub-system or Video Adapter card that can support XGA 1024 × 768, SVGA 800 x 600, or VGA 640 x 480 at 60 Hz. Handling Instructions Do not support the monitor within the screen area. The Liquid - IBM 9511HG2 | User Guide - Page 2
how you can work comfortably and reduce fatigue. Rest Take regular breaks. Vary your posture, stand up and stretch occasionally as prolonged use of computer workstations can be tiring. Back You should sit back in your chair and use the backrest. Hands Adjust the seat height so that your forearms - IBM 9511HG2 | User Guide - Page 3
U65C`tfuvq/cbdlvq/gn Qbhf 5 Xfeoftebz- Kvmz 23- 3111 5;1: QN Eyesight Working with monitors, in common with any prolonged close work, can be visually demanding. Look away from the screen periodically and have your eyesight checked regularly. Screen settings Set the screen brightness and contrast to - IBM 9511HG2 | User Guide - Page 4
PC and all attached devices. Information' at the front of this User Guide before 2. Connect the signal cable to the video port on the back of your computer. carrying out this procedure. This port might be directly attached to your computer (figure A), or it might be part of a video adapter card - IBM 9511HG2 | User Guide - Page 5
of 60Hz. To use the Plug and Play feature in Windows 95 or Windows 98, files should be loaded from the IBM Flat Panel Monitor Installation diskette: 1. Turn off the computer and all attached devices. 2. Ensure that the monitor is connected correctly. 3. Turn on the monitor and then the system unit - IBM 9511HG2 | User Guide - Page 6
3. Turn on the monitor and then the computer. 4. Run AUTO SETUP by following the instructions in the Configuring your Monitor section on page 2000, files should be loaded from the IBM Flat Panel Monitor Installation diskette. 1. Turn off the computer and all attached devices. 2. Ensure that the - IBM 9511HG2 | User Guide - Page 7
U65C`tfuvq/cbdlvq/gn Qbhf 9 Xfeoftebz- Kvmz 23- 3111 5;1: QN 14. Choose IBM T54A monitor and select OK. The files will be copied from the diskette to your hard drive. 15. Close all open windows and remove the - IBM 9511HG2 | User Guide - Page 8
the monitor, refer to Manual Setup on page 12 The signals from your computer without image discoloration or is provided on the IBM Monitor Installation Diskette. Operation and follow the appropriate instructions. You may choose set in the range of the supported screen resolution shown in the table on - IBM 9511HG2 | User Guide - Page 9
the setup several times until the flicker is minimised, or adjust it manually by following Manual Setup on page 13. 10 1. Turn on the monitor first; supported display mode is selected for your PC. 2. Wait approximately 15 minutes, until the monitor warms up. 3. Insert the diskette labelled 'IBM - IBM 9511HG2 | User Guide - Page 10
correct video adapter card is installed. • the correct supported display mode is selected for your PC. 2. Wait of the screen. 4. Insert the diskette labelled 'IBM Flat Panel Monitor Installation Disk' into the diskette on your PC and follow the instructions from the table below. Operating System - IBM 9511HG2 | User Guide - Page 11
U65C`tfuvq/cbdlvq/gn Qbhf 23 Xfeoftebz- Kvmz 23- 3111 5;1: QN 9. When finished, the OSD main menu returns. Press the Exit button once to exit from the OSD. 10. Press the ESC key to return to Windows. You have completed the monitor setup for Windows. If you use other operating systems, perform the - IBM 9511HG2 | User Guide - Page 12
SETUP, however, if your screen image is still distorted after you perform AUTO SETUP or the setup diskette does not run on your system, perform MANUAL SETUP. 1. Have your monitor turned on for about 15 minutes, until the monitor warms up. 2. Display the image you most frequently use on the screen - IBM 9511HG2 | User Guide - Page 13
U65C`tfuvq/cbdlvq/gn Qbhf 25 Xfeoftebz- Kvmz 23- 3111 5;1: QN Adjusting Your LCD Monitor User controls User control features Icon Control Exit Left Arrow Right Arrow OSD Enter Description Displays the OSD main menu Exits from menus and sub-menus Exits the OSD Displays the OSD main menu Moves the - IBM 9511HG2 | User Guide - Page 14
ENGLISH FRANÇAIS U65C`tfuvq/cbdlvq/gn Qbhf 26 Xfeoftebz- Kvmz 23- 3111 5;1: QN The settings are saved after adjustment and when exiting the OSD and will be effective thereafter. • Press the Exit button to move backwards through the sub-menus and exit from the OSD. Note: After making adjustments, - IBM 9511HG2 | User Guide - Page 15
causes horizontal lines or areas on the screen where the image appears to be unstable and jitters or shimmers. This can be done automatically or manually. Automatic Automatic adjustment 16 - IBM 9511HG2 | User Guide - Page 16
5;1: QN OSD Icon Description IMAGE LOCK (continued) IMAGE POSITION Moves the screen left and right or up and down. Sub-menu(s) Manual • Fine • Coarse H-Position V-Position Controls and Adjustments Use the Arrow buttons to adjust away the interference. If satisfactory results are not obtained - IBM 9511HG2 | User Guide - Page 17
the horizontal and vertical frequencies of the images received from the computer or video board. LANGUAGE The language chosen affects only the language of the OSD. It has no effect on any software running on the computer. Changes the position of the OSD on the screen. OSD MENU POSITION H- - IBM 9511HG2 | User Guide - Page 18
ENGLISH FRANÇAIS DEUTSCH U65C`tfuvq/cbdlvq/gn Qbhf 2: Xfeoftebz- Kvmz 23- 3111 5;1: QN The LCD monitor needs time to become thermally stable the first time you turn it on each day. Thus, to achieve more accurate adjustments for parameters, allow the LCD monitor to warm up (be On) for at least 15 - IBM 9511HG2 | User Guide - Page 19
the horizontal and vertical frequencies of the images received from the computer or video board. LANGUAGE The language chosen affects only the language of the OSD. It has no effect on any software running on the computer. Changes the position of the OSD on the screen. OSD MENU POSITION H- - IBM 9511HG2 | User Guide - Page 20
mode the monitor uses is controlled by the computer. Therefore, you should refer to your computer documentation for details on how to change display has been optimized during manufacture. Factory Set Display Modes For image problems, you may want to run AUTO Setup again before consulting to this section - IBM 9511HG2 | User Guide - Page 21
(DPMS) Standard. The power management feature is invoked when the computer recognizes that you have not used your mouse or keyboard for As an ENERGY STAR® Partner, IBM has determined that this product meets the ENERGY STAR® guidelines for energy efficiency. IBM recommends that you switch off your - IBM 9511HG2 | User Guide - Page 22
Troubleshooting If you have a problem setting up or using your monitor, you may be able to solve it yourself. Before calling your retailer or IBM, try the suggested actions that are appropriate to your problem the Power Management software on your computer Reference Connecting your Monitor section - IBM 9511HG2 | User Guide - Page 23
3111 5;1: QN Problem Screen is blank and supported display mode. Š Press any key on the keyboard or move the mouse to restore operation. Š Check the Power Management software on your computer. Š Run Auto Setup. Š If auto setup is not successful, select IMAGE LOCK menu in the OSD. Then select MANUAL - IBM 9511HG2 | User Guide - Page 24
contact your dealer, retailer, or other IBM authorized Servicer. Before calling, please have available as much of the following information as possible: 1. Model and serial number from the label on your monitor. 2. Purchase receipt. 3. Description of problem. 4. Computer type and model. 5. System - IBM 9511HG2 | User Guide - Page 25
U65C`tfuvq/cbdlvq/gn Qbhf 37 Xfeoftebz- Kvmz 23- 3111 5;1: QN 2. Carefully insert the head of a flathead (-) screwdriver into the slot visible along either side of the cable cover (a) and pry it off. 3. Squeeze the sides of the hinge cover (b) and pull it off. 4. Carefully lift the DVI connector - IBM 9511HG2 | User Guide - Page 26
Kvmz 23- 3111 5;1: QN To obtain the correct cables and/or to get further instructions on installing them, call the IBM HELPCENTER at the above numbers or contact your dealer, retailer, or other IBM authorized Servicer. Setting up & connecting your DVI-D cable 1. Refer to "Removing the stand & cables - IBM 9511HG2 | User Guide - Page 27
(Type-model 9511-Axx) uses a 15-inch TFT LCD Dimensions Weight Tilt Image Power Input Power Consumption Video Input Communications Supported Display Modes Environment Width: Depth: Height: Unpackaged: packaged: Forward Tilt: Backward tilt: Viewable Image Size: Maximum Height: Maximum Width: Pixel - IBM 9511HG2 | User Guide - Page 28
3: Xfeoftebz- Kvmz 23- 3111 5;1: QN :DUUDQW\ 6WDWHPHQWV FRANÇAIS DEUTSCH ESPAÑOL ITALIANO Your Installation Diskette includes translation of IBM's Statement of Warranty in following languages: Worldwide Statement of Warranty (Except Turkiye, U.S., Puerto Rico and Canada): Arabic Z1255697.ara - IBM 9511HG2 | User Guide - Page 29
U65C`tfuvq/cbdlvq/gn Qbhf 41 Xfeoftebz- Kvmz 23- 3111 5;1: QN Spanish Swedish Taiwanese Z1255697.spa.html Z1255697.swe.html Z1255697.tai.html Turkiye Statement of Warranty: Turkish English Z1255698.tur.html Z1255698.eng.html United States, Puerto Rico and Candada Statement of Limited Warranty:
-
 1
1 -
 2
2 -
 3
3 -
 4
4 -
 5
5 -
 6
6 -
 7
7 -
8
-
9
-
10
-
11
-
12
-
13
-
14
-
15
-
16
-
17
-
18
-
19
-
20
-
21
-
22
-
23
-
24
-
25
-
26
-
27
-
28
-
29
 |
 |

2
Setup
Hardware Requirements
This monitor requires a computer with a suitable on-board sub-system or
Video Adapter card that can support XGA 1024 × 768, SVGA 800 x 600, or
VGA 640 x 480 at 60 Hz.
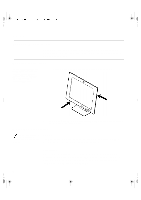
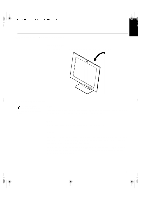
Handling Instructions
Do not support the monitor
within the screen area. The
Liquid Crystal Display is
glass and can be damaged
by rough handling or
excessive pressure.
1.
Lift the monitor by placing your hands where indicated below.
2.
Before using your monitor for the first time, remove the clear protective
film from the front of the screen.
Workplace Preparation
This section gives advice
on what you should
consider before you set up your
monitor.
Height
The monitor should be positioned so that the top of the screen is slightly
below your eye level when you sit at your workstation.
Orientation
Choose a position that gives the least reflection from lights and windows,
usually at a right angle to any windows. The monitor should be positioned
directly in front of you so that you do not have to twist your body to use it. Tilt
the monitor to a comfortable viewing angle.