Intel A2400SATAKIT Installation Guide - Page 23
Install Hot-swap Hard Drives
 |
View all Intel A2400SATAKIT manuals
Add to My Manuals
Save this manual to your list of manuals |
Page 23 highlights
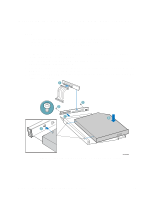
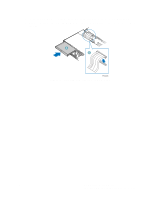
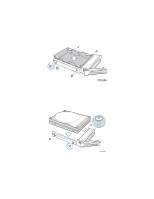
Install Hot-swap Hard Drives Repeat the steps below for each hard drive to be installed. When installing your drive(s) into the chassis, the primary drive must be inserted into the lower left drive bay. 1. Set any jumpers and / or switches on the hard drive(s) according to the instructions that came with your hard drive(s). 2. Remove the four screws that hold the plastic baffle to the drive carrier. See letter "A" in the figure below. Store the plastic drive baffle for future use. A TP01184 Figure 15. Installing Hot-swap Hard Drives into Drive Carrier 3. Position with the drive with circuit side facing down and the connector end of the drive facing the rear of the drive carrier. 4. Align the holes in the drive to the holes in the drive carrier and attach it to the carrier with the screws that were attached to the plastic retention device. TP01140 Figure 16. Installing Hot-swap Hard Drives into Drive Carrier Intel® Server Chassis SR2400 SATA or SCSI Backplane Installation 17
-
 1
1 -
2
-
3
-
4
-
5
-
6
-
7
-
8
-
9
-
10
-
11
-
12
-
13
-
14
-
15
-
16
-
17
-
 18
18 -
 19
19 -
 20
20 -
 21
21 -
 22
22 -
 23
23 -
 24
24 -
 25
25
 |
 |
