Intel D945GPM English Product Guide - Page 37
Connecting the IDE Cable
 |
View all Intel D945GPM manuals
Add to My Manuals
Save this manual to your list of manuals |
Page 37 highlights
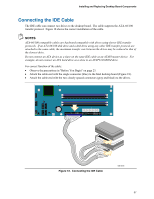
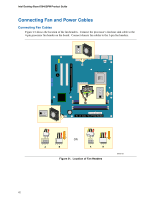
Installing and Replacing Desktop Board Components Connecting the IDE Cable The IDE cable can connect two drives to the desktop board. The cable supports the ATA-66/100 transfer protocol. Figure 18 shows the correct installation of the cable. NOTES ATA-66/100 compatible cables are backward compatible with drives using slower IDE transfer protocols. If an ATA-66/100 disk drive and a disk drive using any other IDE transfer protocol are attached to the same cable, the maximum transfer rate between the drives may be reduced to that of the slowest drive. Do not connect an ATA device as a slave on the same IDE cable as an ATAPI master device. For example, do not connect an ATA hard drive as a slave to an ATAPI CD-ROM drive. For correct function of the cable: • Observe the precautions in "Before You Begin" on page 23. • Attach the cable end with the single connector (blue) to the Intel desktop board (Figure 18). • Attach the cable end with the two closely spaced connectors (gray and black) to the drives. Figure 18. Connecting the IDE Cable OM18106 37
-
 1
1 -
2
-
3
-
4
-
5
-
6
-
7
-
8
-
9
-
10
-
11
-
12
-
13
-
14
-
15
-
16
-
17
-
18
-
19
-
20
-
21
-
22
-
23
-
24
-
25
-
26
-
27
-
28
-
29
-
30
-
31
-
 32
32 -
 33
33 -
 34
34 -
 35
35 -
 36
36 -
 37
37 -
 38
38 -
 39
39 -
 40
40 -
 41
41 -
 42
42 -
43
-
44
-
45
-
46
-
47
-
48
-
49
-
50
-
51
-
52
-
53
-
54
-
55
-
56
-
57
-
58
-
59
-
60
-
61
-
62
-
63
-
64
-
65
-
66
-
67
-
68
-
69
-
70
-
71
-
72
 |
 |
