Intel DP67BG Product Guide - Page 63
Installing the WiFi/Bluetooth* Module in a Desktop Chassis - wireless
 |
View all Intel DP67BG manuals
Add to My Manuals
Save this manual to your list of manuals |
Page 63 highlights
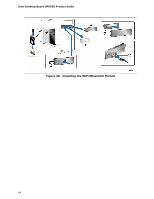
Installing and Replacing Desktop Board Components Installing the WiFi/Bluetooth* Module in a Desktop Chassis NOTE The WiFi/Bluetooth*module is supplemental hardware that is included with certain Desktop Boards. Additional WiFi/Bluetooth modules can be ordered online from http://click.intel.com/Desktop_system_parts-0-C97.aspx Installing the WiFi/Bluetooth module that is shipped with Intel Desktop Board DP67BG in your desktop system allows you to connect to wireless networks and Bluetooth peripherals. The recommended installation procedure for a typical desktop chassis is as follows: 1. Observe the precautions in "Before You Begin" on page 29. 2. Make sure that the system is turned off and disconnected from its power source. 3. Remove the plastic cover from an empty 5-1/4 inch drive bay in the chassis bezel (Figure 30, A). 4. Remove the metal filler plate from the internal drive bay (Figure 30, B). 5. Remove the paper backing covering the adhesive on the back of the WiFi/Bluetooth Module and attach the module to the back side of the plastic drive bay cover (Figure 30, C). 6. Connect one end of the USB cable to the connector on the front of the module (Figure 30, D). 7. Reinstall the plastic drive bay cover in the chassis bezel while routing the USB cable into the chassis through the empty drive bay (Figure 30, E). 8. Connect the free end of the USB cable to an unused front panel USB header on the Desktop Board (see Figure 1, DD for locations) (Figure 30, F). 63
-
 1
1 -
2
-
3
-
4
-
5
-
6
-
7
-
8
-
9
-
10
-
11
-
12
-
13
-
14
-
15
-
16
-
17
-
18
-
19
-
20
-
21
-
22
-
23
-
24
-
25
-
26
-
27
-
28
-
29
-
30
-
31
-
32
-
33
-
34
-
35
-
36
-
37
-
38
-
39
-
40
-
41
-
42
-
43
-
44
-
45
-
46
-
47
-
48
-
49
-
50
-
51
-
52
-
53
-
54
-
55
-
56
-
57
-
 58
58 -
 59
59 -
 60
60 -
 61
61 -
 62
62 -
 63
63 -
 64
64 -
 65
65 -
 66
66 -
 67
67 -
 68
68 -
69
-
70
-
71
-
72
-
73
-
74
-
75
-
76
-
77
-
78
-
79
-
80
-
81
-
82
-
83
-
84
-
85
-
86
-
87
-
88
 |
 |