Intel SE7501BR2 Product Guide - Page 35
Installing the Rubber Bumper,
 |
UPC - 735858158053
View all Intel SE7501BR2 manuals
Add to My Manuals
Save this manual to your list of manuals |
Page 35 highlights
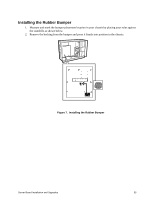
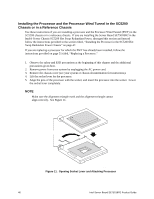
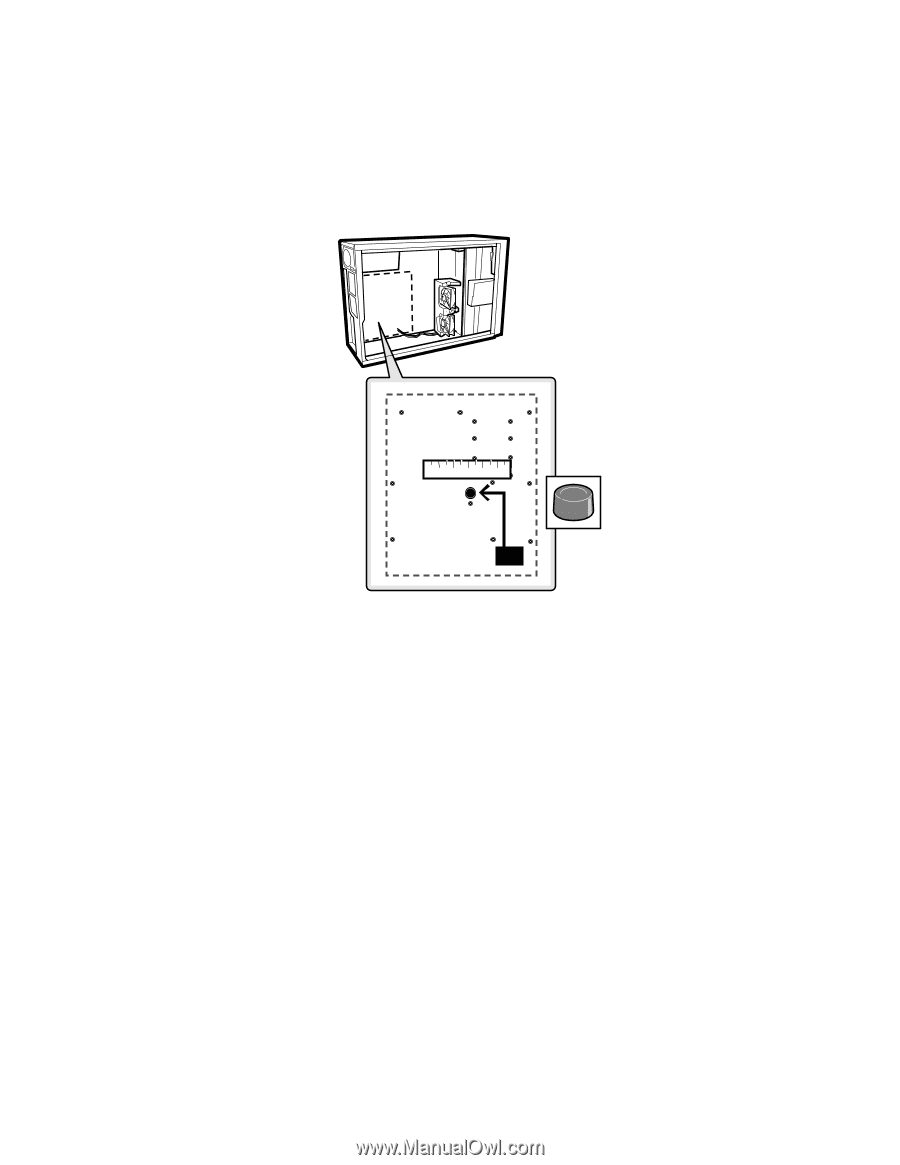
Installing the Rubber Bumper 1. Measure and mark the bumper placement location in your chassis by placing your ruler against the standoffs as shown below. 2. Remove the backing from the bumper and press it firmly into position in the chassis. 1 7 20 P P P P P P 4 8 P 18 7 P 0 23 6 19 26 3" (7.6 cm) OM14835 Figure 7. Installing the Rubber Bumper Server Board Installation and Upgrades 35
-
 1
1 -
2
-
3
-
4
-
5
-
6
-
7
-
8
-
9
-
10
-
11
-
12
-
13
-
14
-
15
-
16
-
17
-
18
-
19
-
20
-
21
-
22
-
23
-
24
-
25
-
26
-
27
-
28
-
29
-
 30
30 -
 31
31 -
 32
32 -
 33
33 -
 34
34 -
 35
35 -
 36
36 -
 37
37 -
 38
38 -
 39
39 -
 40
40 -
41
-
42
-
43
-
44
-
45
-
46
-
47
-
48
-
49
-
50
-
51
-
52
-
53
-
54
-
55
-
56
-
57
-
58
-
59
-
60
-
61
-
62
-
63
-
64
-
65
-
66
-
67
-
68
-
69
-
70
-
71
-
72
-
73
-
74
-
75
-
76
-
77
-
78
-
79
-
80
-
81
-
82
-
83
-
84
-
85
-
86
-
87
-
88
-
89
-
90
-
91
-
92
-
93
-
94
-
95
-
96
-
97
-
98
-
99
-
100
-
101
-
102
-
103
-
104
-
105
-
106
-
107
-
108
-
109
-
110
-
111
-
112
-
113
-
114
-
115
-
116
-
117
-
118
-
119
-
120
-
121
-
122
-
123
-
124
-
125
-
126
-
127
-
128
-
129
-
130
 |
 |
Server Board Installation and Upgrades
35
Installing the Rubber Bumper
1.
Measure and mark the bumper placement location in your chassis by placing your ruler against
the standoffs as shown below.
2.
Remove the backing from the bumper and press it firmly into position in the chassis.
OM14835
1
4
6
7
18
19
20
23
26
P
P
P
P
P
P
P
P
7
0
8
3"
(7.6 cm)
Figure 7.
Installing the Rubber Bumper