Invacare CRFTI Owners Manual - Page 52
Adjusting Fork Tension,
 |
View all Invacare CRFTI manuals
Add to My Manuals
Save this manual to your list of manuals |
Page 52 highlights
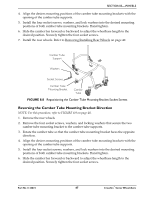
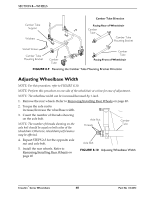
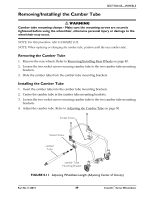
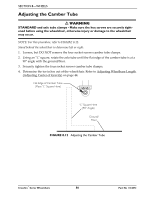
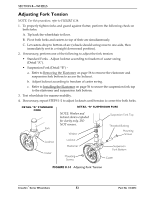
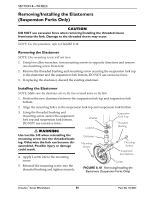
SECTION 8-WHEELS Adjusting Fork Tension NOTE: For this procedure, refer to FIGURE 8.14. 1. To properly tighten forks and guard against flutter, perform the following check on both forks: A. Tip back the wheelchair to floor. B. Pivot both forks and casters to top of their arc simultaneously. C. Let casters drop to bottom of arc (wheels should swing once to one‐side, then immediately rest in a straight downward position). 2. If necessary, perform one of the following to adjust the fork tension: • Standard Forks ‐ Adjust locknut according to freedom of caster swing (Detail "A"). • Suspension Fork (Detail "B") ‐ a. Refer to Removing the Elastomer on page 56 to remove the elastomer and suspension fork bottom to access the locknut. b. Adjust locknut according to freedom of caster swing. c. Refer to Installing the Elastomer on page 56 to secure the suspension fork top to the elastomer and suspension fork bottom. 3. Test wheelchair for maneuverability. 4. If necessary, repeat STEPS 1‐2 to adjust locknuts until tension is correct for both forks. DETAIL "A" STANDARD FORK Fork DETAIL "B" SUSPENSION FORK NOTE: Washer and locknut shown exploded for clarity only. DO NOT remove. Washer Suspension Fork Top Threaded Bushing Mounting Screws Locknut Caster Locknut Elastomer Mounting Screws Suspension Fork Bottom Caster FIGURE 8.14 Adjusting Fork Tension Crossfire™Series Wheelchairs 52 Part No 1134872
-
 1
1 -
2
-
3
-
4
-
5
-
6
-
7
-
8
-
9
-
10
-
11
-
12
-
13
-
14
-
15
-
16
-
17
-
18
-
19
-
20
-
21
-
22
-
23
-
24
-
25
-
26
-
27
-
28
-
29
-
30
-
31
-
32
-
33
-
34
-
35
-
36
-
37
-
38
-
39
-
40
-
41
-
42
-
43
-
44
-
45
-
46
-
 47
47 -
 48
48 -
 49
49 -
 50
50 -
 51
51 -
 52
52 -
 53
53 -
 54
54 -
 55
55 -
 56
56 -
 57
57 -
58
-
59
-
60
-
61
-
62
-
63
-
64
 |
 |
