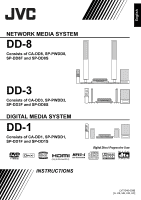
JVC DD-3 Instructions - Page 84
Connecting the main unit to, the computer directly, obtain its IP address automatically.
 |
UPC - 046838029998
View all JVC DD-3 manuals
Add to My Manuals
Save this manual to your list of manuals |
Page 84 highlights
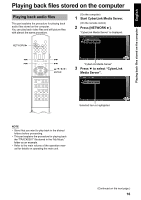
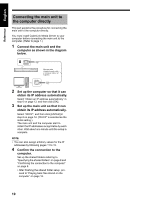
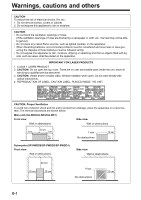
Reference English Connecting the main unit to the computer directly This part explains the procedure for connecting the main unit to the computer directly. You must install CyberLink Media Server to your computer before connecting the main unit to the computer. (Refer to page 7.) 1 Connect the main unit and the computer as shown in the diagram below. Ethernet cable (straight-through cable or crossover cable, not supplied) 2 Set up the computer so that it can obtain its IP address automatically. Select "Obtain an IP address automatically" in step 6 on page 13, and then click [OK]. 3 Set up the main unit so that it can obtain its IP address automatically. Select "DHCP", and then click [ENTER] in step 6 on page 14. ("DHCP" is selected as the initial setting.) The main unit and the computer start to obtain the IP addresses recognizable by each other. Wait about one minute until the setup is complete. NOTE • You can also assign arbitrary values for the IP addresses by following pages 11 to 15. 4 Confirm the connection to the computer. Set up the shared folders referring to "Specifying the shared folders" on page 8 and "Confirming the connection to the computer" on page 9. • After finishing the shared folder setup, pro- ceed to "Playing back files stored on the computer" on page 16. 19
-
 1
1 -
2
-
3
-
4
-
5
-
6
-
7
-
8
-
9
-
10
-
11
-
12
-
13
-
14
-
15
-
16
-
17
-
18
-
19
-
20
-
21
-
22
-
23
-
24
-
25
-
26
-
27
-
28
-
29
-
30
-
31
-
32
-
33
-
34
-
35
-
36
-
37
-
38
-
39
-
40
-
41
-
42
-
43
-
44
-
45
-
46
-
47
-
48
-
49
-
50
-
51
-
52
-
53
-
54
-
55
-
56
-
57
-
58
-
59
-
60
-
61
-
62
-
63
-
64
-
65
-
66
-
67
-
68
-
69
-
70
-
71
-
72
-
73
-
74
-
75
-
76
-
77
-
78
-
 79
79 -
 80
80 -
 81
81 -
 82
82 -
 83
83 -
 84
84 -
 85
85 -
 86
86 -
 87
87 -
 88
88 -
 89
89 -
90
-
91
-
92
-
93
-
94
-
95
-
96
-
97
-
98
-
99
-
100
-
101
-
102
-
103
-
104
-
105
-
106
-
107
-
108
-
109
-
110
-
111
-
112
-
113
-
114
-
115
-
116
-
117
-
118
-
119
-
120
-
121
-
122
-
123
-
124
-
125
-
126
-
127
-
128
-
129
-
130
-
131
-
132
-
133
-
134
-
135
-
136
-
137
-
138
-
139
-
140
-
141
-
142
-
143
-
144
-
145
-
146
-
147
-
148
-
149
-
150
-
151
-
152
-
153
-
154
-
155
-
156
-
157
-
158
-
159
-
160
-
161
-
162
-
163
-
164
-
165
-
166
-
167
-
168
 |
 |
