JVC GRAX890 Instructions
JVC GRAX890 - VHS-C Camcorder w/16x Optical Zoom Manual
 |
UPC - 046838010316
View all JVC GRAX890 manuals
Add to My Manuals
Save this manual to your list of manuals |
JVC GRAX890 manual content summary:
- JVC GRAX890 | Instructions - Page 1
INSTRUCTIONS ENGLISH COMPACT VHS CAMCORDER GR-AX890 LYT1233-001B For Customer Use: Enter below the Model No. and Serial No. which is located on the bottom of the camcorder. Retain this information for future reference. Model No. Serial No. US/UC Printed in Malaysia 1203YDR-NF-VM COPYRIGHT© - JVC GRAX890 | Instructions - Page 2
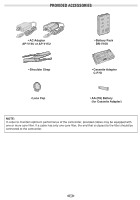
BN-V10U • Shoulder Strap • Cassette Adapter C-P7U • Lens Cap • AA (R6) Battery (for Cassette Adapter) NOTE: In order to maintain optimum performance of the camcorder, provided cables may be equipped with one or more core filter. If a cable has only one core filter, the end that is closest to - JVC GRAX890 | Instructions - Page 3
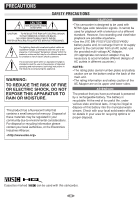
USER-SERVICEABLE PARTS INSIDE. REFER SERVICING TO QUALIFIED SERVICE PERSONNEL maintenance (servicing) instructions in the Electronics Industries Alliance: CAUTIONS • This camcorder JVC BN-V10U/V12U/V20U/V400U battery packs and, to recharge them or to supply power to the camcorder - JVC GRAX890 | Instructions - Page 4
JVC's involvement in this program is part discarding batteries, environmental problems must be considered INSTRUCTIONS (1) Read these instructions. (2) Keep these instructions. (3) Heed all warnings. (4) Follow all instructions Refer all servicing to qualified service personnel. Servicing is required - JVC GRAX890 | Instructions - Page 5
Battery Pack pg. 6 Clean The Camcorder pg. 27 Connection To a VCR/TV pg. 15 Counter Memory pg. 14 D Date/Time Display pg. 20 Date/Time Settings pg. 7 Demonstration Mode pg. 1, 22 Digital Effects pg. 24 Digital Zoom pg. 20 Diopter Adjustment pg. 8 E Electronic Fog Filter Mode pg. 24 Erase - JVC GRAX890 | Instructions - Page 6
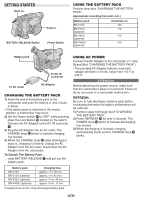
CHARGING THE BATTERY PACK 1) Hook the end of the battery pack to the camcorder and push the battery in until it locks in place. • If the battery and pull out the battery pack. USING AC POWER Connect the AC Adapter to the camcorder (੬ step 2) and 3) of "CHARGING THE BATTERY PACK"). • The provided AC - JVC GRAX890 | Instructions - Page 7
the Menu Screen. • To display the date and time in the camcorder's display and on a connected TV, see DATE/TIME DISP. (੬ pg be stored in memory if the built-in clock battery runs out. Consult an authorized JVC dealer for replacement, or set the date/time as necessary before you start shooting. 1 - JVC GRAX890 | Instructions - Page 8
the Velcro strip. 3 9 Velcro strip Tripod Mounting Align the screw and camera direction stud on the tripod with the tripod mounting socket o. Then tighten , be sure to open and extend its legs fully to stabilize o the camcorder. To prevent damage to the unit caused by falling over, do not use - JVC GRAX890 | Instructions - Page 9
CONTROLS, CONNECTORS AND INDICATORS 12 34 Refer to this diagram while reading the instructions. During shooting @ # $% ^ & 5 6 7 89 0 ! Viewfinder y u 180° Keep the lens cap attached to the camcorder. Cassette holder t i Microphone *( ) qw e Turn the gear to take up slack. r e o Erase - JVC GRAX890 | Instructions - Page 10
Manual Focus Button [ FOCUS pg. 12 • Time Base Corrector Button [TBC pg. 14 5 Audio Output Connector [A pg. 15 6 Video y Diopter Adjustment Control pg. 8 u Camera Sensor Be careful not to cover this area; Backlight Compensation Indicator pg. 12 E • Digital Effect Indicator pg. 24 • Program AE - JVC GRAX890 | Instructions - Page 11
q or R ^ during playback (holding Q q or R ^ down during playback continues search until released). To resume normal playback, press B/ ; %. For VIDEO RECORDING/VIDEO PLAYBACK • The camcorder shuts off automatically after about 5 minutes in the Record-Standby or Stop mode. To turn on again, set the - JVC GRAX890 | Instructions - Page 12
Button 9. Recording starts, and after 5-second recording is finished, the camcorder re-enters the Record- Standby mode automatically. 4) To cancel the the MENU Wheel 1 downward. " B" appears and blinks. 4) To cancel the Manual Focus, press FOCUS 4. " " disappears and the Auto Focus is applied. • - JVC GRAX890 | Instructions - Page 13
while in Record- Standby, lock the focus by using the manual focus (੬ pg. 12, "Auto/Manual Focus"), then zoom in or out in Record mode. • To deactivate Digital Zoom, set "D.ZOOM" (੬ pg. 20) to "OFF" in SYSTEM MENU. Quick Review To check the end of the last recording. 1) Make sure the camcorder is - JVC GRAX890 | Instructions - Page 14
• When noise bars appear during playback, the camcorder enters the Auto Tracking mode and "AT" D appears. • Manual Tracking may not work with tapes recorded on other VCRs or camcorders. TBC (Time Base Corrector) Removes jitter from fluctuating video signals to deliver a stable picture even with old - JVC GRAX890 | Instructions - Page 15
Connections To A TV/VCR 1) Make sure all units are turned off. 2) Connect the camcorder to a TV or VCR using optional video and audio cables. If using both TV and VCR, connect the VCR output to the TV input. 3) Turn on all units. Set the VCR to - JVC GRAX890 | Instructions - Page 16
Using The Cassette Adapter Use this to play back an VHS-C video cassette recorded with this camcorder on a VHS VCR. 1) Slide the battery cover up to remove it, install one "AA (R6)" size battery, then reattach the cover. 2) Slide the latch to open the - JVC GRAX890 | Instructions - Page 17
to this diagram while reading the instructions. During shooting @ # $% ^ & 5 6 7 89 0 ! Keep the lens cap attached to the camcorder. Cassette holder *( ) qw Viewfinder y u t 180° i Microphone e Turn the gear to take up slack. r e o Erase protection tab Y I U O P a s d Viewfinder - JVC GRAX890 | Instructions - Page 18
C MOD E SP D . Z OOM 50x S. LX NORMA L WI DE O FF TAPE L ENGTH T 3 0 D I SPLAY FULL DAT E T I ME D I SP . BR E T U R N CAMERA MENU EXPOSURE Manual exposure adjustment is recommended in the following situations: • When shooting using reverse lighting or when the background is too bright - JVC GRAX890 | Instructions - Page 19
on a cloudy day. HALOGEN : A video light or similar type of lighting is used. MWB: White balance is set manually. Hold a sheet of plain white be used when the "SEPIA" or "MONOTONE" mode (੬ pg. 24, "Digital Effects") is activated. TITLE Allows you to superimpose one of eight preset titles. - JVC GRAX890 | Instructions - Page 20
limit), to a maximum of 50X or 700X digital magnification. When set to "OFF" only optical in the "TITLE SETUP (SIZE)" (੬ pg. 19, "CAMERA MENU") cannot be selected. TAPE LENGTH Allows you to set shooting. • In the AUTO DATE mode, the camcorder records the date for about 5 seconds when recording - JVC GRAX890 | Instructions - Page 21
recommended that SCROLL in TITLE SETUP (੬ pg. 18, 19) be set to "OFF". INT. TIME You can record sequentially at preset time spans. Leaving the camcorder aimed at a specific subject, you can record subtle changes over an extended period of time (Time-Lapse). REC MODE should be set to "SP". (Please - JVC GRAX890 | Instructions - Page 22
temporarily. Set to OFF to stop completely. • When a tape whose erase protection tab is in the position that allows recording is loaded in the camcorder, demonstration is not available. • If you do not detach the Lens Cap, you cannot see the actual changes of the Automatic Demonstration activated on - JVC GRAX890 | Instructions - Page 23
ADVANCED FEATURES Fade/Wipe Effects Fade- or wipe-in works at recording start, and fadeor wipe-out works at recording end. 1) Set the Power Switch ! to " " while pressing down the Lock Button 0 located on the switch. 2) Press FADE/WIPE ) repeatedly until the desired mode appears. 3) Press the - JVC GRAX890 | Instructions - Page 24
surroundings such as in the snow or beach. In this mode, the fast moving images can be recorded since the shutter speed becomes fast. Digital Effects 1) Set the Power Switch ! to " " while pressing down the Lock Button 0 located on the switch. 2) Press DIGIFECT # repeatedly until the desired mode - JVC GRAX890 | Instructions - Page 25
TROUBLESHOOTING Before consulting your JVC dealer, please check the following to see if you can correct the problem yourself. Vertical Before recording in the Animation mode at the very beginning of a tape, set the camcorder to the Recording mode for about 5 seconds, so that the tape runs smoothly. - JVC GRAX890 | Instructions - Page 26
plug adapter, consult your nearest JVC dealer. Plug adapter • adapter (C-P6U/C-P7U) instructions. 2. Do not shorten service life. VHS-C mark. .... be aware that recording onto prerecorded tapes automatically erases the previously recorded video . .... open the camcorder's chassis. .... disassemble - JVC GRAX890 | Instructions - Page 27
Moisture on the head drum can cause severe damage to the video tape, and can lead to internal damage to the camcorder itself. Serious malfunctioning If malfunctioning occurs, stop using the unit immediately and consult your local JVC dealer. For Your Maintenance 1. After Use 1 Set the Power Switch - JVC GRAX890 | Instructions - Page 28
auto iris and macro control, filter diameter 40.5 mm : Electronic viewfinder with 0.5" black/white CRT White balance adjustment : Auto/Manual adjustment Connectors Video Audio : 1 V (p-p), 75 Ω unbalanced, analog output (via Video output connector) : 300 mV (rms), 1 kΩ, analog output (via Audio - JVC GRAX890 | Instructions - Page 29
110 (opcional) BN-V20U 170 (opcional) BN-V400U 410 (opcional) USO DE LA ALIMENTACIÓN DE CA Conecte el adaptador de CA en la cámara de video (੬ pasos 2) y 3) de "CARGA DE LA BATERÍA"). • El adaptador de CA suministrado presenta una selección automática de voltaje con límites de CA de 110 - JVC GRAX890 | Instructions - Page 30
CHARGE * puede no se encender. Retire la batería de la cámara de video, luego intente la carga nuevamente. • Si el tiempo de funcionamiento de una bater es posible cargar la batería BN-V10U/V12U/V20U/V400U sin la cámara de video. Sin embargo, no es posible utilizarlo como un adaptador de CA. • Para - JVC GRAX890 | Instructions - Page 31
mal, deje de usarla inmediatamente y consulte a su concesionario local de JVC. Colocación/Extracción de un cassette 1) Deslice EJECT & hasta que el • El compartimiento de cassette no puede ser abierto mientras la cámara de video está en el modo de grabación o desconectada de la fuente de alimentaci - JVC GRAX890 | Instructions - Page 32
presione 2/ ; %. Para GRABACIÓN DE VÍDEO/REPRODUCCION DE VÍDEO • La cámara de video se desactiva automáticamente después de 5 minutos en el modo de espera de grabación o en SYSTEM MENU. O simplemente reproduzca la cinta en un VCR de VHS utilizando el adaptador de cassette. ੬ p. 16 1 %^ 0! qw 32
-
 1
1 -
 2
2 -
 3
3 -
 4
4 -
 5
5 -
 6
6 -
 7
7 -
8
-
9
-
10
-
11
-
12
-
13
-
14
-
15
-
16
-
17
-
18
-
19
-
20
-
21
-
22
-
23
-
24
-
25
-
26
-
27
-
28
-
29
-
30
-
31
-
32
 |
 |
1
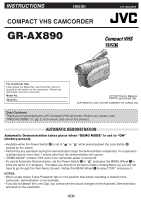
INSTRUCTIONS
ENGLISH
LYT1233-001B
AUTOMATIC DEMONSTRATION
Automatic Demonstration takes place when “DEMO MODE” is set to “ON”
(factory-preset).
• Available when the Power Switch
!
is set to “
” or “
” while pressing down the Lock Button
0
located on the switch.
•Performing any operation during the demonstration stops the demonstration temporarily. If no operation
is performed for more than 1 minute after that, the demonstration will resume.
• “DEMO MODE” remains “ON” even if the camcorder power is turned off.
•To cancel Automatic Demonstration, set the Power Switch
!
to “
” and press the MENU Wheel
1
in
while the demo is in progress. This takes you directly to the demo mode’s Setting Menu (so you will not
have to go through the main Menu Screen). Rotate the MENU Wheel
1
to select “OFF” and press it.
NOTES:
• When a tape whose Erase Protection tab is in the position that allows recording is loaded in the
camcorder, demonstration is not available.
• If you do not detach the Lens Cap, you cannot see the actual changes of the Automatic Demonstration
activated on the viewfinder.
Dear Customer,
Thank you for purchasing the JVC Compact VHS camcorder. Before use, please read
“PRECAUTIONS” (
±
pg. 3, 4) to ensure safe use of this product.
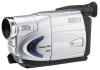
COMPACT VHS CAMCORDER
GR-AX890
COPYRIGHT©
2003 VICTOR COMPANY OF JAPAN, LTD
US/UC
Printed in Malaysia
1203YDR-NF-VM
For Customer Use:
Enter below the Model No. and Serial No. which is
located on the bottom of the camcorder. Retain this
information for future reference.
Model No.
Serial No.