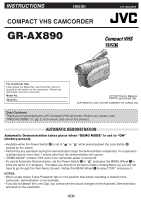
JVC GRAX890 Instructions - Page 6
Getting Started
 |
UPC - 046838010316
View all JVC GRAX890 manuals
Add to My Manuals
Save this manual to your list of manuals |
Page 6 highlights
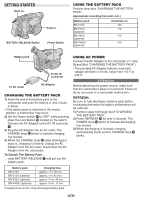
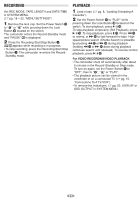
GETTING STARTED Hook on. Push in. BATTERY RELEASE Switch Power Switch USING THE BATTERY PACK Perform step 1) of "CHARGING THE BATTERY PACK". Approximate recording time (unit: min.) Battery pack BN-V10U BN-V12U (optional) BN-V20U (optional) BN-V400U (optional) Viewfinder on 100 110 170 410 Battery pack To AC outlet To DC IN connector AC Adapter CHARGING THE BATTERY PACK 1) Hook the end of the battery pack to the camcorder and push the battery in until it locks in place. • If the battery pack is attached in the wrong position, a malfunction may occur. 2) Set the Power Switch ! to "OFF" while pressing down the Lock Button 0 located on the switch. Connect the AC Adapter to the DC IN connector 8. 3) Plug the AC Adapter into an AC outlet. The CHARGE lamp * blinks to indicate charging has started. 4) When the CHARGE lamp * stops blinking but stays lit, charging is finished. Unplug the AC Adapter from the AC outlet. Disconnect the AC Adapter from the camcorder. To Detach The Battery Pack . . . ... slide BATTERY RELEASE 7 and pull out the battery pack. USING AC POWER Connect the AC Adapter to the camcorder (੬ step 2) and 3) of "CHARGING THE BATTERY PACK"). • The provided AC Adapter features automatic voltage selection in the AC range from 110 V to 240 V. ATTENTION Before detaching the power source, make sure that the camcorder's power is turned off. Failure to do so can result in a camcorder malfunction. REFRESH: Be sure to fully discharge a battery pack before recharging otherwise the battery performance will be reduced. 1) Perform steps 1) through 3) of "CHARGING THE BATTERY PACK". 2) Press REFRESH ( for over 2 seconds. The POWER lamp @ blinks to indicate discharging has started. 3) When discharging is finished, charging automatically starts and the CHARGE lamp * blinks. Battery pack BN-V10U BN-V12U (optional) BN-V20U (optional) BN-V400U (optional) Charging time approx. 1 hr. 30 min. approx. 1 hr. 40 min. approx. 2 hrs. 40 min. approx. 5 hrs. 10 min. Charging times are for a fully discharged battery pack. 6
-
 1
1 -
 2
2 -
 3
3 -
 4
4 -
 5
5 -
 6
6 -
 7
7 -
 8
8 -
 9
9 -
 10
10 -
 11
11 -
 12
12 -
13
-
14
-
15
-
16
-
17
-
18
-
19
-
20
-
21
-
22
-
23
-
24
-
25
-
26
-
27
-
28
-
29
-
30
-
31
-
32
 |
 |
