JVC GY-HM710U GY-HM710 ProHD Camcorder 141 page owner's manual (includes GY-HM - Page 51
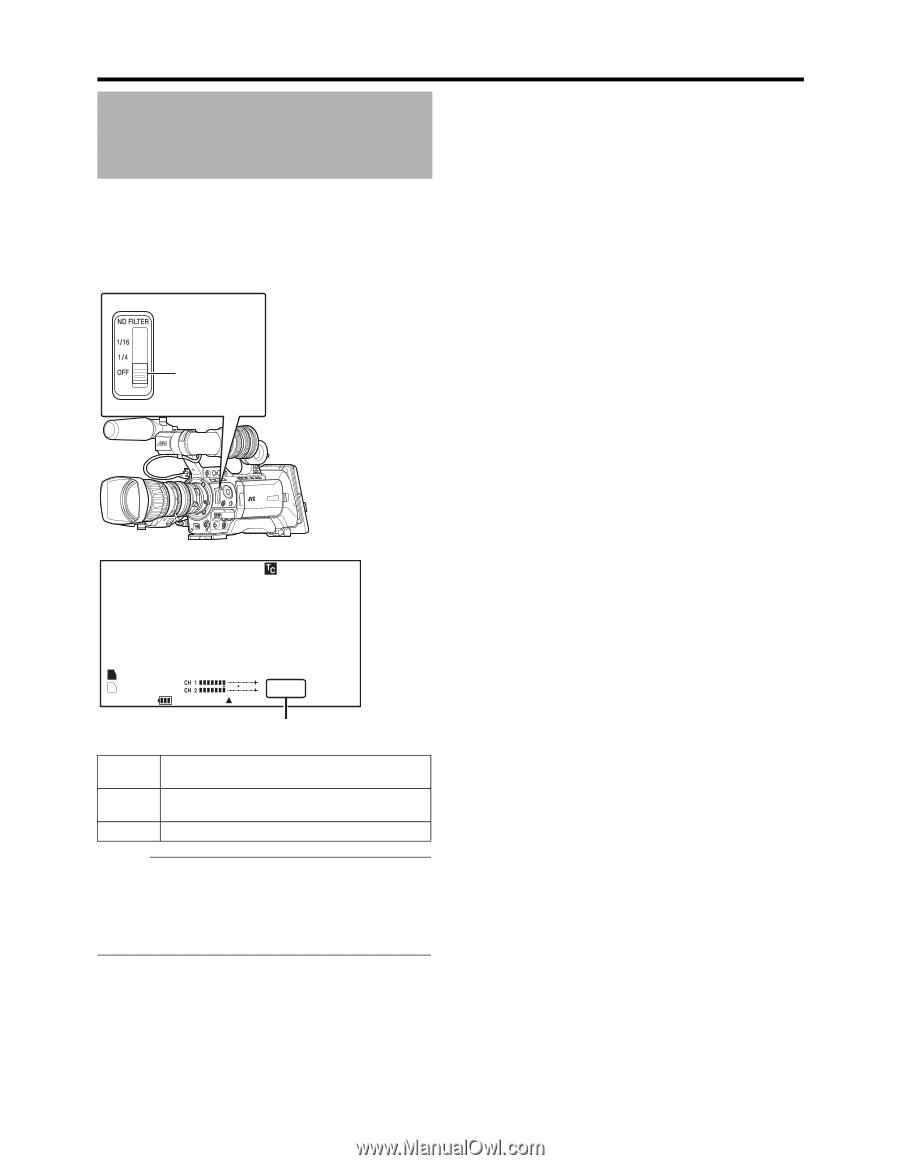
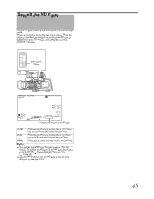
Setting the ND Filter
 |
View all JVC GY-HM710U manuals
Add to My Manuals
Save this manual to your list of manuals |
Page 51 highlights
Setting the ND Filter Use the ND filter to keep the lens aperture in the appropriate range. Switch according to the brightness of the object. When the switch is changed, the position of the switched ND filter is displayed on the LCD monitor and viewfinder screens. (STATUS 1 Screen) [ND FILTER] Switch 1280x720 30/24 fps 24p HQ 00:00:00:00 A 100min B 100min STBY 282min MAX 123% MIN 45% S.DTL B -3 ND1/16 A Displays the position of the ND filter [1/16] [1/4] [OFF] Reduces the amount of incident light to 1/16. Select this for extremely bright outdoor environments. Reduces the amount of incident light to 1/4. Select this for bright and sunny outdoor environments. Select this for indoor and dark outdoor environments. Memo : ● The display of the ND filter position is set to AOffB by default. To display the position of the ND filter, set [Filter] in the [LCD/VF] B [Status Display] menu to AOnB. (A Page 90) ● It is recommended to use the ND filter to set the lens aperture to less than F5.6. 45
-
 1
1 -
2
-
3
-
4
-
5
-
6
-
7
-
8
-
9
-
10
-
11
-
12
-
13
-
14
-
15
-
16
-
17
-
18
-
19
-
20
-
21
-
22
-
23
-
24
-
25
-
26
-
27
-
28
-
29
-
30
-
31
-
32
-
33
-
34
-
35
-
36
-
37
-
38
-
39
-
40
-
41
-
42
-
43
-
44
-
45
-
 46
46 -
 47
47 -
 48
48 -
 49
49 -
 50
50 -
 51
51 -
 52
52 -
 53
53 -
 54
54 -
 55
55 -
 56
56 -
57
-
58
-
59
-
60
-
61
-
62
-
63
-
64
-
65
-
66
-
67
-
68
-
69
-
70
-
71
-
72
-
73
-
74
-
75
-
76
-
77
-
78
-
79
-
80
-
81
-
82
-
83
-
84
-
85
-
86
-
87
-
88
-
89
-
90
-
91
-
92
-
93
-
94
-
95
-
96
-
97
-
98
-
99
-
100
-
101
-
102
-
103
-
104
-
105
-
106
-
107
-
108
-
109
-
110
-
111
-
112
-
113
-
114
-
115
-
116
-
117
-
118
-
119
-
120
-
121
-
122
-
123
-
124
-
125
-
126
-
127
-
128
-
129
-
130
-
131
-
132
-
133
-
134
-
135
-
136
-
137
-
138
-
139
-
140
-
141
 |
 |