JVC GZ-HM200BUS Guide Book - Page 51
Select the desired menu., Select [OK]., mode: [ALL IMAGES]
 |
UPC - 046838037788
View all JVC GZ-HM200BUS manuals
Add to My Manuals
Save this manual to your list of manuals |
Page 51 highlights
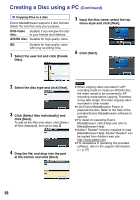
Backup All Files Preparation: • Connect the camcorder to the USB external hard disk drive. • Select ! or # mode. • Make sure that SD card is inserted in the SD Slot. 1 Select the desired menu. VIDEO BACKUP ALL SCENES UNSAVED SCENES PLAYBACK DELETE SAVE ALL VIDEOS SET QUIT • ! mode: [ALL SCENES] # mode: [ALL IMAGES] All files in the recording medium are copied. • ! mode: [UNSAVED SCENES] # mode: [UNSAVED IMAGES] Files that have never been copied are automatically selected and copied. 2 Select [OK]. ALL SCENES DEC.12.2009 44SCENES REQ SPACE: 22MB FREE SPACE: 1.791MB START BACKUP? OK RETURN SET QUIT • The files are copied to the USB external hard disk drive. When [COMPLETED] appears, touch OK. • To cancel copying, select [STOP]. To delete the files in the USB external hard disk drive In step 1, select [DELETE]. To play back the files in the USB external hard disk drive 1) In step 1, select [PLAYBACK]. 2) Select the desired folder. 3) Select the desired file. To return to the previous screen, select @. To format the USB external hard disk drive In step 1, select [FORMAT]. When connecting a USB external hard disk drive to the camcorder • Do not connect a USB hub between the camcorder and the USB external hard disk drive. • Disconnect the USB external hard disk drive when using other USB devices such as BD/DVD burner or another USB external hard disk drive. • Format the USB external hard disk drive when connecting it to the camcorder for the first time. (All data is deleted.) When copying or playing back • Copying may take time. (For example, saving 1 hour video in XP mode takes about 20 minutes.) • Avoid the following operations during copying and playing back, - Turning off the camcorder or the USB external hard disk drive. - Disconnecting the USB cable. • Files in the USB external hard disk drive cannot be copied back to the camcorder. • Files deleted from the camcorder cannot be written to a disc using a BD/DVD burner, even if they have been copied in the USB external hard disk drive. • Sound or video may be interrupted during playback. When connecting a USB external hard disk drive to a PC • Do not format the USB external hard disk drive using the PC. If you did, format again using the camcorder. (All the data in the USB external hard disk drive will be erased.) • Avoid the following operations using the PC - Deleting files or folders in the USB external hard disk drive - Moving files or folders in the USB external hard disk drive - Changing the name of files or folders in the USB external hard disk drive. These operations make the data impossible to be played back on the camcorder. • When you use the PC to edit the data in the USB external hard disk drive, copy the data to the PC before editing. Editing the data in the USB external hard disk drive directly from the PC makes the data impossible to be played back on the camcorder. 51 COPYING ENGLISH
-
 1
1 -
2
-
3
-
4
-
5
-
6
-
7
-
8
-
9
-
10
-
11
-
12
-
13
-
14
-
15
-
16
-
17
-
18
-
19
-
20
-
21
-
22
-
23
-
24
-
25
-
26
-
27
-
28
-
29
-
30
-
31
-
32
-
33
-
34
-
35
-
36
-
37
-
38
-
39
-
40
-
41
-
42
-
43
-
44
-
45
-
 46
46 -
 47
47 -
 48
48 -
 49
49 -
 50
50 -
 51
51 -
 52
52 -
 53
53 -
 54
54 -
 55
55 -
 56
56 -
57
-
58
-
59
-
60
-
61
-
62
-
63
-
64
-
65
-
66
-
67
-
68
-
69
-
70
-
71
-
72
-
73
-
74
-
75
-
76
-
77
-
78
 |
 |
