JVC GZ-HM200BUS Guide Book - Page 59
Uploading Files to Websites, Turning on the Upload Mode, Upload Trimming
 |
UPC - 046838037788
View all JVC GZ-HM200BUS manuals
Add to My Manuals
Save this manual to your list of manuals |
Page 59 highlights
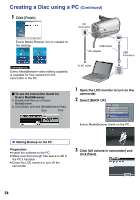
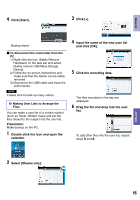
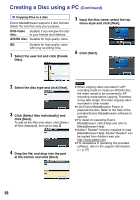
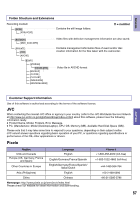
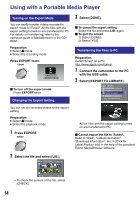
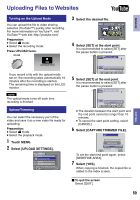
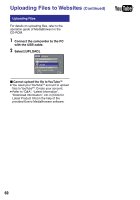
Uploading Files to Websites ENGLISH Turning on the Upload Mode You can upload the file to video sharing websites (YouTube™) quickly after recording. For more information on YouTube™, visit YouTube™ web site: http://youtube.com/ Preparation: • Select ! mode. • Select the recording mode. Press UPLOAD twice. UPLOAD ON If you record a file with the upload mode set on, the recording stops automatically 10 minutes after the recording is started. The remaining time is displayed on the LCD monitor. NOTE The upload mode turns off each time recording is finished. Upload Trimming You can select the necessary part of the video and save it as a new video file ready for uploading. Preparation: • Select ! mode. • Select the playback mode. 1 Touch MENU. 2 Select [UPLOAD SETTINGS]. VIDEO DELETE UPLOAD SETTINGS SEARCH PLAYBACK PLAYLIST SELECT THE SCENE TO UPLOAD SET QUIT 3 Select the desired file. UPLOAD SETTINGS 1/2 SD SET QUIT 4 Select [SET] at the start point. It is recommended to select [SET] after the pause button is pressed. TRIM (FROM HERE) SET S E 0 : 12 : 05 QUIT 5 Select [SET] at the end point. It is recommended to select [SET] after the pause button is pressed. TRIM (UNTIL HERE) SET S 0 : 12 : 05 CANCEL E 0 : 08 : 05 QUIT • The duration between the start point and the end point cannot be longer than 10 minutes. • To cancel the start point setting, select [CANCEL]. 6 Select [CAPTURE TRIMMED FILE]. SET CAPTURE TRIMMED FILE REDEFINE AREA S 0 : 12 : 05 SET E 0 : 08 : 05 QUIT To set the start/end point again, select [REDEFINE AREA]. 7 Select [YES]. When copying is finished, the copied file is added to the index screen. COPYING To quit the screen Select [QUIT]. 59
-
 1
1 -
2
-
3
-
4
-
5
-
6
-
7
-
8
-
9
-
10
-
11
-
12
-
13
-
14
-
15
-
16
-
17
-
18
-
19
-
20
-
21
-
22
-
23
-
24
-
25
-
26
-
27
-
28
-
29
-
30
-
31
-
32
-
33
-
34
-
35
-
36
-
37
-
38
-
39
-
40
-
41
-
42
-
43
-
44
-
45
-
46
-
47
-
48
-
49
-
50
-
51
-
52
-
53
-
 54
54 -
 55
55 -
 56
56 -
 57
57 -
 58
58 -
 59
59 -
 60
60 -
 61
61 -
 62
62 -
 63
63 -
 64
64 -
65
-
66
-
67
-
68
-
69
-
70
-
71
-
72
-
73
-
74
-
75
-
76
-
77
-
78
 |
 |
