JVC GZ-HM400US Instructions - Page 10
GETTING STARTED, Accessories, Shoe Adapter - filter
 |
UPC - 046838040238
View all JVC GZ-HM400US manuals
Add to My Manuals
Save this manual to your list of manuals |
Page 10 highlights
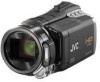
GETTING STARTED GETTING STARTED Accessories AP-V21U AC Adapter BN-VF815U Battery Pack Shoe Adapter An optional microphone or light can be attached to the shoe adapter. Slide the shoe cover in the direction of the arrow to reveal the shoe adapter mounting socket. Component Cable AV Cable Mount the accessory shoe adapter. USB Cable LY37115-001A Shoe Adapter RM-V751U Remote Control CR2025 Lithium Battery Pre-installed in the remote control. Fasten the shoe adapter to the shoe adapter mounting socket by turning the screw in the direction of the arrow. Insert a microphone, etc. from behind the shoe adapter. CD-ROM Core Filter NOTE Make sure to use the provided cables for connections. Do not use any other cables. NOTE Do not try to attach a microphone, etc. to the shoe adapter forcibly. 10 EN
-
 1
1 -
2
-
3
-
4
-
 5
5 -
 6
6 -
 7
7 -
 8
8 -
 9
9 -
 10
10 -
 11
11 -
 12
12 -
 13
13 -
 14
14 -
 15
15 -
16
-
17
-
18
-
19
-
20
-
21
-
22
-
23
-
24
-
25
-
26
-
27
-
28
-
29
-
30
-
31
-
32
-
33
-
34
-
35
-
36
-
37
-
38
-
39
-
40
-
41
-
42
-
43
-
44
 |
 |
