JVC GZMC200 Instructions - Page 17
Selecting Recording Medium
 |
UPC - 046838015694
View all JVC GZMC200 manuals
Add to My Manuals
Save this manual to your list of manuals |
Page 17 highlights
3 To insert an SD card, firmly insert it with its clipped edge first. To remove an SD card, push it once. After the SD card comes out of the camera, pull it out. ● Do not touch the terminal on the reverse side of the label. 4 Close the card cover. To protect valuable files Slide the write/erase protection tab on the side of the SD card in the direction of "LOCK". This prevents the SD card from being recorded over. To record on this SD card, slide the tab back to the position opposite to "LOCK" before inserting it. NOTE: Before using a new SD card, it is necessary to format the card. (੬ pg. 26, 27) ATTENTION: Do not insert or remove the SD card while the camera is turned on, as this may cause the SD card to be corrupted or cause the camera to become unable to recognize whether or not the SD card is installed. GETTING STARTED EN 17 Selecting Recording Medium Select the recording medium before starting recording or playback. Example: When recording still images to an SD card 1 Set the power switch to or while pressing down the lock button located on the switch. 2 Press MENU. The menu screen appears. 3 Press rt to select [MEMORY CARD SETTING], and press 49. DIS CAMERA SETTING BASIC SETTING MEMORY CARD SETTING DISPLAY QUALITY WIDE MODE 4 Press rt to select [IMAGE MODE], and press 49. 5 Press rt to select [SD SLOT], and press 49. 6 Press MENU to return to the normal screen. COPY/MOVE NO. RESET VIDEO MODE IMAGE MODE VOICE MODE FORMAT CLEAN UP GETTING STARTED
-
 1
1 -
2
-
3
-
4
-
5
-
6
-
7
-
8
-
9
-
10
-
11
-
 12
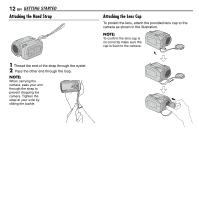
12 -
 13
13 -
 14
14 -
 15
15 -
 16
16 -
 17
17 -
 18
18 -
 19
19 -
 20
20 -
 21
21 -
 22
22 -
23
-
24
-
25
-
26
-
27
-
28
-
29
-
30
-
31
-
32
-
33
-
34
-
35
-
36
-
37
-
38
-
39
-
40
-
41
-
42
-
43
-
44
 |
 |
